
Categories
Articles

On Writing: Pen and Computer in the Shadow of Technology

Image by Freepik

“Söz uçar, yazı kalır.” This proverb is a piece of wisdom that emphasizes the importance and permanence of writing. As technology rapidly evolves and digitalization becomes increasingly prevalent in our lives, the role and function of writing are also undergoing transformation. So, what is the relationship between pen and computer in the shadow of this change?

Advantages of the Computer:

The computer offers many tools that facilitate and accelerate the writing process. Features such as spell checkers, grammar and word suggestions, and text editing options make writing more practical. Additionally, access to information is facilitated by internet connection, making research less time-consuming.

The Power of the Pen:

Despite all the advantages offered by the computer, the pen has its own unique power and impact. Writing by hand helps to organize thoughts more clearly and increases the emotional impact of words. In handwritten texts, the emotions and thoughts of the writer are felt in a more concrete and sincere way.

The Alliance of Technology and Writing:

The advancement of technology has allowed writing to go beyond just paper and become widespread on digital platforms. New media such as blogs, social media platforms, and e-books offer writers the opportunity to reach a wider audience.

Image by Freepik

The Enduring Power of Writing:

No matter how much computers and digital tools develop, the real power and value of writing lies in its permanence. Written texts are one of the most important tools for transmitting knowledge and experiences from the past, sharing ideas and thoughts.

Conclusion:

In the shadow of technology, pen and computer represent different aspects of the writing act. The computer offers practicality and speed, while the pen stands out as a tool of emotion and sincerity. The important thing is to use the possibilities offered by both tools consciously to preserve the power and permanence of writing.

The Future of Writing:

With the advancement of technology and the emergence of new tools, the forms and functions of writing will continue to change. The important thing is to keep up with these changes without losing sight of the core values ​​and the main purpose of writing. Writing is not only important for transmitting information or sharing ideas, but also for expressing ourselves and understanding the world.
Categories
Articles Azure

Azure VM: Resolving the c0000034 Fatal Error

Azure VM: Resolving the c0000034 Fatal Error

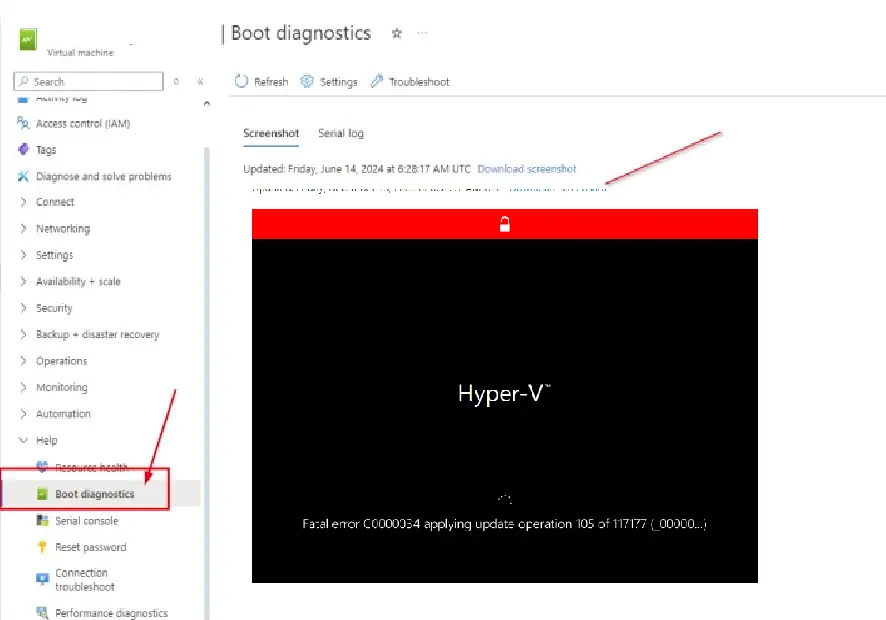
One of the critical issues you may encounter when working with Azure Virtual Machines (VMs) is the “c0000034” fatal error. This error typically occurs in Windows operating systems and is usually caused by a corrupt registry hive. The Windows registry is a critical database that stores configuration settings and options for the OS and installed applications. If the registry becomes corrupt, it can prevent the system from booting, leading to serious errors.

In this article, I will explain step-by-step how to resolve the c0000034 error on an Azure VM. The steps are simplified for easy understanding, even if you’re new to system administration.

azure boot


What is the c0000034 Error?

The c0000034 error is a fatal system error in Windows that typically occurs when registry files such as SYSTEM and SOFTWARE become corrupt. Without these crucial files, the system is unable to boot properly. The solution to this issue involves replacing these corrupt files with backups of healthy versions.


Solution: Steps to Fix the c0000034 Error in Azure VM

You can resolve this issue by accessing the corrupt disk and restoring the registry files from a backup. Follow these steps using the Azure portal:

  1. Stop the Faulty VM
    First, go to the Azure portal and stop the virtual machine experiencing the error. This ensures that you can safely modify its disk without interference.
  2. Create a New Virtual Machine
    Create a new virtual machine with the same operating system and disk size as the original. This new VM will be used to access the disk from the faulty VM and make the necessary changes.
  3. Attach the Original VM’s Disk to the New VM
    Attach the disk from the original virtual machine to the new virtual machine as a data disk. This allows you to access the files of the faulty VM without booting it.
  4. Start the New VM and Connect to It
    Start the newly created VM and connect to it using Remote Desktop.
  5. Assign a Drive Letter to the Attached Disk
    Once connected, open Disk Management on the new VM. Assign a drive letter (e.g., D:) to the attached disk, so it is accessible from File Explorer.
  6. Backup the Corrupted Registry Files
    Navigate to the attached disk, and go to C:\Windows\System32\config. Here, you will find the corrupted registry files:

    • Rename the SYSTEM file to SYSTEM.old.
    • Rename the SOFTWARE file to SOFTWARE.old.
      By renaming these files, you are effectively backing them up in case you need to revert the changes later.
  7. Restore Healthy Versions from RegBack
    In the attached disk, navigate to C:\Windows\System32\config\RegBack. This folder contains backup copies of the registry files:

    • Copy the SYSTEM and SOFTWARE files from the RegBack folder and paste them into the config folder, replacing the corrupted versions.
  8. Restart the New VM
    After replacing the corrupt registry files, restart the new virtual machine. If everything has been done correctly, the VM should now boot without encountering the c0000034 error.


    Conclusion

    By following these steps, you can successfully resolve the c0000034 error caused by corrupt registry files. Accessing the faulty VM’s disk from another virtual machine allows you to replace the corrupt files with healthy backups, enabling the system to boot properly again. Remember, registry corruption can be caused by sudden shutdowns or disk issues, so it’s important to regularly back up your data to prevent future occurrences.

    If you encounter other issues in Azure, you can always refer to Microsoft’s official documentation for further assistance and troubleshooting tips.


    These steps serve as a guide for system administrators and IT professionals dealing with critical Azure VM errors. Taking care to back up your files and follow the steps precisely will help you recover your system with minimal disruption.

Categories
Articles Azure

Detailed Review of Azure ARM

Azure Resource Manager (ARM) is one of the cornerstones of Microsoft Azure and a powerful tool that simplifies infrastructure management. In this section, we will explore the functions, benefits and use cases of ARM in more detail.

Functions of ARM:

  • Resource Creation and Management: ARM can create and manage a variety of Azure resources such as virtual machines, storage accounts, networks and databases through a single template.
  • Repeatability: ARM templates enable consistent and repeatable infrastructure setup across multiple environments. This reduces the risk of error and simplifies the management process.
  • Automation: ARM can be integrated with tools such as Azure DevOps to automate infrastructure deployment and updates.
  • Cost Control: ARM helps optimize costs by providing detailed control over resource usage and billing.
  • Security: ARM protects Azure resources from unauthorized access using security features such as role-based access control (RBAC).

Benefits of ARM:

  • Consistency and Repeatability: ARM templates ensure error-free and consistent infrastructure deployment across different environments.
  • Efficiency and Automation: ARM automates manual processes, making infrastructure management faster and more efficient.
  • Cost Savings: ARM helps reduce costs through resource optimization and automation.
  • Scalability: ARM can be used to easily manage large and complex infrastructures.
  • Security and Compliance: ARM supports Azure’s security and compliance features.

ARM Use Cases:

  • Development and Test Environments: ARM is ideal for building and managing development and test environments quickly and easily.
  • Production Environments: ARM can be used to set up and manage production environments in a consistent and repeatable way.
  • Hybrid Cloud Environments: ARM enables managing Azure resources in hybrid cloud environments from a single platform.
  • Application Lifecycle Management: ARM can be integrated with tools such as Azure DevOps to provide infrastructure automation across the application lifecycle.

Examples:

  • Web Application Deployment: Using an ARM template, you can create the necessary Azure resources such as virtual machines, storage accounts and networking with a single command.
  • Create Database Infrastructure: Using an ARM template, you can automatically create infrastructure such as SQL database server, storage and networking.
  • Hybrid Cloud Synchronization: You can automatically synchronize data between Azure and on-premises infrastructure using an ARM template.

Conclusion:

Azure ARM is a powerful and flexible tool for managing Azure infrastructure. The benefits of ARM — consistency, repeatability, automation, and scalability — help you manage IT infrastructure faster, more securely, and at lower cost.

Categories
Articles Windows Server

Remove Server Header on IIS for Web Security

Today, web security has become more important than ever. The Server header, which explicitly specifies the operating system and version of a web server, can be a valuable source of information for potential attackers. Therefore, if you are using IIS (Internet Information Services), it is a good security practice to remove the Server header.

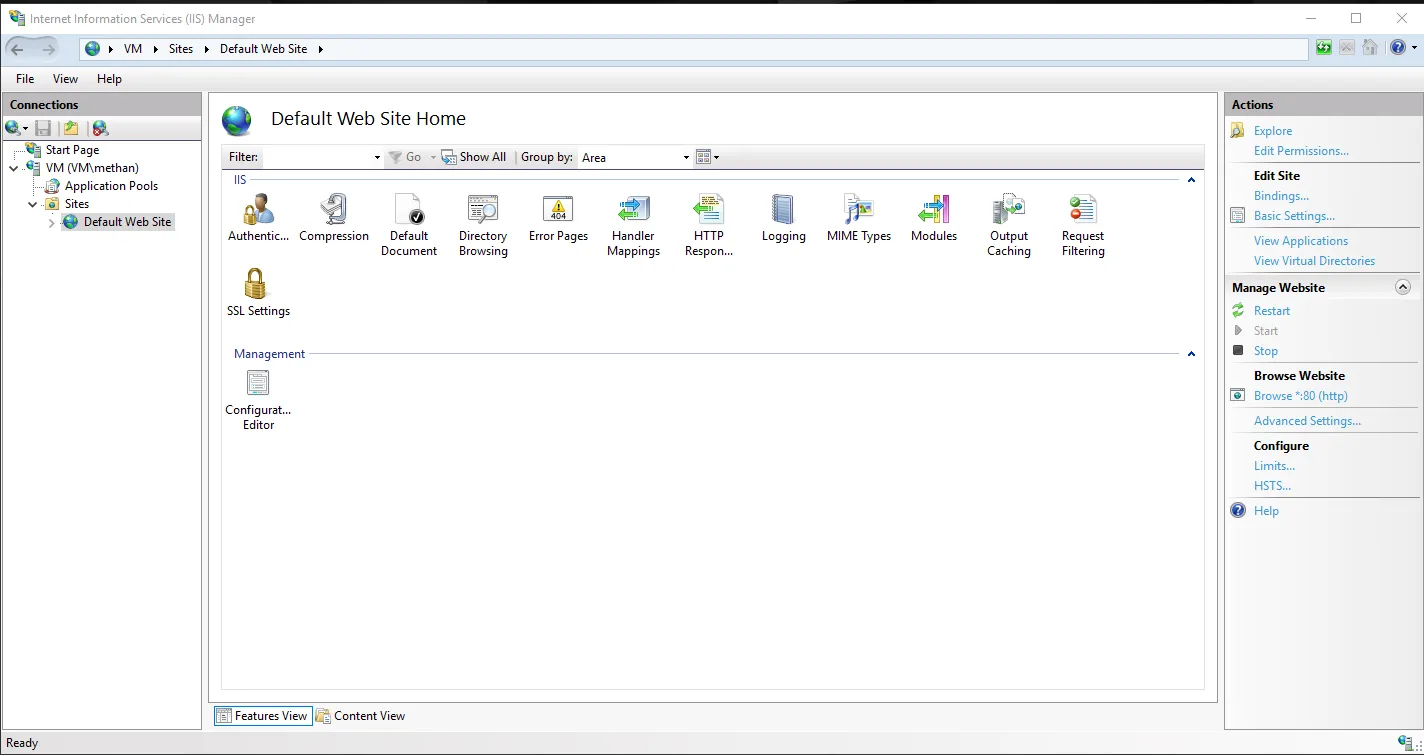
Step 1: Open IIS Manager
As a first step, open IIS Manager. You can easily access it by typing “IIS Manager” from the Start menu.

Step 2: Web Server and Site Selection
Select your server and the website you are running on from the menu on the left.

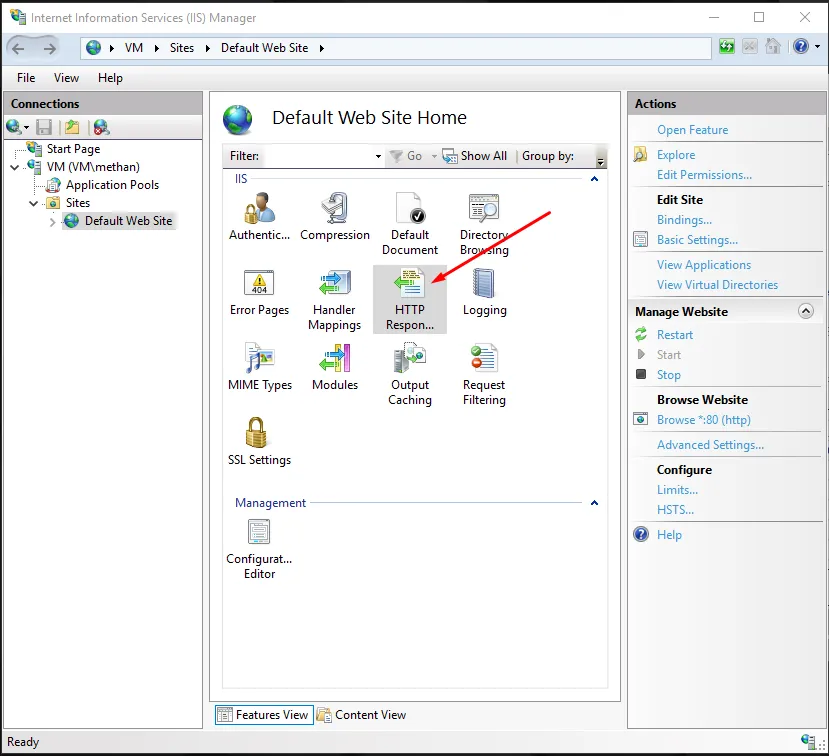
Step 3: HTTP Response Headers
On the right side, locate and click on “HTTP Response Headers”.

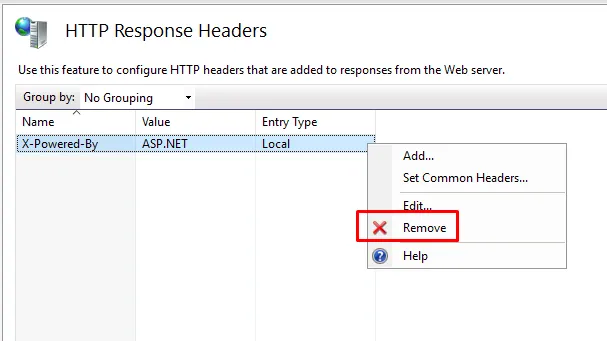
Step 4: Edit Server Header
Find the “Server” heading, right-click on it and use “Remove” or “Edit Feature Settings” to clear or customize the value.

Step 5: Save Changes
Use the “Apply” option from the “Actions” menu in the upper right corner to apply the changes made..

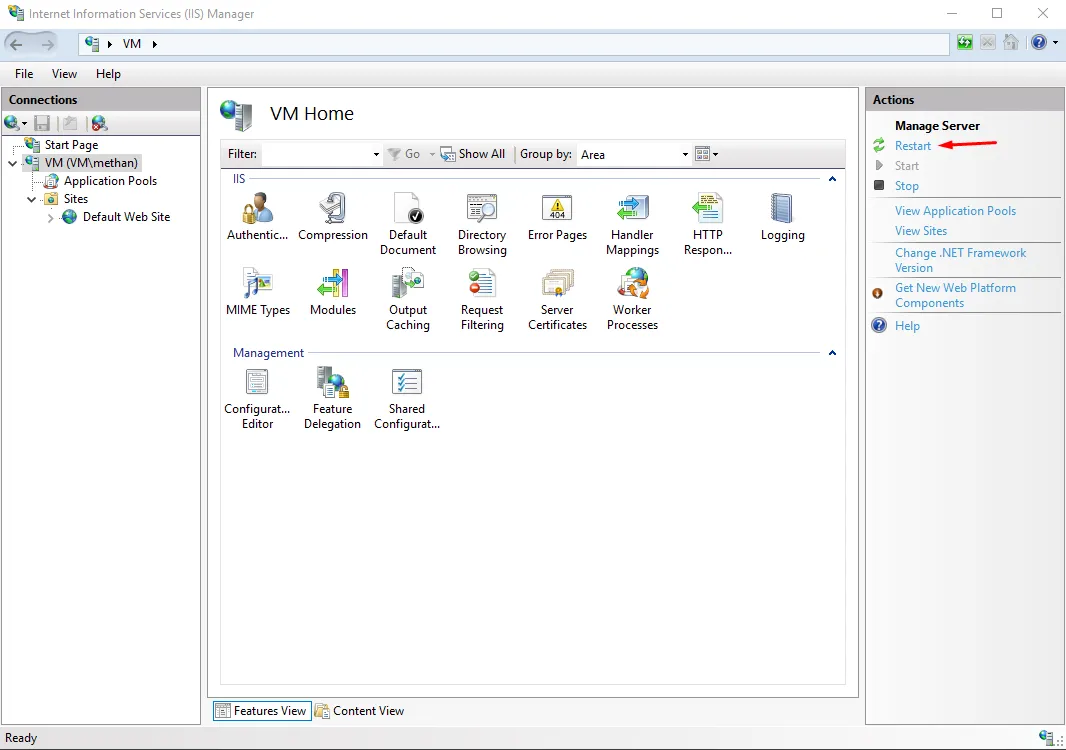
Step 6: Restart IIS
If necessary, restart IIS so that the changes take effect.
Alternative Step With Web.config File
You can also remove the Server header by directly intervening in your web.config file. You can perform this setting using the following example:

<configuration>
<system.webServer>
<httpProtocol>
<customHeaders>
<remove name="Server" />
</customHeaders>
</httpProtocol>
</system.webServer>
</configuration>

You can remove the Server header by adding this XML block into the<configuration> element of your web.config file.

By following these simple steps, you can improve the security of your web server and minimize the information available to potential attackers. Remember that it is always good practice to take a backup before implementing these changes. Never underestimate the importance of protecting your web applications by prioritizing your security.


If you have any questions or details you would like to add, feel free to write me.

Categories
Articles Windows Server

Efficient Resource Management on IIS: Setting RAM Limits for Application Pools

Adding RAM limits to an application pool (App Pool) on an IIS (Internet Information Services) server is an important step to control and stabilize the server’s resources. IIS monitors and manages web applications through application pools. Here are the steps to add RAM limits to an application pool in IIS:

1.Open the IIS Administration Tool:

Open “Internet Information Services (IIS) Manager” from the Start menu, and find the “Application Pools” section from the context menu on the left.

2.Selecting an Application Pool:

Find the application pool and right-click on it and select “Edit”.

3.Open the Edit Window:

In the editing window that opens, locate the “Related Actions” tab.

4.Open Advanced Settings:

Click on “Advanced Settings…”. This allows you to see more configuration options of the application pool.

5.Private Memory Limit Setting:

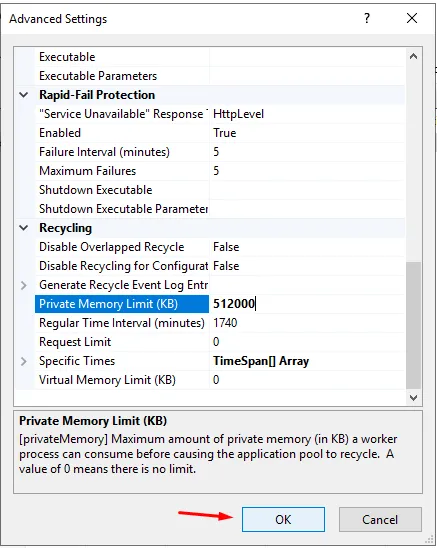
In the advanced settings window, you will see a field titled “Private Memory Limit (KB)” or “Private Memory Limit (Bytes)”. This field sets the maximum amount of private memory to be allocated to the application pool.

Once a certain limit is reached, processes in the application pool can be stopped or restarted.

6.Setting Limits:

Set the desired maximum memory limits in the “Private Memory Limit” field. This value is usually in kilobytes, so for example 512000 KB would give the application pool a private memory limit of 512 MB.

7.Saving Changes:
After making the settings, click “OK” or “Apply” to save the changes.

8.Restarting the Application Pool:

After updating the settings, you may need to restart the application pool. Select the relevant application pool in the “Application Pools” section and right-click and select “Restart”.

By following these steps, you can add RAM limits to a specific application pool on your IIS server and manage resources more effectively.

Can we give a percentage limit to application pools?

Unfortunately, the process of setting RAM limits on application pools in IIS does not include the option to directly specify a percentage limit. However, the “Private Memory Limit” setting allows you to specify a certain amount of memory (in kilobytes). That is, instead of expressing this limit as a percentage, you specify it as a specific amount of memory.

For example, if a server has a total of 8 GB of RAM and you want to add a percentage limit to an application pool, you must calculate this manually. For example, if you want to allocate 10 percent of the total RAM to an application pool, this equals 8 GB * 0.10 = 800 MB. You then specify this value as the “Private Memory Limit” setting in the IIS administration tool.

Once you have specified the setting, the maximum amount of private memory available to the application pool will be limited to a specific value. This way, you can control problems caused by excessive memory consumption by the application pool.


If you have any questions or details you would like to add, feel free to write me