Categories
Articles

What is CSS Minify? What is it used for?

CSS minification is a technique used by web developers to compress CSS files on a webpage. This process involves removing unnecessary spaces, indentation, line breaks, and other redundant characters from CSS files, ultimately reducing their size. The primary purpose of minification is to improve webpage performance by decreasing loading times.

Some key benefits of CSS minification include:

1. Faster Loading Times: Minified CSS files enable browsers to download and process them more quickly, resulting in faster webpage loading times.

2. Reduced Data Consumption: Minified CSS files lead to less data being downloaded by users, which is particularly advantageous for mobile devices or connections with limited bandwidth.

3. SEO Improvements: Speedier loading webpages receive favorable evaluations from search engines. Therefore, CSS minification positively contributes to Search Engine Optimization (SEO).

Here’s a simple example:

/* Normal CSS */
body {
font-family: 'Arial', sans-serif;
color: #333;
margin: 20px;
}

/* Minified CSS */
body{font-family:'Arial',sans-serif;color:#333;margin:20px;}

In the example above, spaces and indentation in the regular CSS file are eliminated during the minification process. This reduces the file size, allowing browsers to process it more efficiently.

Web developers commonly use various tools or online services for CSS minification, as these tools automatically help reduce the size of CSS files and often offer additional optimization options.


Here are some tools for CSS minification:

1.Online Minification Services:
— [CSS Minifier](https://cssminifier.com/)
— [Minify CSS](https://www.minifier.org/)

2.Developer Tools:
— Web browser developer tools often provide options for CSS minification. For example, in Google Chrome’s developer tools, you can find unused CSS codes under the “Coverage” tab and optimize them.

3.Node.js-based Tools:
— [clean-css](https://github.com/jakubpawlowicz/clean-css): A fast and efficient Node.js-based CSS minification tool. It can be used from the command line or within a Node.js project.

4. Task Runners like Grunt and Gulp:
— Task runners like Grunt and Gulp can help automate CSS minification. You can use relevant plugins to minify CSS files in your project.

5. UglifyCSS:
— [UglifyCSS](https://www.npmjs.com/package/uglifycss): Another Node.js tool used for minifying CSS files. It’s simple and effective.

6. PostCSS and CSSNano:
— [PostCSS](https://postcss.org/) and [CSSNano](https://cssnano.co/): PostCSS is a tool that allows you to automate various processes on your CSS files. CSSNano is one of its plugins and is used for CSS minification.

When choosing among these tools, consider the requirements of your project and ease of use.


If you have any questions or details you would like to add, feel free to write me.m
Categories
Articles SQL Windows Server

What are the TLS supports in SQL Server?

SQL Server can support different TLS (Transport Layer Security) versions across various editions. The TLS versions supported by SQL Server may vary depending on the SQL Server version and the Windows operating system in use.

In general, SQL Server 2008 and later versions typically support TLS 1.0, TLS 1.1, and TLS 1.2. However, it’s essential to obtain the most up-to-date information from Microsoft’s official sources, as security updates and patch releases are primarily designed to address security vulnerabilities.

Below is a table illustrating the commonly supported TLS versions. Keep in mind that this information may change over time:

SQL Server VersionMin. TLS VersionMax. TLS Version
SQL Server 2008TLS 1.0TLS 1.2
SQL Server 2008 R2TLS 1.0TLS 1.2
SQL Server 2012TLS 1.0TLS 1.2
SQL Server 2014TLS 1.0TLS 1.2
SQL Server 2016TLS 1.0TLS 1.2
SQL Server 2017TLS 1.0TLS 1.2
SQL Server 2019TLS 1.2TLS 1.3*

* SQL Server 2019 may support TLS 1.3, but this is contingent on the operating system and configuration.

From a security perspective, it is recommended to use the latest version of SQL Server and keep the operating system up to date. Additionally, avoiding the use of unsupported TLS versions is crucial to prevent potential security vulnerabilities.


If you have any questions or details you would like to add, feel free to write me.

Categories
Articles Windows Windows Server

Evolution of SSL/TLS Protocols & Disabling TLS 1.0 and TLS 1.1 on Windows Servers while Enabling TLS 1.2

History of SSL/TLS

SSL (Secure Sockets Layer) and TLS (Transport Layer Security) are cryptographic protocols used to secure communication over the internet. They are similar but distinct security protocols and are often collectively referred to as “SSL/TLS.”

1.SSL (Secure Sockets Layer):

  • SSL was initially developed by Netscape Communications Corporation in 1994.
  • Its first version, SSL 1.0, was never publicly released due to numerous security vulnerabilities.
  • SSL 2.0 emerged in 1995 and saw more widespread use, but its lifespan was short-lived due to security vulnerabilities.
  • SSL 3.0, introduced in 1996, was more secure. However, over time, various security vulnerabilities were discovered, leading to the abandonment of SSL 3.0.

2.TLS (Transport Layer Security):

  • TLS is considered an enhanced and secure version of SSL.
  • TLS 1.0, introduced in 1999, is an improved version of SSL 3.0 with security vulnerabilities addressed.
  • TLS 1.1 arrived in 2006, and TLS 1.2 followed in 2008, both enhancing the protocol’s security.
  • TLS 1.3 was released in 2018, introducing numerous security and performance improvements. TLS 1.3 is faster and more secure compared to its predecessors.

SSL and TLS secure internet communication by encrypting traffic, ensuring the confidentiality of data exchanges, and updating security protocols. However, as vulnerabilities and weaknesses emerge, these protocols are continually updated and improved.


TLS 1.2 or TLS 1.3?

As of 2021, TLS 1.0 and TLS 1.1 have been officially deprecated.
Source

TLS 1.2: 

  • It is an older version and is supported by many applications and systems.
  • It is a good option for establishing a secure connection but may have some security vulnerabilities.
  • Security experts recommend using TLS 1.3 whenever possible instead of TLS 1.2.

TLS 1.3:

  • It is a more recent version and offers a range of security improvements.
  • It includes faster connection establishment times and more secure encryption algorithms.
  • Designed to address security vulnerabilities, it is supported by many modern browsers and servers.

The version you should use depends on the systems, applications, and requirements in use. However, generally, you might prefer TLS 1.3 if possible, as it is more secure and offers better performance. Nevertheless, compatibility issues with older systems or specific requirements may necessitate the use of TLS 1.2.

Web servers and browsers typically automatically use up-to-date and supported TLS versions. If you manage a web server, it is advisable to use the latest and supported TLS version. As users, keeping your browsers and systems up-to-date is essential for enhancing security and ensuring optimal performance.


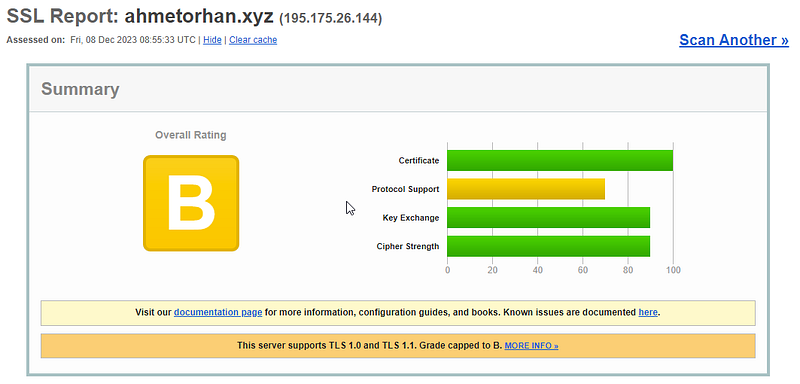
In this article, we will explore how to address the general SSL/TLS warnings provided by https://www.ssllabs.com/ssltest, a platform used to check and score the SSL/TLS security levels of the web hosting platforms. Additionally, we will conduct these checks on the test website https://ahmetorhan.xyz for demonstration purposes. The article will simplify the steps to disable the RC4 protocol and TLS 1.0 and TLS 1.1, especially focusing on how to implement these measures on Windows Servers. As indicated in the output, we will observe the necessity of disabling these protocols for enhanced security.

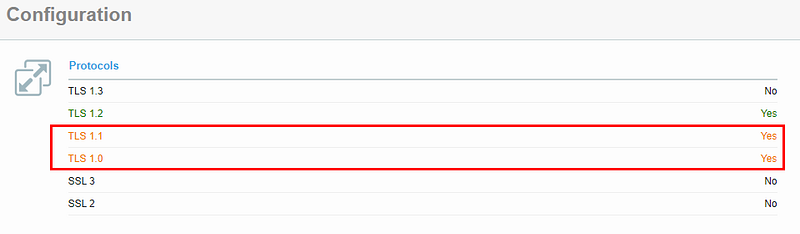
  • Our objective here is to disable the deprecated TLS 1.0 and TLS 1.1, as indicated in the following sections.

SSL Security Registry Configuration

  • Paste the provided code into a text document named “security_enable.txt.” Rename the file to “security_enable.reg” and remove the “.txt” extension.
Windows Registry Editor Version 5.00

[HKEY_LOCAL_MACHINE\SYSTEM\CurrentControlSet\Control\SecurityProviders\SCHANNEL\Protocols\TLS 1.2\Client]
"Enabled"=dword:00000001
"DisabledByDefault"=dword:00000000

[HKEY_LOCAL_MACHINE\SYSTEM\CurrentControlSet\Control\SecurityProviders\SCHANNEL\Protocols\TLS 1.2\Server]
"Enabled"=dword:00000001
"DisabledByDefault"=dword:00000000

[HKEY_LOCAL_MACHINE\SYSTEM\CurrentControlSet\Control\SecurityProviders\SCHANNEL\Protocols\TLS 1.1\Client]
"Enabled"=dword:00000000
"DisabledByDefault"=dword:00000000

[HKEY_LOCAL_MACHINE\SYSTEM\CurrentControlSet\Control\SecurityProviders\SCHANNEL\Protocols\TLS 1.1\Server]
"Enabled"=dword:00000000
"DisabledByDefault"=dword:00000000

[HKEY_LOCAL_MACHINE\SYSTEM\CurrentControlSet\Control\SecurityProviders\SCHANNEL\Protocols\TLS 1.0\Client]
"Enabled"=dword:00000000
"DisabledByDefault"=dword:00000000

[HKEY_LOCAL_MACHINE\SYSTEM\CurrentControlSet\Control\SecurityProviders\SCHANNEL\Protocols\TLS 1.0\Server]
"Enabled"=dword:00000000
"DisabledByDefault"=dword:00000000

[HKEY_LOCAL_MACHINE\SYSTEM\CurrentControlSet\Control\SecurityProviders\SCHANNEL\Protocols\SSL 2.0\Client]
"Enabled"=dword:00000000

[HKEY_LOCAL_MACHINE\SYSTEM\CurrentControlSet\Control\SecurityProviders\SCHANNEL\Protocols\SSL 2.0\Server]
"Enabled"=dword:00000000

[HKEY_LOCAL_MACHINE\SYSTEM\CurrentControlSet\Control\SecurityProviders\SCHANNEL\Protocols\SSL 3.0\Client]
"Enabled"=dword:00000000

[HKEY_LOCAL_MACHINE\SYSTEM\CurrentControlSet\Control\SecurityProviders\SCHANNEL\Protocols\SSL 3.0\Server]
"Enabled"=dword:00000000

[HKEY_LOCAL_MACHINE\SYSTEM\CurrentControlSet\Control\SecurityProviders\SCHANNEL\KeyExchangeAlgorithms\Diffie-Hellman]
"ServerMinKeyBitLength"=dword:00000800

[HKEY_LOCAL_MACHINE\SYSTEM\CurrentControlSet\Control\SecurityProviders\SCHANNEL\Ciphers\RC4 128/128]
"Enabled"=dword:00000000

[HKEY_LOCAL_MACHINE\SYSTEM\CurrentControlSet\Control\SecurityProviders\SCHANNEL\Ciphers\RC4 40/128]
"Enabled"=dword:00000000

[HKEY_LOCAL_MACHINE\SYSTEM\CurrentControlSet\Control\SecurityProviders\SCHANNEL\Ciphers\RC4 56/128]
"Enabled"=dword:00000000
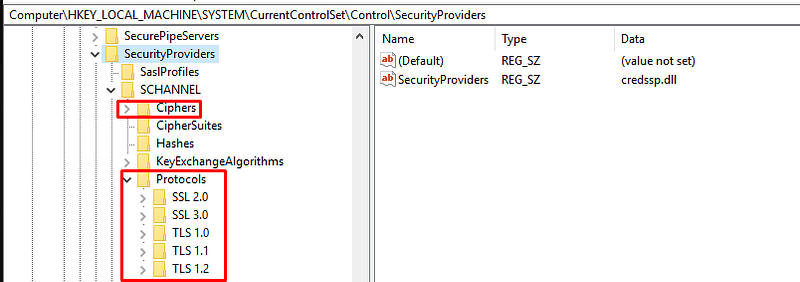
  • When we run the “security_enable.reg” file, all the entries above will be automatically added to the registry, and you can verify that they have been added as shown below.
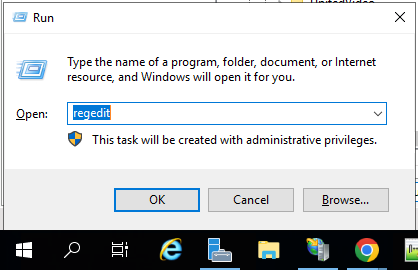
  • Open regedit by following the path Start -> Run.

  • After completing these steps, you need to restart your server for the changes to take effect.
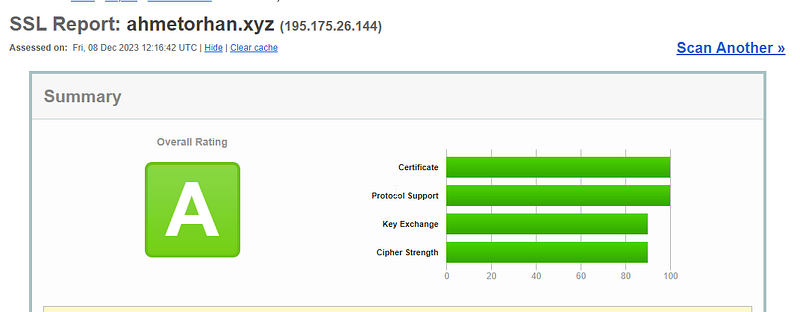
  • After the restart process is complete, I am initiating the test procedure again for the domain https://ahmetorhan.xyz. Initially classified as B, we now observe that it is categorized as A.

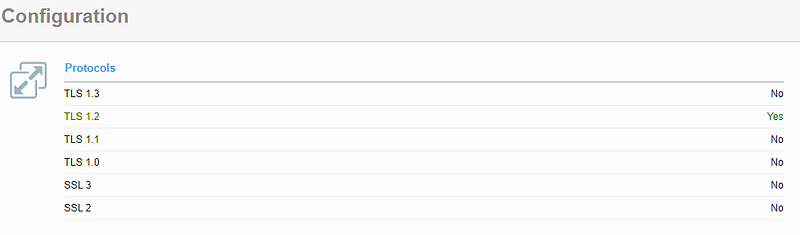
  • You can observe that the TLS 1.0 and TLS 1.1 protocols have been disabled.

  • If you want to revert the changes made in the registry, running the following entries and restarting will be sufficient.
Windows Registry Editor Version 5.00

[-HKEY_LOCAL_MACHINE\SYSTEM\CurrentControlSet\Control\SecurityProviders\SCHANNEL\Protocols\TLS 1.2]
[-HKEY_LOCAL_MACHINE\SYSTEM\CurrentControlSet\Control\SecurityProviders\SCHANNEL\Protocols\TLS 1.1]
[-HKEY_LOCAL_MACHINE\SYSTEM\CurrentControlSet\Control\SecurityProviders\SCHANNEL\Protocols\TLS 1.0]
[-HKEY_LOCAL_MACHINE\SYSTEM\CurrentControlSet\Control\SecurityProviders\SCHANNEL\Protocols\SSL 3.0]

[-HKEY_LOCAL_MACHINE\SYSTEM\CurrentControlSet\Control\SecurityProviders\SCHANNEL\KeyExchangeAlgorithms\Diffie-Hellman]
"ServerMinKeyBitLength"=dword:00000800

[-HKEY_LOCAL_MACHINE\SYSTEM\CurrentControlSet\Control\SecurityProviders\SCHANNEL\Ciphers\RC4 128/128]
"Enabled"=dword:00000000

[-HKEY_LOCAL_MACHINE\SYSTEM\CurrentControlSet\Control\SecurityProviders\SCHANNEL\Ciphers\RC4 40/128]
"Enabled"=dword:00000000

[-HKEY_LOCAL_MACHINE\SYSTEM\CurrentControlSet\Control\SecurityProviders\SCHANNEL\Ciphers\RC4 56/128]
"Enabled"=dword:00000000

If you have any questions or details you would like to add, feel free to write me.

Categories
Articles Backups SQL

How many types of backups can be taken in SQL Server?

In SQL Server, backups are typically taken in four different types:

  1. Full Backup
  2. Differential Backup
  3. Transaction Log Backup
  4. File or Filegroup Backup

Let’s delve into the details of each type of backup in SQL Server:

1.Full Backup:

  • Description: A complete backup of the entire database.
  • Purpose: Provides a baseline for a complete restore of the database in case of a failure.
  • Frequency: Typically performed on a regular basis, such as daily or weekly.

2.Differential Backup :

  • Description: Captures only the data that has changed since the last full backup.
  • Purpose: Reduces the time and space required for backups by including only the changes.
  • Frequency: Can be taken between full backups to provide incremental updates.

3.Transaction Log Backup:

  • Description: Backs up the transaction log, recording changes made to the database since the last transaction log backup.
  • Purpose: Allows for point-in-time recovery and minimizes data loss.
  • Frequency: Usually taken more frequently, especially in databases with high transaction volumes.

4.File or Filegroup Backup:

  • Description: Targets specific files or filegroups within the database.
  • Purpose: Enables more granular backup and restore operations, useful for large databases.
  • Frequency: Can be used based on the need to selectively backup specific portions of the database.

These backup types collectively form a comprehensive strategy for ensuring data integrity, availability, and recoverability in SQL Server environments. The choice of which backup type(s) to use depends on factors such as the database size, recovery objectives, and the desired balance between backup frequency and resource utilization.


If you have any questions or details you would like to add, feel free to write me.

Categories
Articles Azure Windows

What is Azure CLI? How to use?

Azure Command-Line Interface (Azure CLI) is a command-line tool used for managing Microsoft Azure, the cloud service platform by Microsoft. Azure CLI is employed to create, configure, manage, and monitor Azure resources. It is compatible with Windows, macOS, and Linux operating systems.

Key features of Azure CLI include:
1. Cross-Platform Support: Azure CLI can be used on Windows, macOS, and Linux operating systems.
2. Azure Resource Management: Azure CLI facilitates the management of resources supported by Azure Resource Manager (ARM). This encompasses virtual machines, storage accounts, networks, application services, and many other Azure resources.
3. Command-Line Interface: Azure CLI operates as a tool in the command line, making it suitable for automation and scripting tasks utilized by software developers and system administrators.


  1. Installation of Azure Account and Azure CLI

Now that we have learned the basic information about Azure CLI, let’s examine how to install it on the Windows operating system.

Note: Azure CLI is available for use on Windows, macOS, and Linux operating systems.

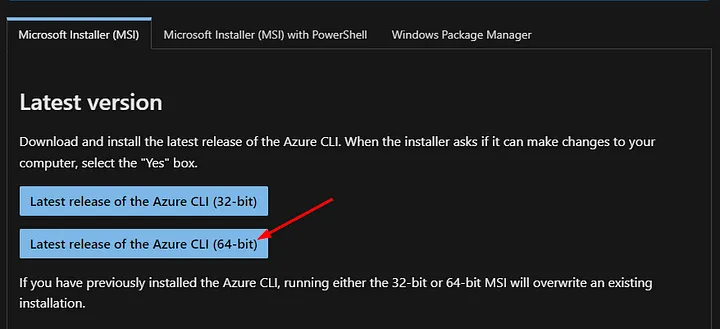
Firstly, we navigate to the link provided below, where options for installation are displayed:

  • We download the 64-bit version by selecting “.msi”

https://learn.microsoft.com/en-us/cli/azure/install-azure-cli-windows?tabs=azure-cli

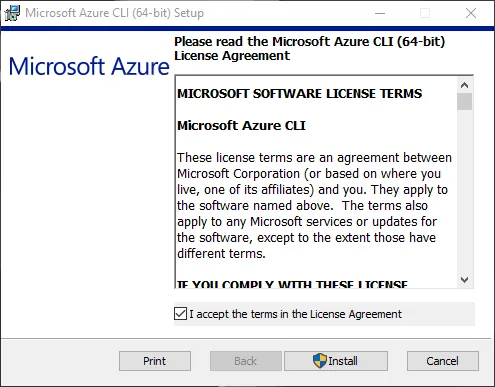
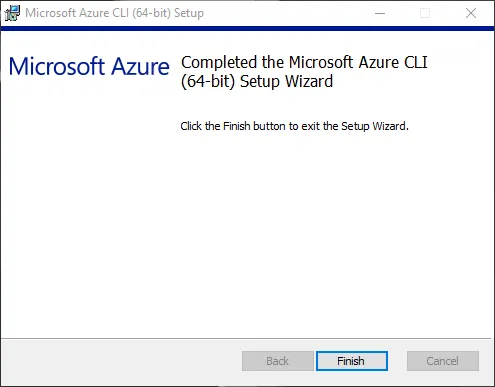
  • We run the downloaded setup file and complete the installation process by following the relevant steps.

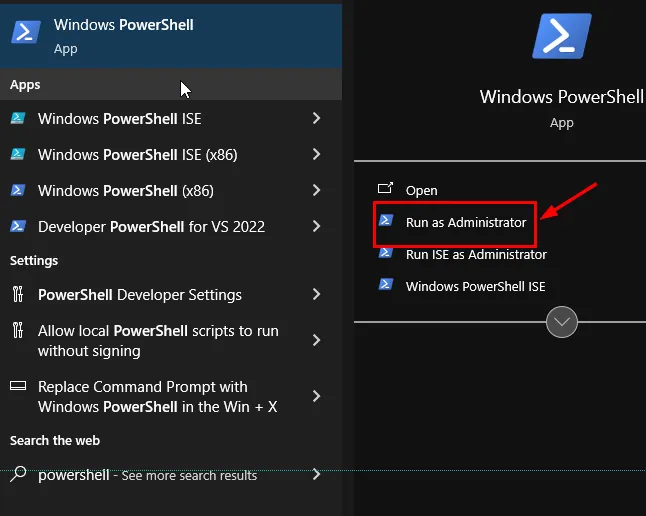
  • Next, we open PowerShell as an administrator.

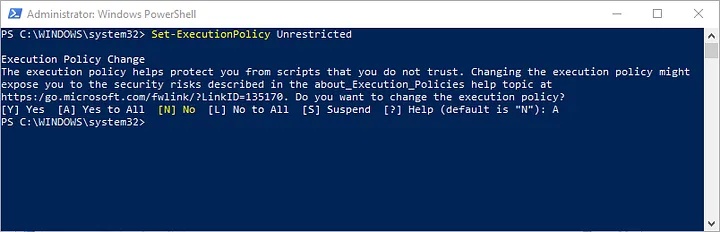
  • `Set-ExecutionPolicy Unrestricted` sets the minimum security level that allows the execution of script files in PowerShell. This enables you to run almost any script file on your computer or any script that comes your way.

  • We grant the necessary permission by selecting “Yes to All” or “A”.
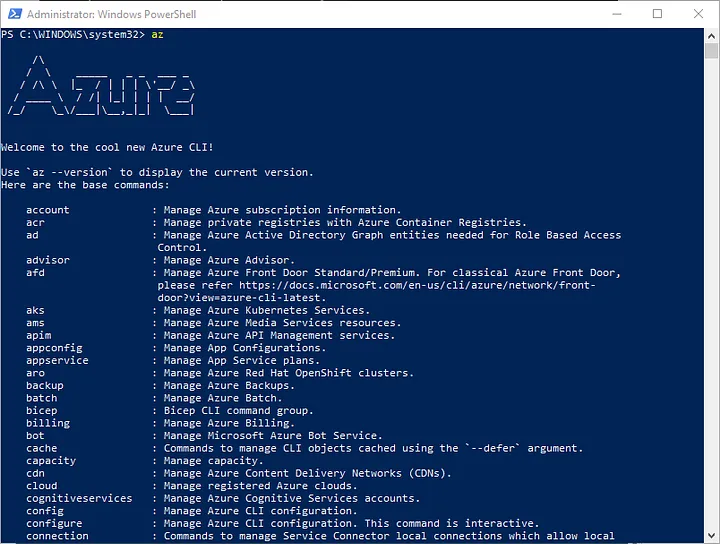
  • Afterward, by running the “az” command, we complete the installation of Azure CLI.


2.Signing In and Selecting a Subscription

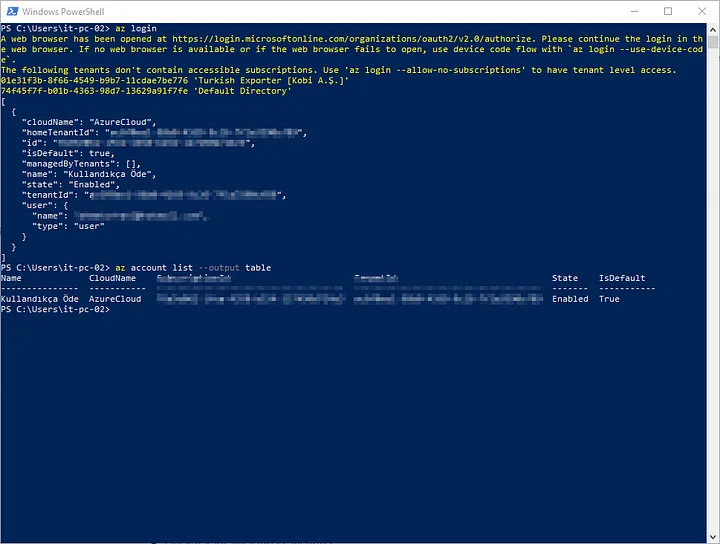
To use Azure CLI, you need to sign in to your Azure account using the az login command. Once signed in, you can choose the subscription you want to work with.

3. Creating and Managing a Resource Group

To manage resources efficiently in Azure, resource groups are utilized. Here is an example of creating and managing a resource group:

4. Virtual Machine Management

Azure CLI provides a comprehensive set of commands for creating and managing virtual machines. For example, to create a new Ubuntu virtual machine:

5. Managing Other Azure Resources

With Azure CLI, you can manage networks, storage accounts, databases, and many other Azure resources. Each resource has a specific set of commands.

6. Automation and Scripting

Azure CLI is an excellent tool for automating your workflows. By creating Bash or PowerShell scripts, you can quickly execute repetitive tasks, streamlining your processes.

7. Up-to-Date Documentation and Help

Always refer to the current and comprehensive documentation for Azure CLI. Additionally, you can use the az [command] --help command to see the usage of each command.

If you have any questions or details you would like to add, feel free to write me.