
Categories
Articles Windows Server

Installation of ELK Stack (Elasticsearch, Logstash, and Kibana) on Windows Server

ELK Stack (Elasticsearch, Logstash, Kibana Stack) is a data analysis and visualization platform where ElasticsearchLogstash, and Kibana are brought together. These three open-source components are used collectively to gather, process, analyze, and visualize unstructured data. ELK Stack offers a powerful toolkit for organizations aiming to effectively work with large datasets.

Here are the fundamental components of ELK Stack:

Elastics
Elastics

1. Elasticsearch: Elasticsearch is a search and analytics engine that provides rapid search, querying, and indexing capabilities for unstructured data. By swiftly indexing and storing data, it facilitates easy access to information. Elasticsearch is used to handle various types of unstructured data such as text documents, log files, time series data, and other non-structured data.

Logstash
Logstash

2. Logstash: Logstash collects data from various sources, processes and transforms it, and then directs it to Elasticsearch or other destinations. Logstash plays a significant role in data collection, processing, and transformation stages. With Logstash, it is possible to organize, filter, enrich, and convert data into different formats.

Kibana
Kibana

3. Kibana: Kibana is used to visualize, analyze, and share data from Elasticsearch. Through Kibana, users can discover data, create diverse visual elements, and build dashboards to effectively present information.

When these three components come together, organizations can collect, process, analyze, and visualize their data. ELK Stack can be employed for handling various data types such as application logs, network logs, text documents, performance metrics, and more. Moreover, the flexible nature of ELK Stack enables the creation of customized solutions and addressing unique data analysis needs.


Installation and Configuration of ELK Stack (Elasticsearch, Logstash, Kibana) on Windows Server can be achieved through the following steps:

1: Java Installation:
Java is required to run Elasticsearch and Logstash. I recommend using OpenJDK instead of the official Oracle JDK. Follow the steps to download and install OpenJDK.

2: Elasticsearch Download and Installation:
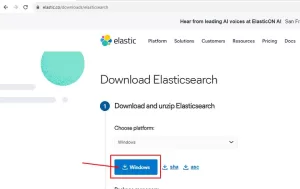
2.1. Download the suitable version of Elasticsearch for Windows from the official Elasticsearch website: https://www.elastic.co/downloads/elasticsearch
elasticsearch
elasticsearch
  • Extract the downloaded compressed file to a folder.

2.2. Configuration File (elasticsearch.yml):

  • The configuration file for Elasticsearch is located in the “config” folder.
  • Open the “elasticsearch.yml” file with a text editor.
  • Make the necessary configurations.

2.3. Starting Elasticsearch as a Service:

  • To run Elasticsearch as a Windows service, locate the “elasticsearch-service.bat” file in the “bin” folder.

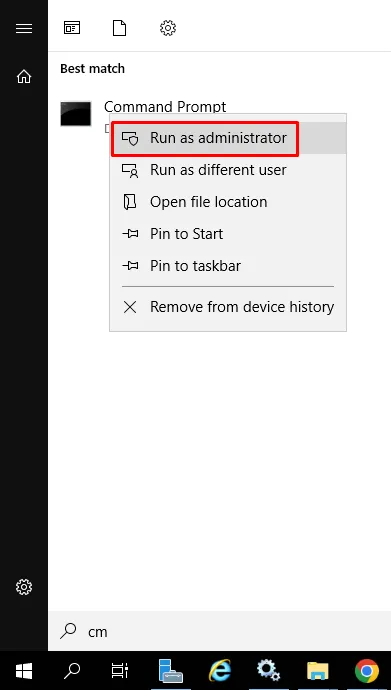
  • Open the command prompt as an administrator (right-click and select “Run as administrator”) and navigate to the relevant directory.
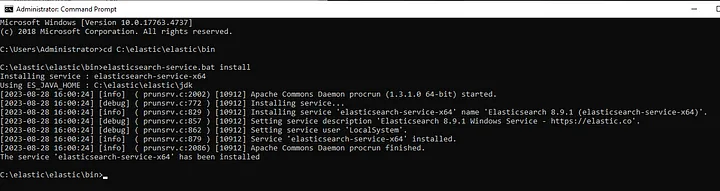
  • Use the command elasticsearch-service.bat install to register Elasticsearch as a service.
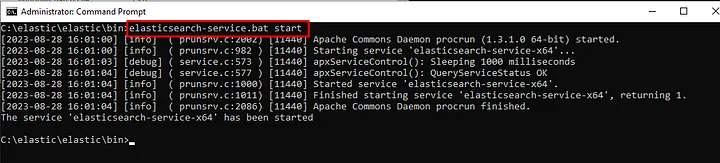
  • Then, start the Elasticsearch service using the command elasticsearch-service.bat start.
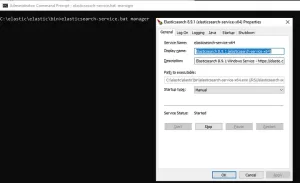
  • You can stop or manage the service using the command elasticsearch-service.bat manager.
2.4. After these steps, check whether the Elasticsearch service is installed and running:

  • Go to Start > Run > services.msc, and verify that the Elasticsearch service is installed and running.

Services / elasticsearch

3. Installation of Logstash:

3.1. Download Logstash: Obtain the appropriate Logstash file for Windows from the official Logstash download page: https://www.elastic.co/downloads/logstash
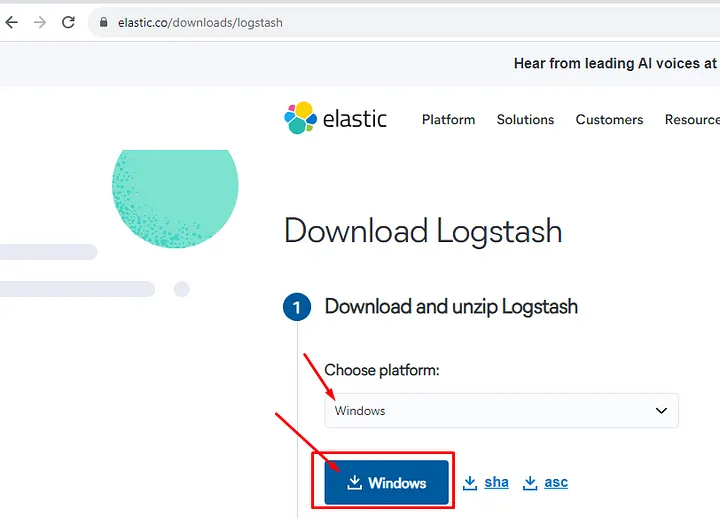
3.2. Extract the downloaded compressed file to a folder.

3.3. Configuring Logstash via logstash.yml:
Logstash is configured through the “logstash.yml” file, typically located in the “config” subdirectory within the Logstash installation directory. In the configuration file, you can set up input, filter, and output settings. Additionally, you define the pipeline processing logic here.

3.4. Running Logstash:
To run Logstash, open the command prompt, navigate to the Logstash installation directory, and use the following command to start Logstash:

bin\logstash -f logstash.conf
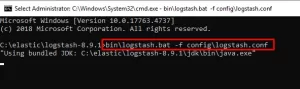
logstash
logstash

4. Installation of Kibana:

4.1. Download Kibana: Download the suitable Kibana file for Windows from the official Kibana download page: https://www.elastic.co/downloads/kibana
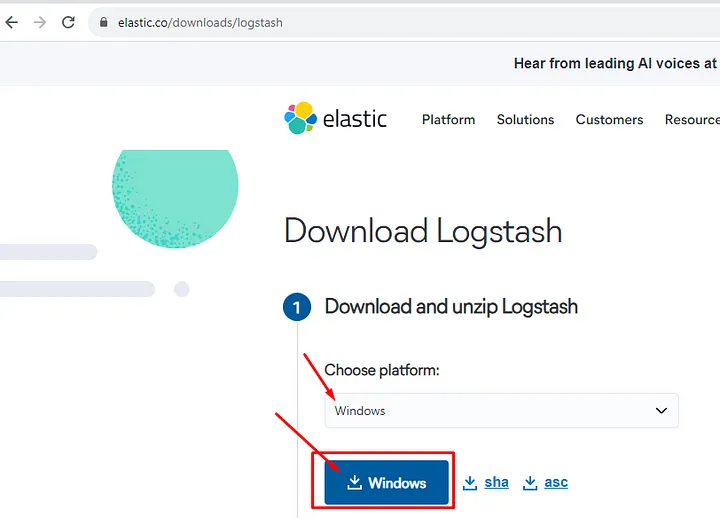
Kibana
Kibana

4.2. Extract the downloaded compressed file to a folder.

4.3. Configure Kibana: Edit the Kibana configuration file (kibana.yml) to make your configurations (e.g., Elasticsearch connection settings, etc.).

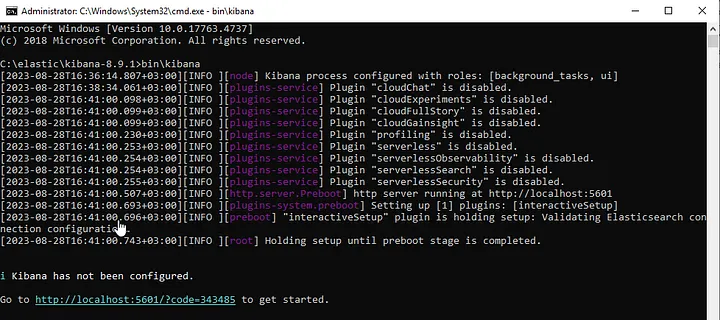
4.4. Running Kibana: Open the command prompt, navigate to the Kibana installation directory, and use the following command to start the service:

bin\kibana
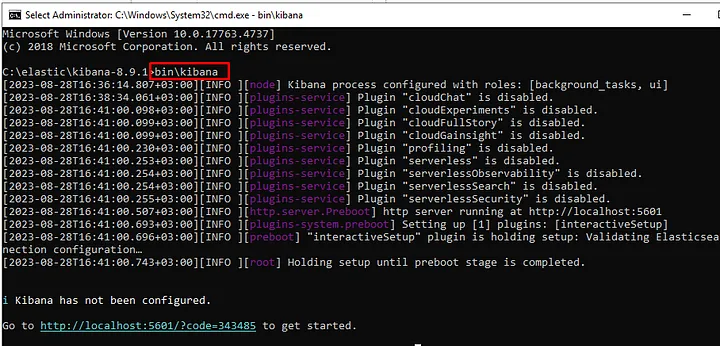

Installation is complete, now we move on to configuration settings:

Elasticsearch’s security features can vary depending on the version of Elasticsearch you are using. Starting from version 6.8.0, basic security features (Security) are enabled by default in Elasticsearch. These features include user authentication, role-based access control, and encryption.

In Elasticsearch 7.0.0 and later versions, there is a built-in “elastic” user with a default password. This user can be used for administrative tasks. The credentials for the default “elastic” user are as follows: Username: elastic, Password: A randomly generated password in these versions, printed to the console when Elasticsearch is started.

However, for security reasons, it’s highly recommended to promptly change this default password. It’s advised to replace the randomly generated password with a secure one as soon as Elasticsearch is started.

For the most up-to-date information about Elasticsearch versions and security features, you can refer to the official Elasticsearch documentation or other reliable sources. Security features can evolve over time, so checking the official Elasticsearch documentation is advisable for staying informed.

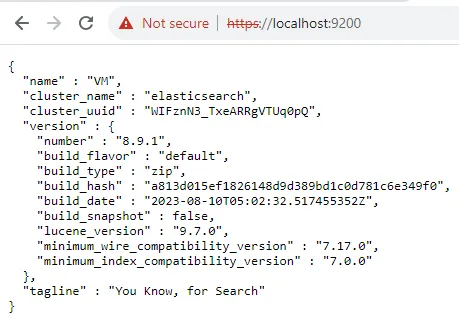
https://localhost:9200/
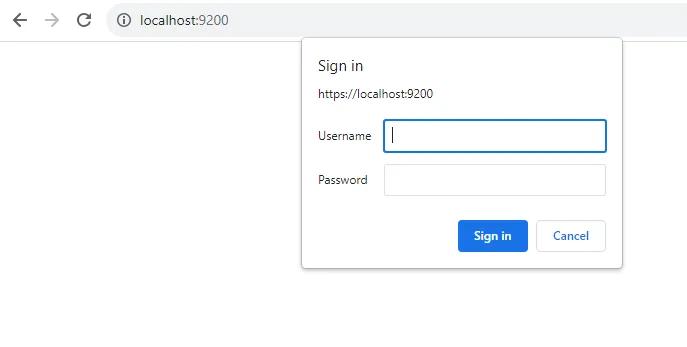
Username: elastic

Password: Enter the password that was generated during the initial installation, found in the “log” folder within the Elasticsearch directory.

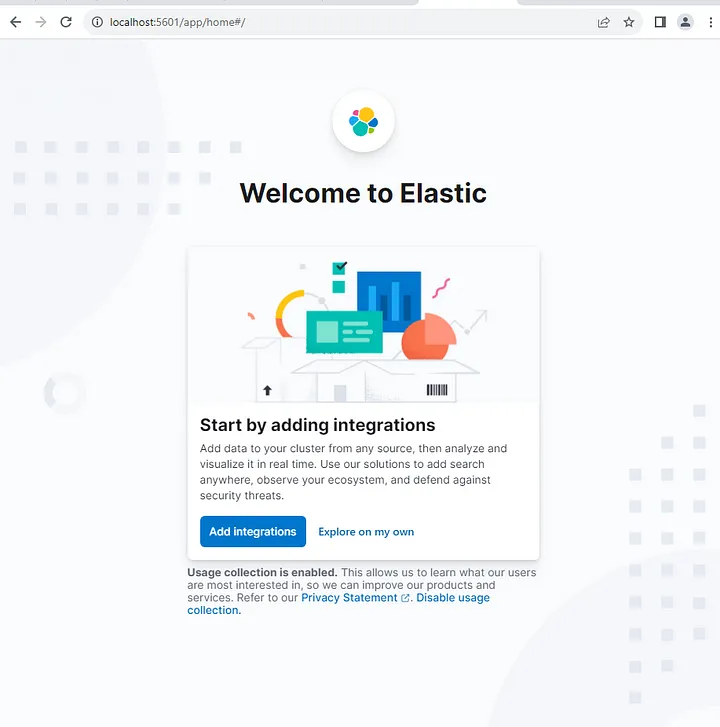
  • Open your web browser and navigate tohttp://localhost:5601 . This address is the default location where Kibana operates.
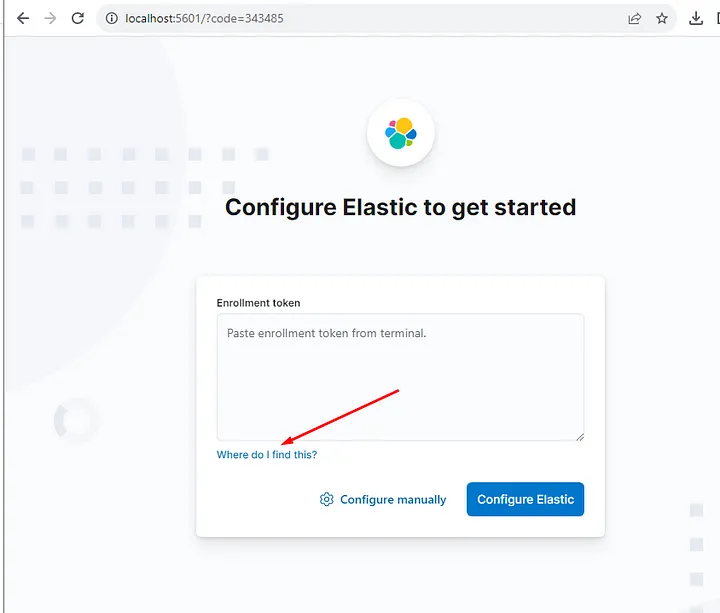
  • At this step, it requires you to generate a token.

  • To generate the token, you need to run the relevant command in the command prompt.
bin\elasticsearch-create-enrollment-token.bat
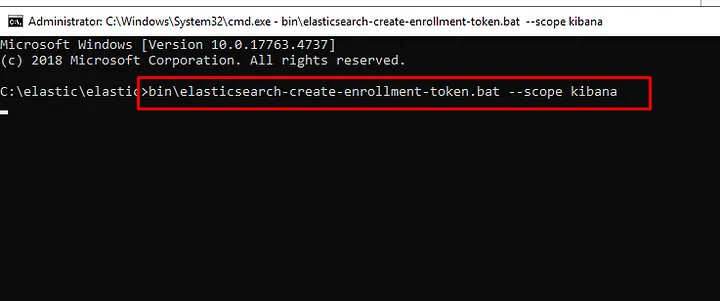
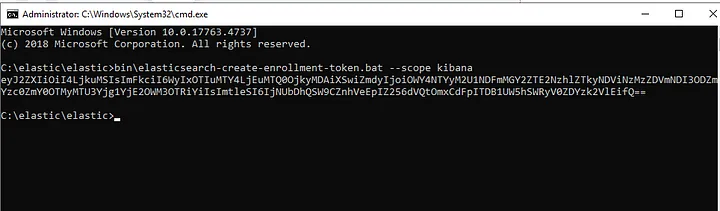
binelastlcsearch-create-enrollment-token.bat
bin\elasticsearch-create-enrollment-token.bat

  • You add the code you generated to the Kibana panel.
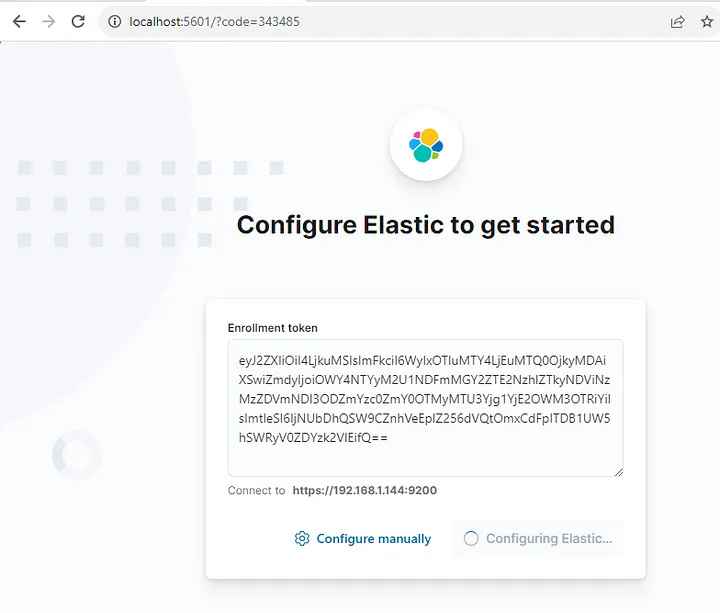
Kibana Panel
Kibana Panel
  • You establish the connection with the Elastic panel.
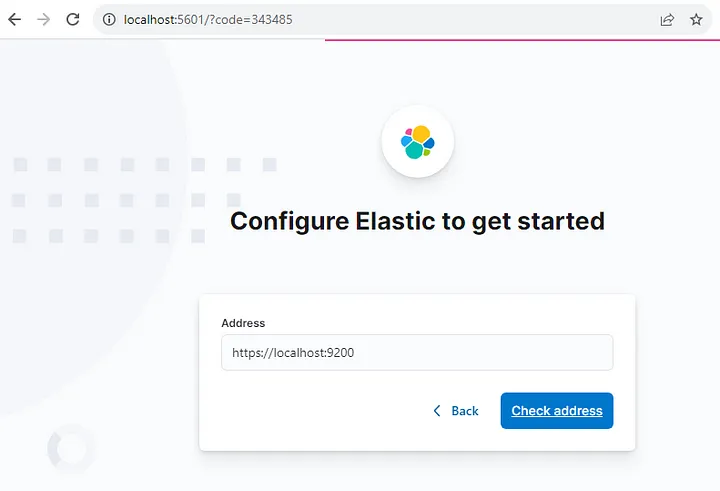
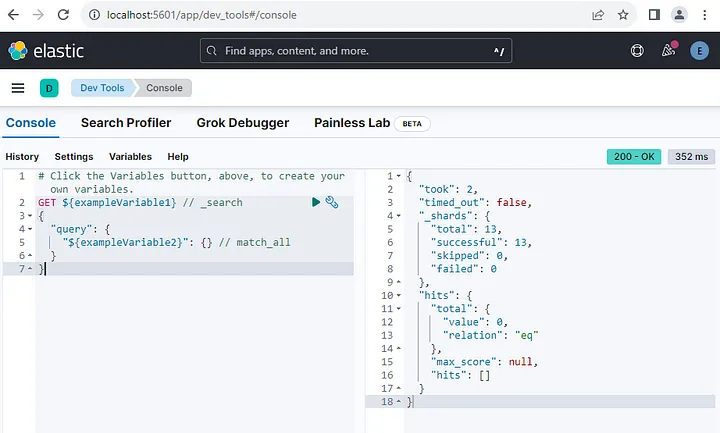
The configuration process for connecting Kibana with Elasticsearch is complete. Now, your ELK Stack connections are ready.

Since data security is crucial in our lives, remember to change the “default” password from the Kibana panel.

  • Select the “Edit Profile” option from the top right corner.
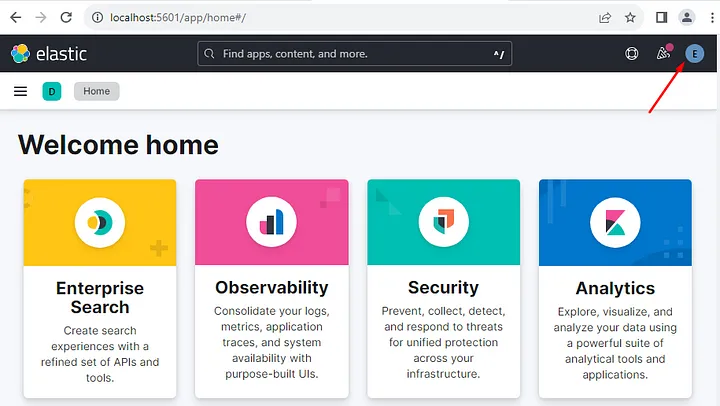
Edit Profile
Edit Profile
  • From the “Profile” section, select the “Change password” option.
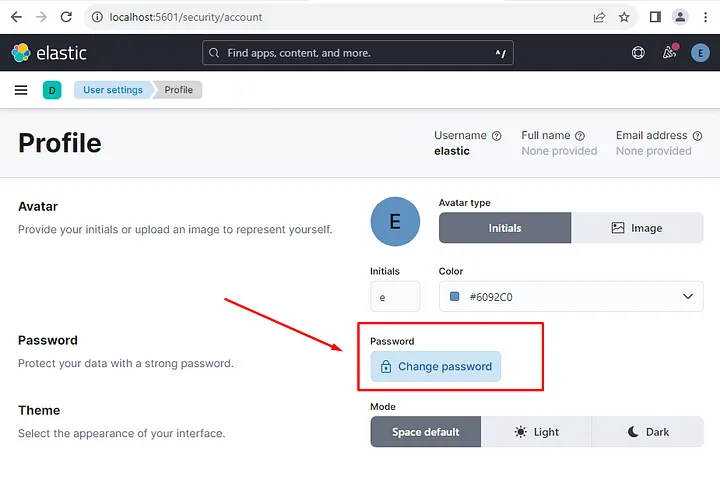
  • Complete the process of changing the password by filling in the relevant fields.
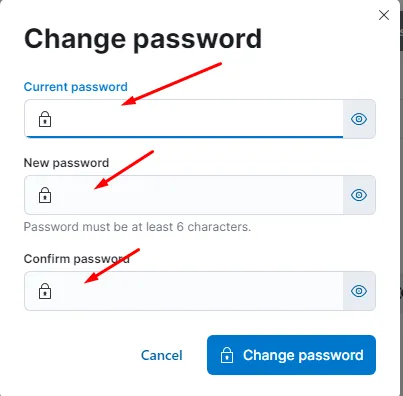
By following these steps, you should have completed the installation and configuration of ELK Stack (Elasticsearch, Logstash, Kibana) on a Windows Server. Now, you can begin utilizing this powerful toolset for data analysis and visualization. ELK Stack will assist you in the processes of data collection, processing, analysis, and creating meaningful visuals.

Data security is of utmost importance, so remember to change the default passwords in Elasticsearch and Kibana to strong and unique passwords. This step will ensure the safety of your data.

If you encounter any challenges along the way, it’s a good idea to refer to the official documentation of Elasticsearch and Kibana or seek help from community support forums. Best of luck, and I wish you a successful journey filled with data insights!


If you have any questions or details you would like to add, feel free to write me.
Categories
Articles Backups SQL Windows Server

How to Perform a Database Copy in SQL Server

Copying databases can often be quite useful, but knowing how to do it is crucial. In SQL Server, an easy way to copy a database is to use the “Database Copy Wizard.” Here’s how to do it using this wizard:

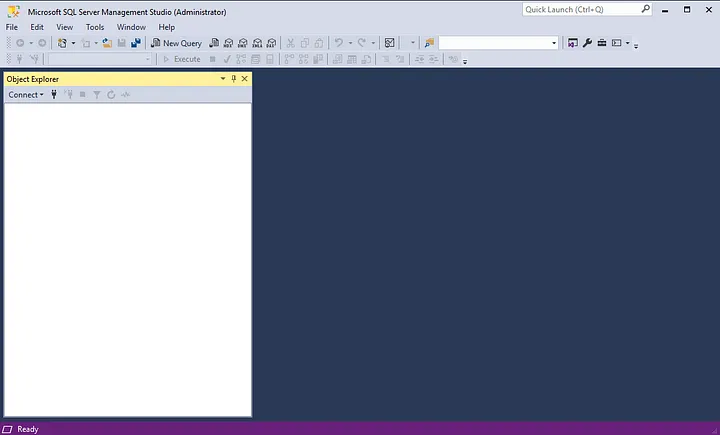
  1. First, open the SQL Server Management Studio (SSMS) application and connect to your SQL Server.

You can access the article where I previously explained the installation process from here.

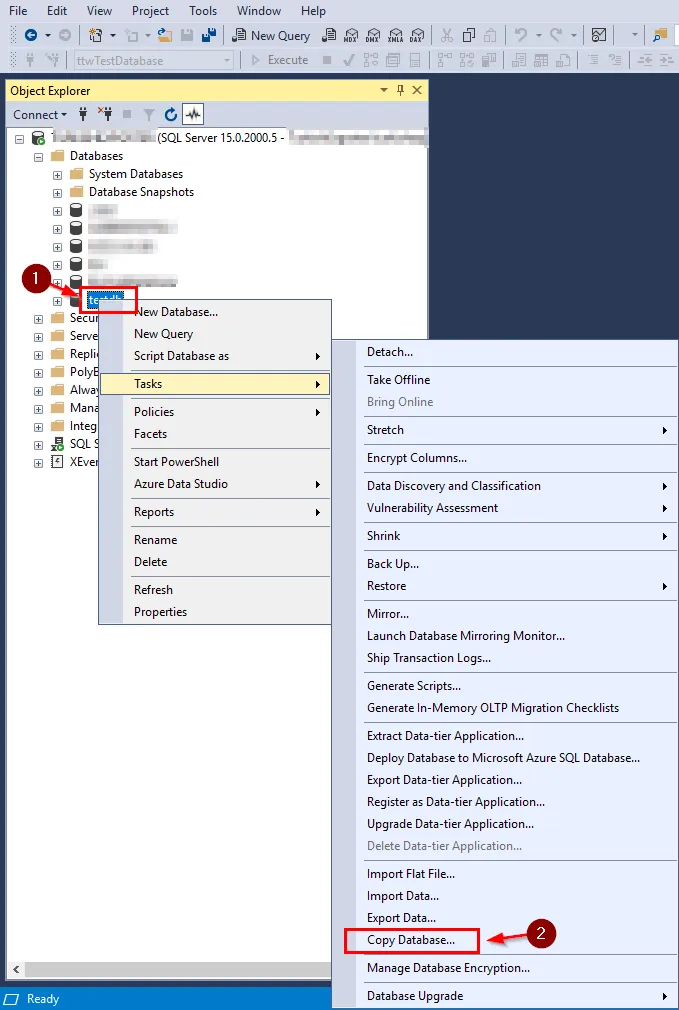
2. In the “Databases” tab on the left, locate the database you want to copy. This is the database you’ll be duplicating.

3. Now, right-click on it and select the “Tasks” option, then click on “Copy Database” to start the Database Copy Wizard.

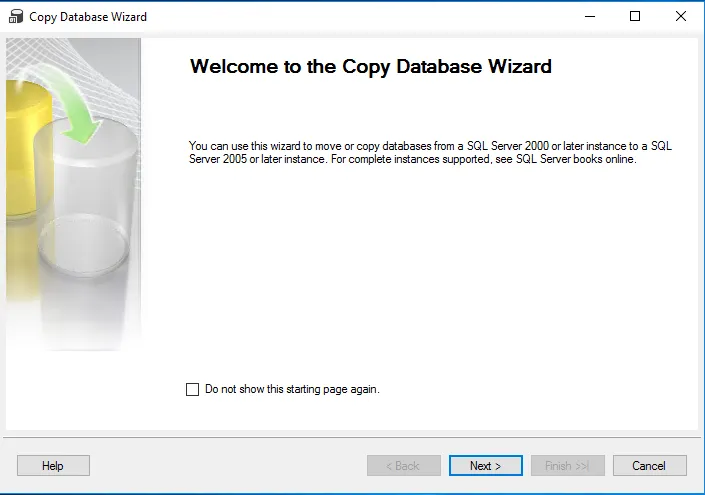
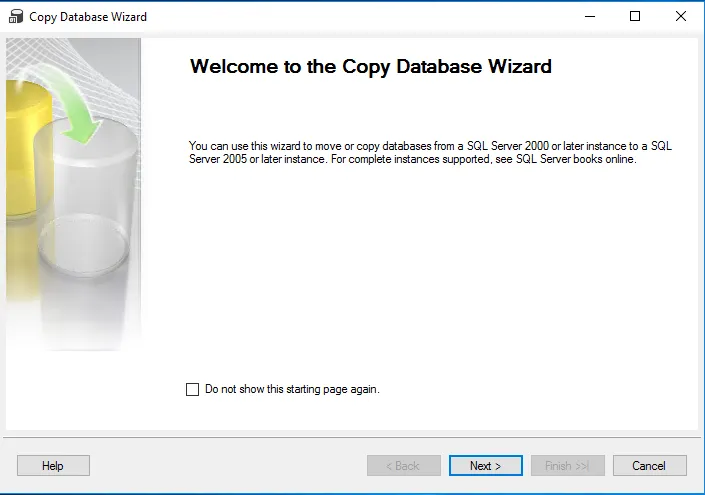
4. On the wizard’s initial screen, you’ll see the “Welcome to the Copy Database Wizard” message. Click “Next” to proceed.

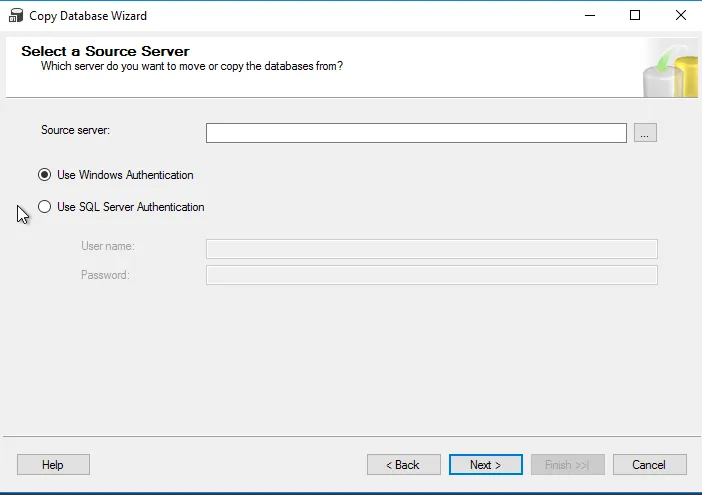
5. On the “Select a Source Server and Database” screen, enter the name of your source SQL Server instance and, if necessary, provide authentication credentials. Then, choose the database you want to copy.

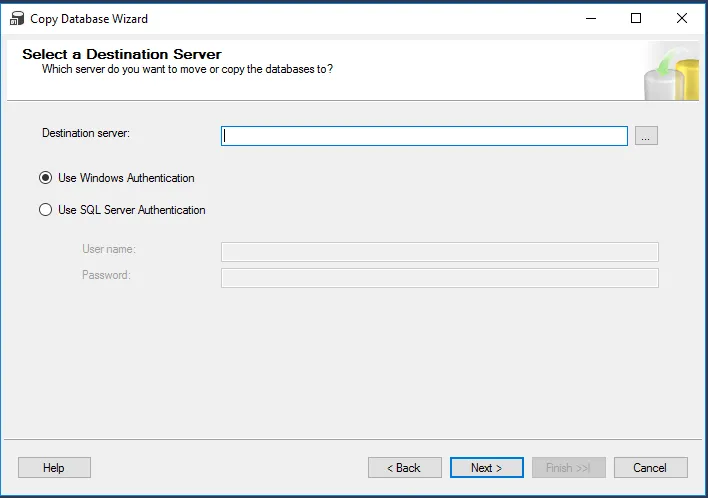
6. On the “Select a Destination Server and Database” screen, specify the name of your destination SQL Server instance and enter a new name for the copied database.

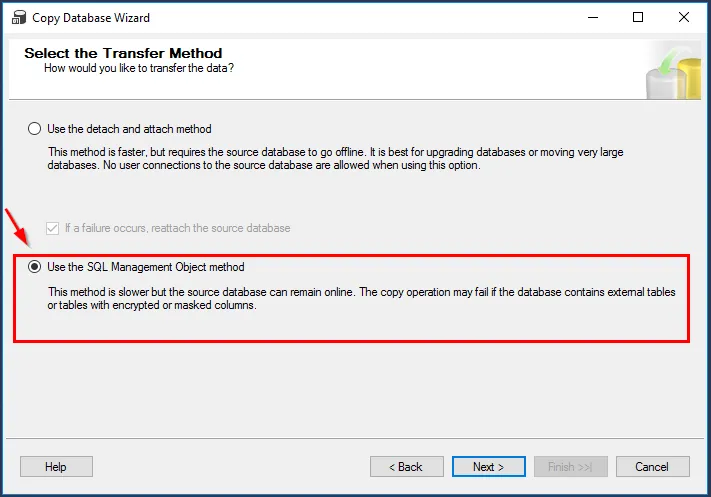
7. On the “Select Transfer Method” screen, you typically prefer to use the “Use the SQL Management Object method” option.

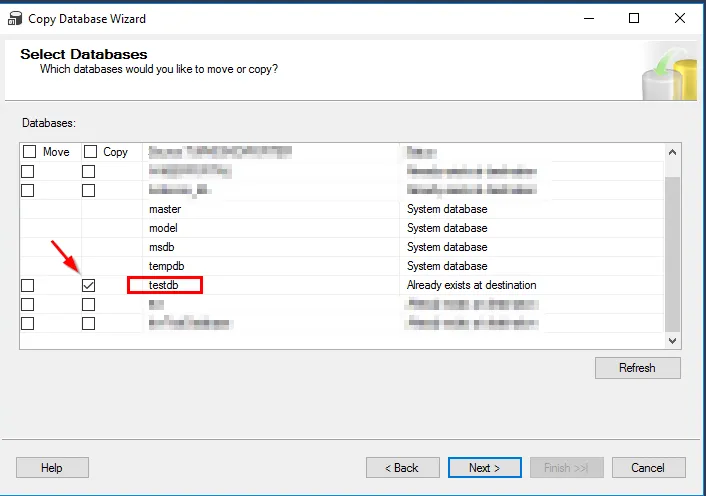
8. On the “Select Databases” screen, select the relevant database for the copy operation..

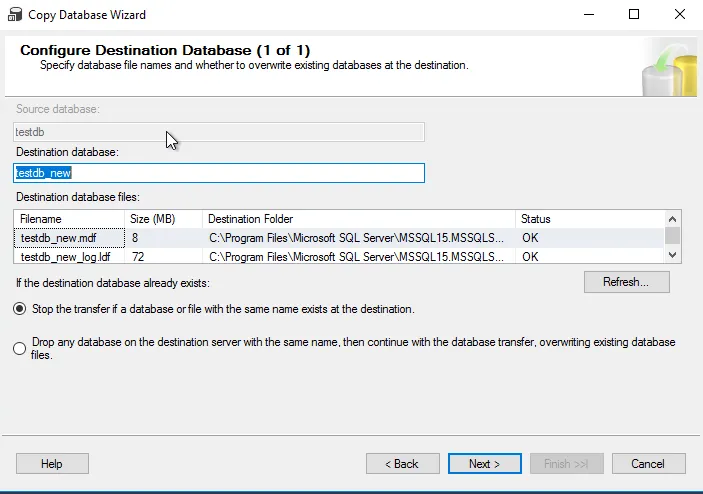
9. Next, on the “Configure Destination Database” screen, you can configure settings like database size, growth options, and other configurations.

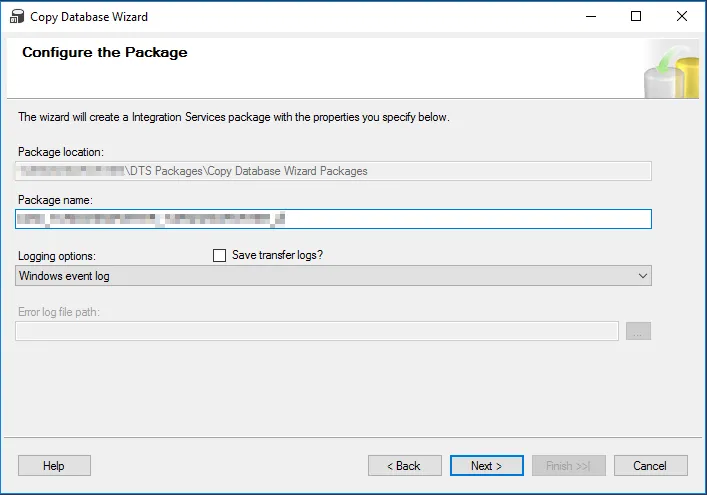
10. “Configure the Package” will create an Integration Services package with your specified settings.

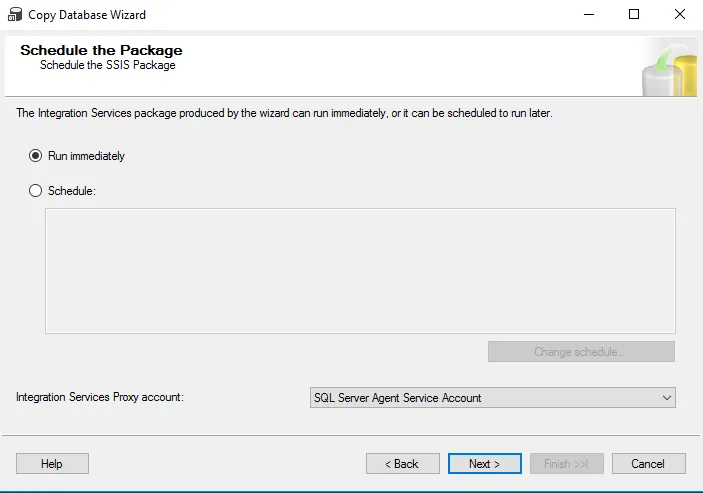
11. On the “Schedule and Start Copying” screen, you can choose to start the process immediately or create a scheduling plan.

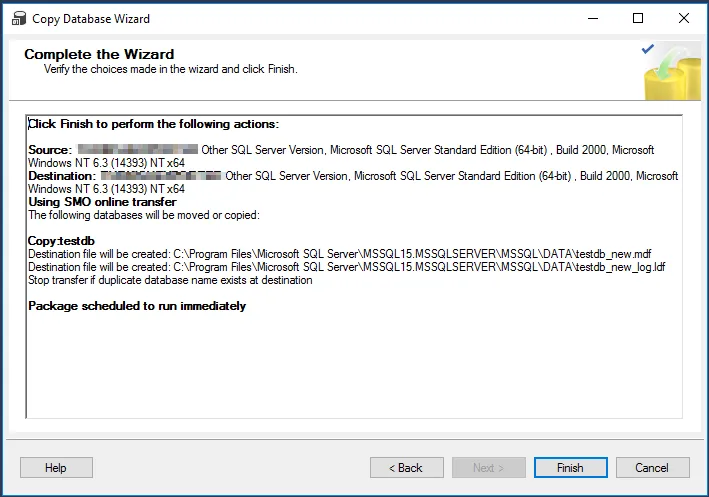
12. In the final step, review the operation and click “Finish” to initiate the database copying process.

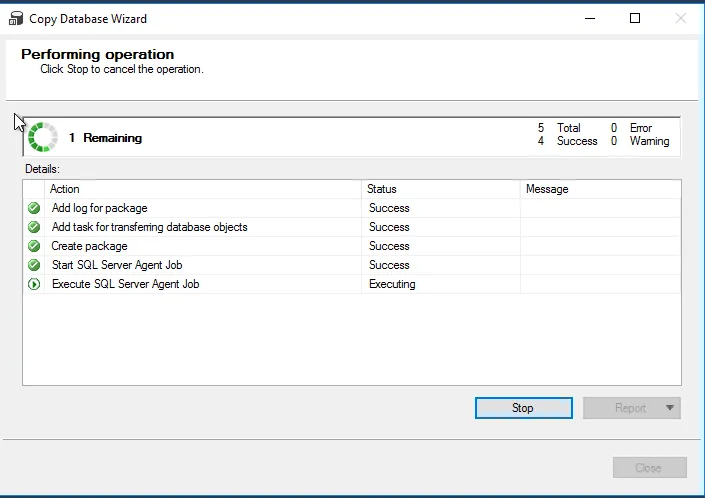
This process can take some time depending on your settings and the database’s size. Once completed, the new database will be created on the destination server.

So, you’ve successfully copied your database!


If you have any questions or details you would like to add, feel free to write me.
Categories
Articles Backups

rclone: Command Line Tool for Multi-Cloud Storage Operations and Installation Guide

rclone” is a command-line based tool that allows interaction with various cloud storage providers (such as Google Drive, Dropbox, Amazon S3, Microsoft OneDrive, etc.) and helps synchronize data across these storage spaces. Here are some of the use cases for rclone:

  1. Cloud Storage Synchronization: rclone can be used to synchronize or back up files between different cloud storage providers. For instance, you can synchronize files from your computer to Google Drive or Dropbox.
  2. Backup and Recovery: rclone can be utilized to back up important data to cloud storage. This simplifies the process of recovering files in case of data loss.
  3. Data Movement and Transfer: When you need to move large files or datasets between different cloud storage providers, rclone can come in handy.
  4. Remote File Management: Through the command-line interface, rclone enables you to manage files in remote cloud storage accounts. You can delete, move, or rename files and folders.
  5. Multi-Account Management: When dealing with multiple cloud storage provider accounts, rclone can help manage them. This makes it easy to switch between different accounts.
  6. Script Automation: You can automate rclone commands and create scripts to perform automatic backups or synchronizations based on a specific schedule.
  7. Data Analysis and Processing: rclone can be integrated with other tools used for data analysis or processing. For example, you can pull and process data and then store the results in cloud storage.
  8. Large Data Transfer: When transferring large datasets between different cloud storage providers, rclone ensures fast and reliable data transfer.
  9. Server Backup: You can use rclone to back up server data to cloud storage spaces.
  10. Data Sharing: With rclone, you can share your cloud storage spaces with others, which can be useful for collaboration purposes.

In summary, rclone is a versatile tool that finds application in a wide range of scenarios including data synchronization, backup, data movement, and management of cloud storage accounts.

Installation of rclone

Step 1: Prepare the Required Tools

Before installing rclone, you’ll need a command-line environment to work with through the terminal.

  • On Linux or macOS, open the Terminal application.
  • On Windows, open PowerShell or Command Prompt.

Step 2: Download rclone

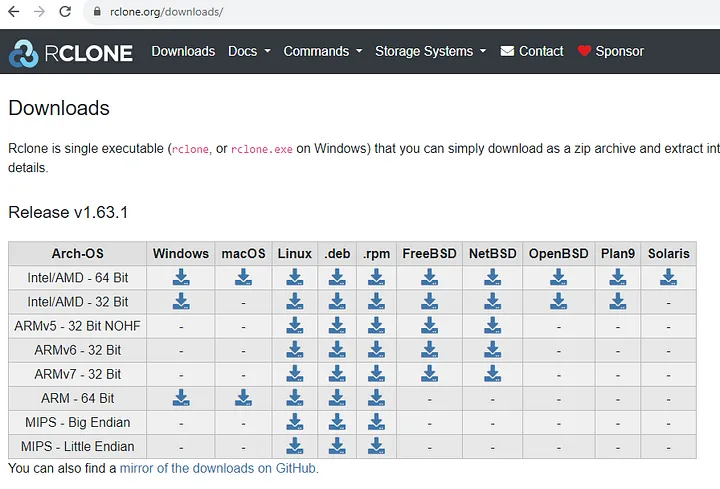
You can download rclone from the official website. Choose the version suitable for your operating system (Windows, macOS, Linux) and download it.

  • rclone download
    rclone download
  • Sizin için uygun olan sürümü (örneğin, Windows, macOS veya Linux) seçin ve indirin.

Step 3: Installation and Configuration of rclone

Extract the downloaded rclone file and move the files to an appropriate location (e.g., /usr/local/bin on macOS and Linux, C:\Windows\System32 on Windows).

Step 4: rclone Configuration

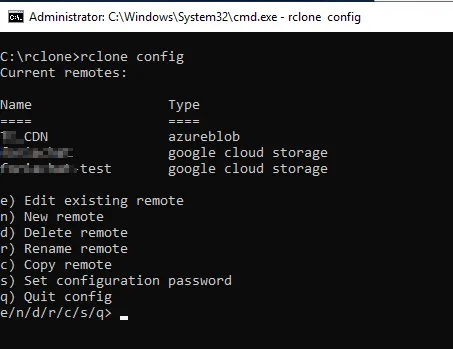
Before you start using rclone, you need to configure your cloud storage accounts. Open the terminal or command prompt. To initiate the rclone configuration, use the following command:

rclone config
rclone config
rclone config

Follow the on-screen instructions to add and configure your cloud storage accounts. You’ll complete steps such as OAuth2 authentication or other identity verification methods depending on the cloud service you’re using.

Once configuration is complete, you can save it with a chosen name.

Step 5: Using rclone

rclone offers great flexibility in its usage. For example, to upload a file from your local disk to a cloud storage account:

rclone copy /path/to/local/file remote: destination/folder

Here, replace /path/to/local/file with the local file’s path, remote with the name you configured for the cloud storage, and destination/folder with the target folder in the cloud storage account.

To sum up, by following these steps, you can start using rclone to easily synchronize, backup, move, and share your data across different cloud storage providers.


If you have any questions or details you would like to add, feel free to write me.
Categories
Articles Windows Server

Creating and Using Your Website’s Robots.txt File — Optimizing Server Resource Consumption

A “robots.txt” file is a text document located in the root directory of your website that specifies which pages should or should not be indexed by web browsers and search engines. Here are the basic steps to create a robots.txt file:

1. Create a text file using a text editor and save it as “robots.txt

2. Edit the file’s content as follows:

User-agent: *
Disallow: /gizli/
Allow: /izinli/

In this example, the “*” (asterisk) represents a rule that applies to all search engines. The “Disallow” command specifies the directory you want to block, while the “Allow” command specifies the specific directories within the blocked directory that you want to permit indexing. In this case, “/private/” is blocked, and “/public/” is allowed for indexing by search engines.

3. Upload the robots.txt file to the root directory of your website. It should be accessible at the end of your website’s main URL (e.g., “https://ahmetorhan.com/robots.txt“).

4. To verify the changes, you can access Google Search Console or the webmaster tools of other search engines.


Now, let’s examine the example below:

User-agent: Googlebot
Disallow:

User-agent: AdsBot-Google
Disallow:

User-agent: Googlebot-Image
Disallow:

User-agent: yandex
Disallow:

User-agent: uptimebot
Disallow:

User-agent: Amazonbot 
Disallow: /do-not-crawl

User-agent: PetalBot
Disallow: /

User-agent: Applebot
Disallow: /not-allowed/

User-agent: GPTBot
Disallow: /

An example robots.txt file contains rules for blocking or allowing directories specific to different user agents (web browser robots). Let’s examine this example in detail:

  1. `User-agent: Googlebot`
  • This rule is for Googlebot. It targets Google’s web crawling robot.
  • It does not block any directories, meaning all pages can be indexed.

2. `User-agent: AdsBot-Google`

  • This rule is for Google AdsBot. It targets the robot used for Google’s advertising services.
  • It does not block any directories, so all pages can be indexed.

3. `User-agent: Googlebot-Image`

  • This rule is for Googlebot-Image. It targets Google’s image crawling robot.
  • It does not block any directories, allowing all images to be indexed.

4. `User-agent: Yandex`

  • This rule is for Yandex. It targets Yandex’s search engine robot.
  • It does not block any directories, meaning all pages can be indexed.

5. `User-agent: uptimebot`

  • This rule is for uptimebot, a robot responsible for checking the uptime of a specific service.
  • It does not block any directories, allowing all pages to be indexed.

6. `User-agent: Amazonbot`

  • This rule is for Amazonbot. It targets Amazon’s proprietary robot.
  • It blocks the “/do-not-crawl” directory, preventing pages in this directory from being indexed.

7. `User-agent: PetalBot`

  • This rule is for PetalBot. It targets Huawei’s Petal Search engine’s robot.
  • It blocks all directories, preventing all pages from being indexed.

8. `User-agent: Applebot`

  • This rule is for Applebot. It targets Apple’s search engine robot.
  • It blocks the “/not-allowed/” directory, preventing pages in this directory from being indexed.

9. `User-agent: GPTBot`

  • This rule is for GPTBot, targeting it.
  • It blocks all directories, preventing all pages from being indexed.

In conclusion, by making adjustments in the “robots.txt” file, you can effectively mitigate unnecessary resource consumption on your web server and associated database servers. You can also ensure that the most relevant bots are allowed, leading to more accurate results.


If you have any questions or details you would like to add, feel free to write me.
Categories
Articles Windows Server

Installing IIS on Windows Server

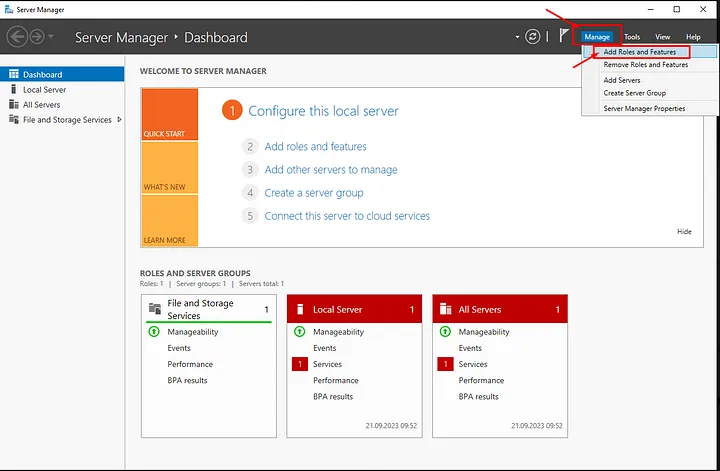
You can install IIS (Internet Information Services) on Windows Server using Server Manager by following the steps below:

1. Server Preparation:
— Make sure you have Administrator privileges on your server if you are using a Windows Server operating system.

2. Opening Server Manager:
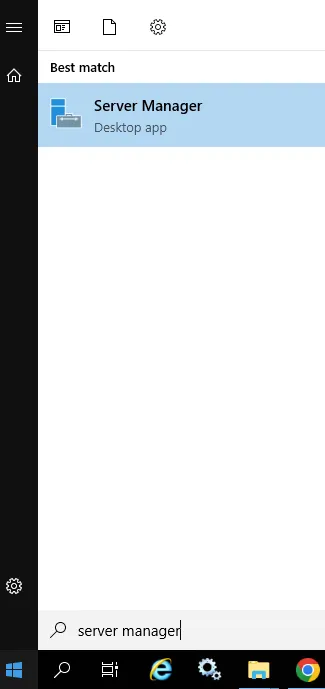
— Click on the Start button.

— Search for “Server Manager” and open it.

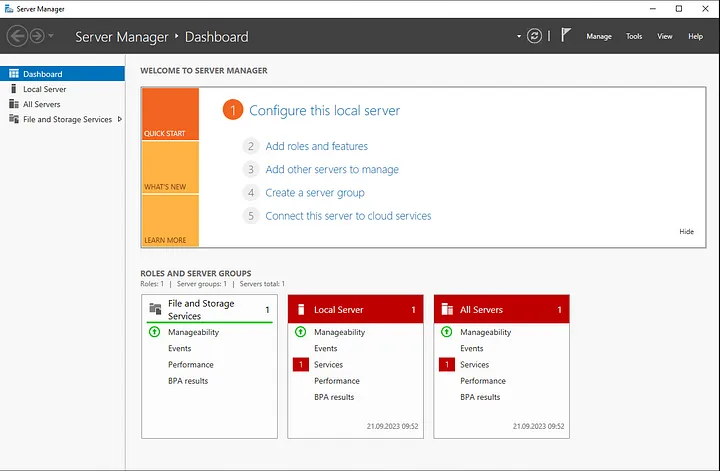
3. Select “Add Roles and Features” from the Left Menu:
— In the Server Manager main window, locate “Upper Banners” and select “Add Roles and Features.”

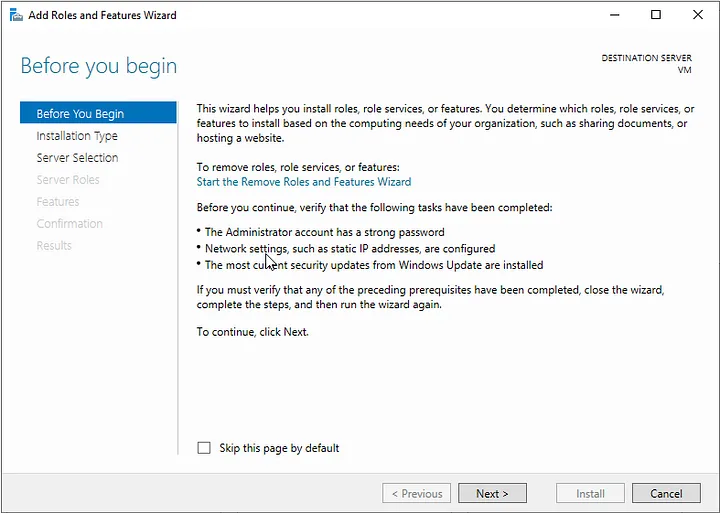
4. Launch the “Add Roles and Features Wizard”:
— The “Add Roles and Features Wizard” window will open. This wizard helps you add roles and features to your server.

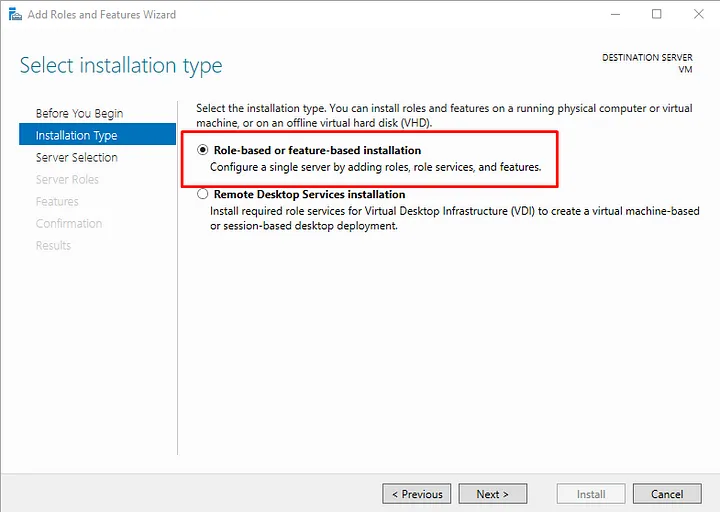
5. Select Features:
— In the first step of the wizard, choose the “Installation Type.” Typically, select “Role-based or feature-based installation,” and proceed.

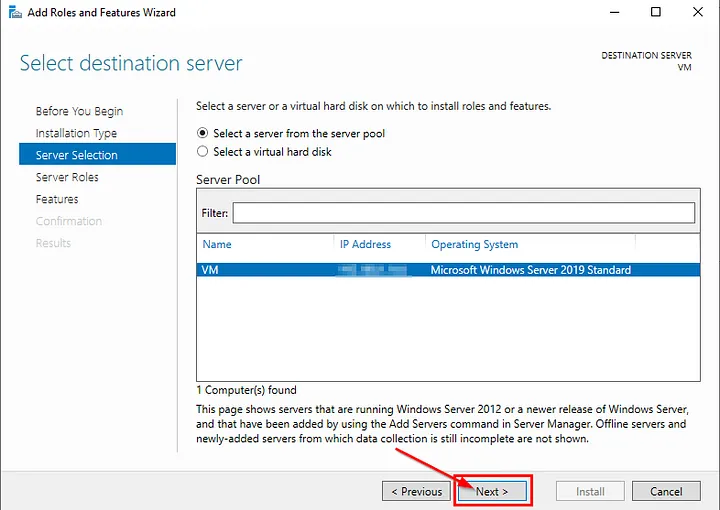
6. Choose the Target Server:
— Select your server or specify the target server, then click “Next.”

7. Select Roles:
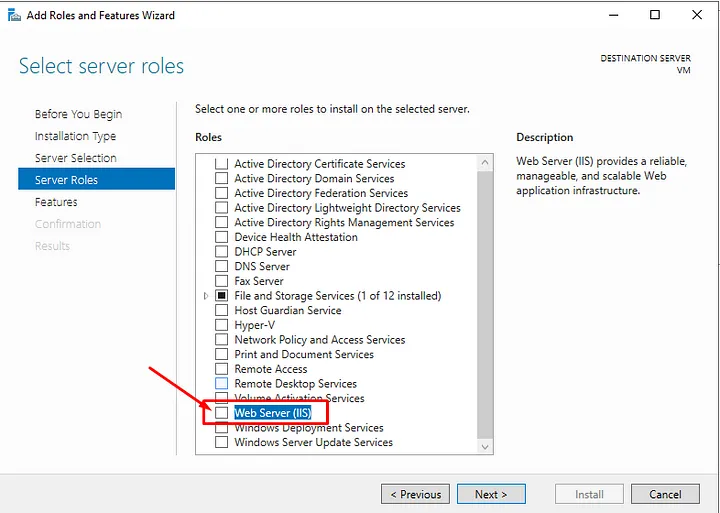
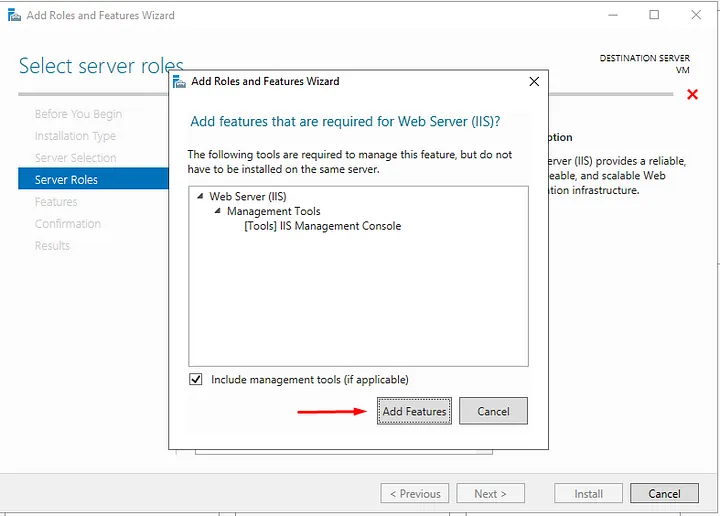
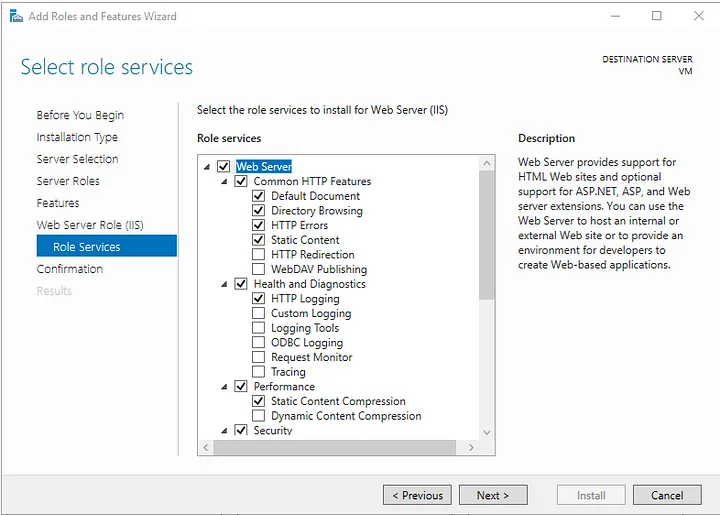
— In the “Roles” section, find “Web Server (IIS)” and check the box. You can also select additional components if needed.

8. Review Accessibility Information:
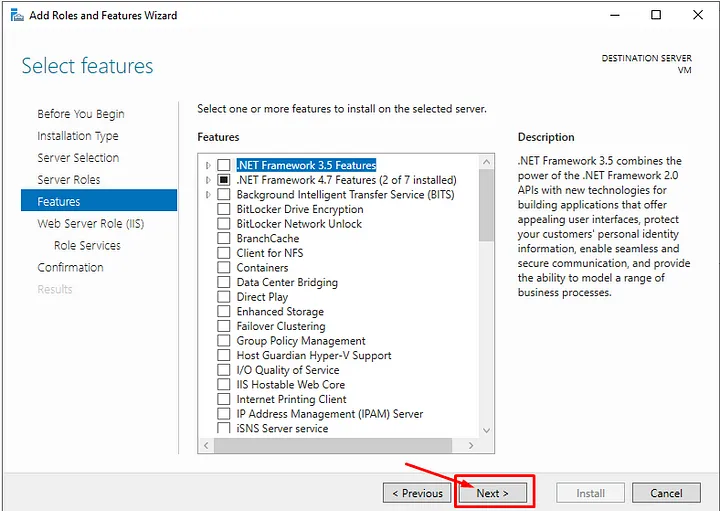
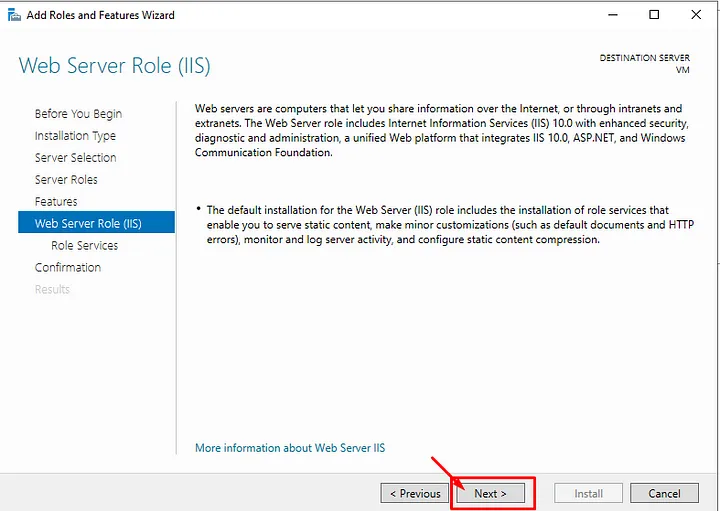
— Follow the wizard’s progression and configure necessary options when prompted.

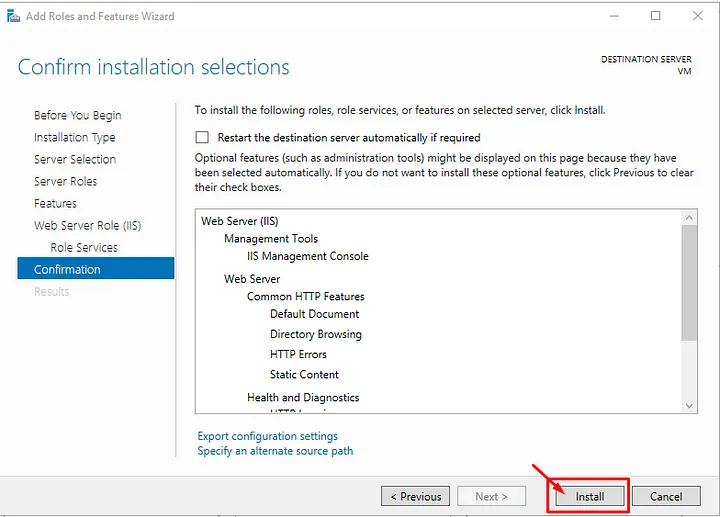
9. Initiate the Installation:
— Start the IIS installation by clicking the “Install” button.

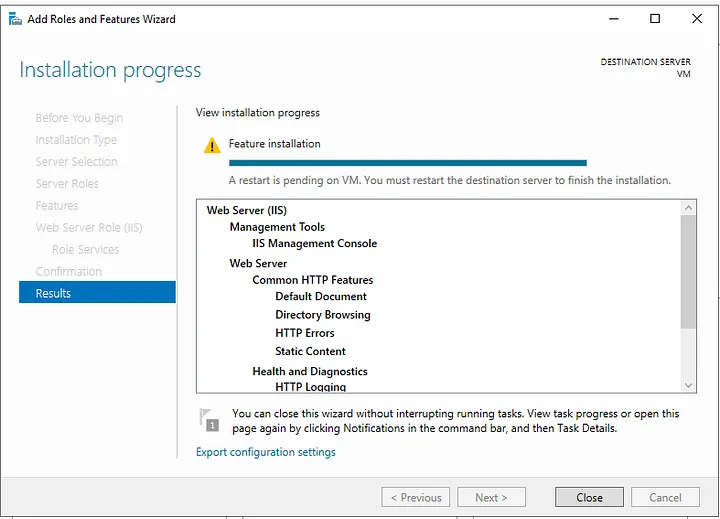
10. Completion of Installation:
— Once the installation is complete, you will receive a confirmation message indicating successful installation.You will then be prompted for a reboot.

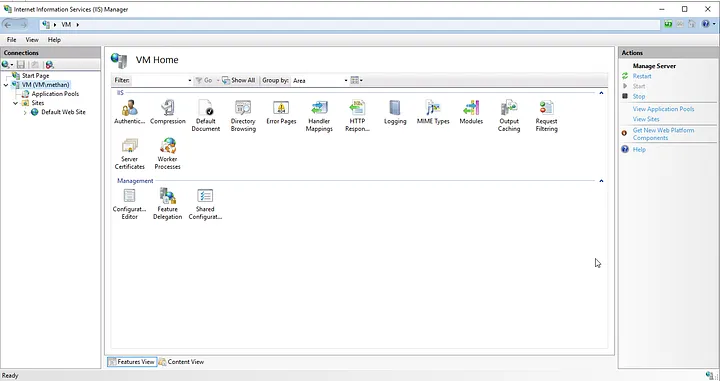
You can successfully install IIS by following these steps. Afterward, you can configure your websites and applications using the IIS Management Console.


If you have any questions or details you would like to add, feel free to write me.