Categories
Articles Cloudflare

How to Add a Domain for Free, Get an SSL Certificate, and Set Up DNS Forwarding with Cloudflare?

How to Add a Domain for Free, Get an SSL Certificate, and Set Up DNS Forwarding Using Cloudflare for Free?

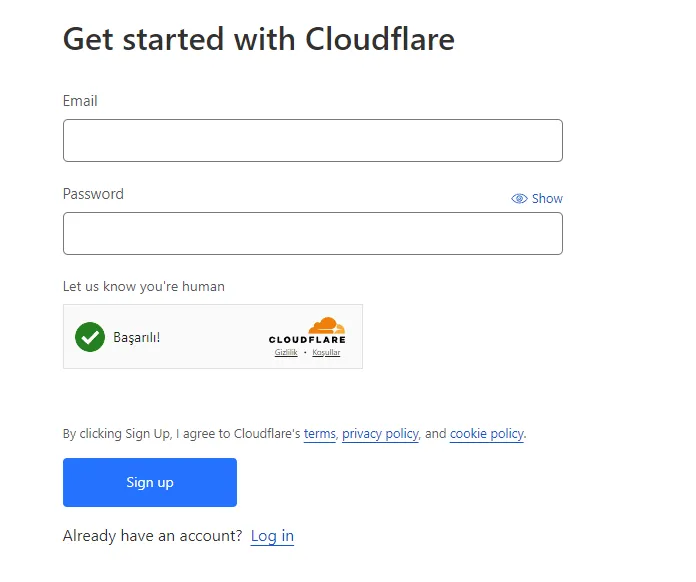
1.Creating a Cloudflare Account: If you don’t have a Cloudflare account, go to cloudflare.com and create an account.

2.Adding a Site on Cloudflare: After logging into your account, go to the Cloudflare control panel and click on the ‘Add a Site’ option. Then, enter the domain name of your site.

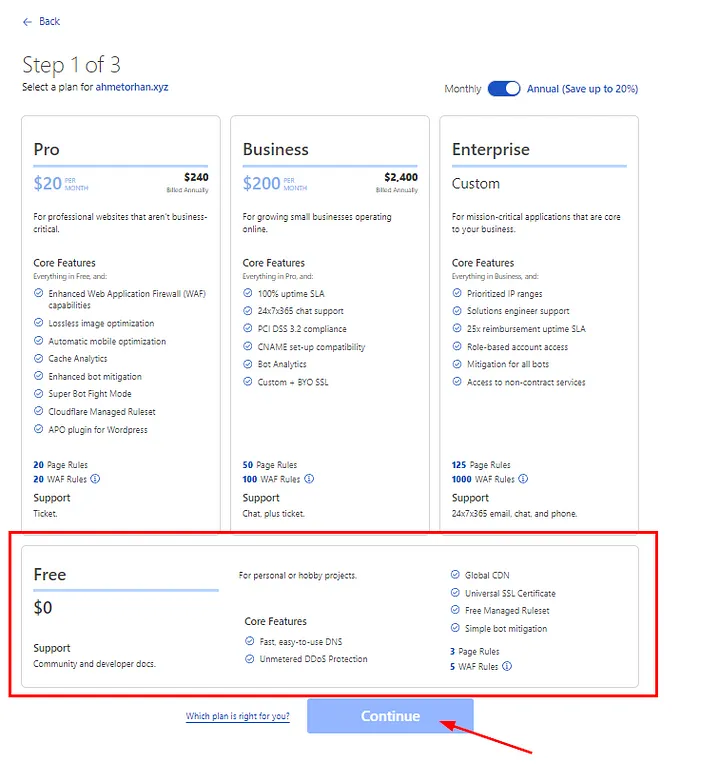
3.Choosing a Plan: Cloudflare offers different service levels. The free plan provides basic services, but if you want more features, you can upgrade to paid plans. In this step, we are selecting the free plan.

4.Verifying DNS Records: After adding the domain name, Cloudflare automatically analyzes your DNS records. In this step, ensure that your existing DNS records are correct. Edit them if necessary.

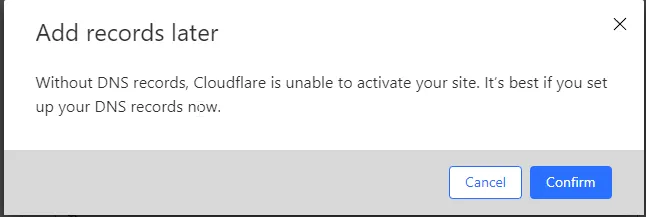
  • We proceed by saying continue this step to edit later.

  • We accept a warning about adjusting DNS settings and continue.

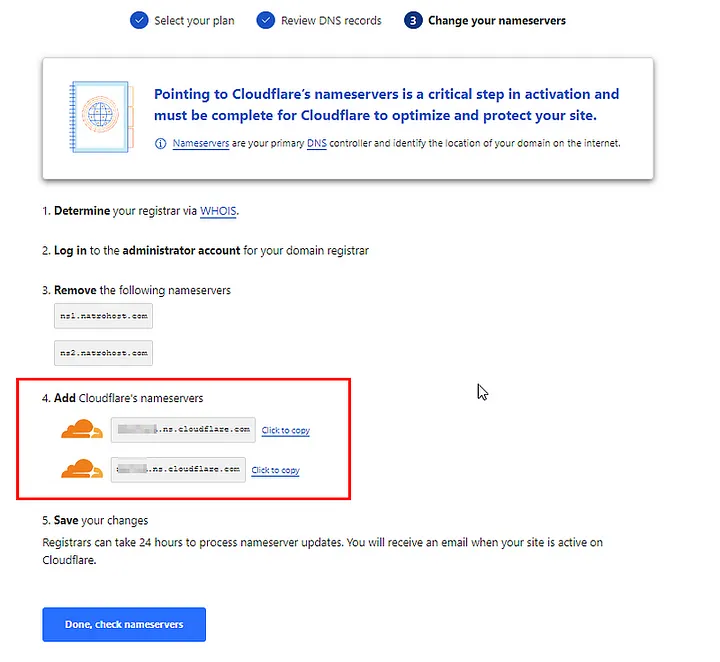
  • At this stage, our Cloudflare dns information comes. To do this, you need to change the DNS routing from the domain provider as follows. (This field may vary depending on the domain providers.)

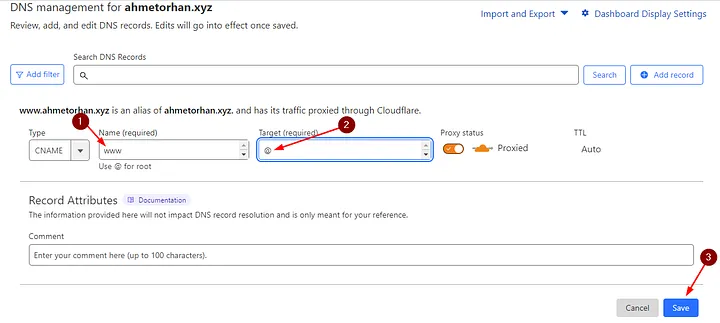
5.DNS Forwarding: Cloudflare is used to manage your DNS forwarding. To forward your DNS records, go to the Cloudflare control panel. Click the “DNS” tab on the home page. Here, we will add new DNS records.

  • We continue by clicking Add Record. We will add Host A and CName as necessary.
HOST A
HOST A
CNAME
CNAME

NOTE: After changing your DNS settings, it may take several hours for these changes to propagate throughout the internet. Once the DNS records are updated worldwide, your site will start serving via Cloudflare.

6.Adding an SSL Certificate: Cloudflare provides a free SSL/TLS certificate. To enable this certificate, go to the “SSL/TLS” tab in the Cloudflare control panel. Next, enable “Full” or “Flexible” SSL mode.
  • You can also check whether it has received SSL from the Edge Certificates section.

7.Test and Monitor: Test your site to make sure everything is working properly. Cloudflare control panel provides detailed information about site traffic.

…and happy ending 🙂

In summary; We can add DNS redirects and SSL to our existing domain name free of charge via Cloudflare.


If you have any questions or details you would like to add, feel free to write me.

Categories
Articles Cloudflare

Adding a Domain to Yandex Mail and Configuring Email Settings with Cloudflare

Let’s get started with adding a domain to Yandex Mail and configuring email settings with Cloudflare.

1.Create Your Yandex Mail Account:

If you don’t already have a Yandex Mail account, create one.

2.Adding a Domain:

Log in to your Yandex Mail account.

  • Next, go to your account settings and locate the “Manage” and “Domains” options.

3. Add a Domain:

  • Click on the “Add Domain” or “Add Domain” option.
  • Enter your domain name and add it. Yandex may ask you to verify your domain.

4. Create Your Cloudflare Account:

5. Transfer Domain Settings to Cloudflare:

  • Log in to your Cloudflare account.

  • Add your domain to Cloudflare by selecting the “Add Site” option.

  • Then, use the Cloudflare DNS (Domain Name System) manager to configure your DNS records.

6. Configure DNS Settings:

  • To add the necessary DNS records for Yandex Mail, go to the DNS management section in your Cloudflare account.

  • Below are the basic DNS records and settings that you will add in the Cloudflare DNS section following the instructions after adding your domain in the Yandex Mail panel:
  • Return to your Yandex Mail account.
  • When you’ve added the domain, Yandex may ask you to verify your DNS records. Proceed with this verification.

— Follow the instructions provided by Yandex Mail for verification.

— In the Cloudflare DNS “Records” section, follow the steps below and save the TXT record.

—  Afterward, verify it in the Yandex Mail panel.

  • MX (Mail Exchange) Record: This record contains the server address that directs email delivery. Use the values specified by Yandex for Yandex Mail’s MX records.

— Perform the following additions on the Cloudflare panel.

  • DKIM (DomainKeys Identified Mail) Record: DKIM records authenticate the identity of your emails. Use the DKIM settings specified by Yandex Mail for Yandex Mail.


— Perform the following additions on the Cloudflare panel.

  • SPF (Sender Policy Framework) Record: The SPF record verifies email sending permissions. Use the SPF record settings specified by Yandex Mail for Yandex Mail.

— Perform the following additions on the Cloudflare panel.


By following these steps, you can add a domain to Yandex Mail and configure your DNS settings through Cloudflare. If you encounter any issues related to email, you can reach out to the support teams of Yandex Mail or Cloudflare for assistance.


If you have any questions or details you would like to add, feel free to write me.