
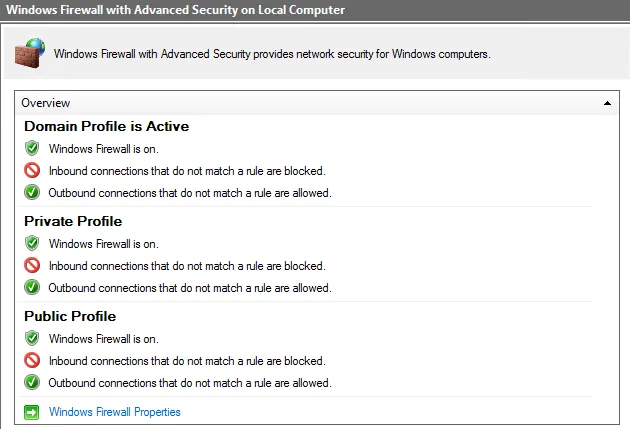
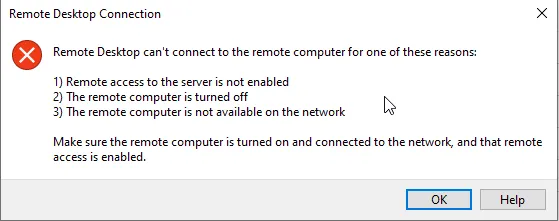
When you enable Windows Firewall, in some cases, you might lose Remote Desktop access to the virtual machine. In such situations, you can follow the steps outlined below in the Azure portal to make the Windows Firewall inactive and regain access:
Firstly;
Step 1: Let’s create a PowerShell script with the following codes and name it:
DisableWindowsFirewall.ps1
Set-ItemProperty -Path 'HKLM:\SYSTEM\CurrentControlSet\services\SharedAccess\Parameters\FirewallPolicy\DomainProfile' -name "EnableFirewall" -Değer 0

Set-ItemProperty -Path 'HKLM:\SYSTEM\CurrentControlSet\services\SharedAccess\Parameters\FirewallPolicy\PublicProfile' -name "EnableFirewall" -Değer 0

Set-ItemProperty -Path 'HKLM:\SYSTEM\CurrentControlSet\services\SharedAccess\Parameters\FirewallPolicy\Standardprofile' -name "EnableFirewall" -Değer 0
Step 2: Let’s go to the relevant virtual machine on the Azure portal;

- Let’s select Extensions + applications and go;

- Let’s find “Custom script extension” from the screen that opens by clicking Add and continue by selecting it;

- On the screen that opened, I created a storage and transferred the PowerShell script I had previously prepared into it;


- Afterwards, the relevant virtual server needs to be restarted.


- Afterwards, the relevant virtual server needs to be restarted.


- When the reboot process is completed, we check the windows firewall by making a remote connection to the virtual machine and the process is completed.
If you have any questions or details you would like to add, feel free to write me.