Categories
Articles Azure

Detailed Review of Azure ARM

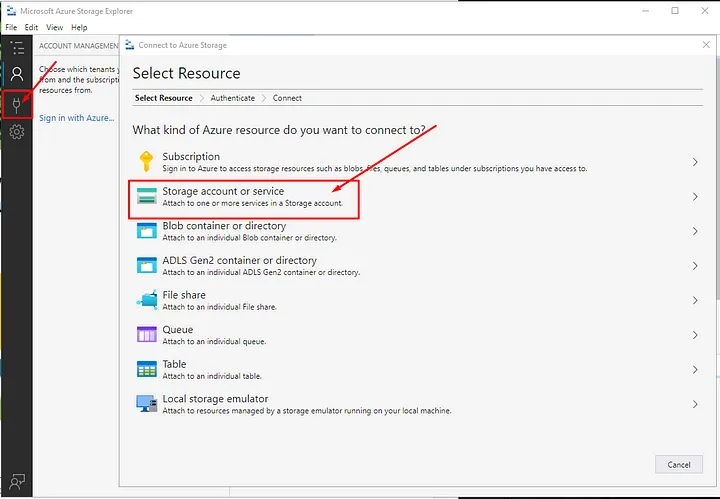
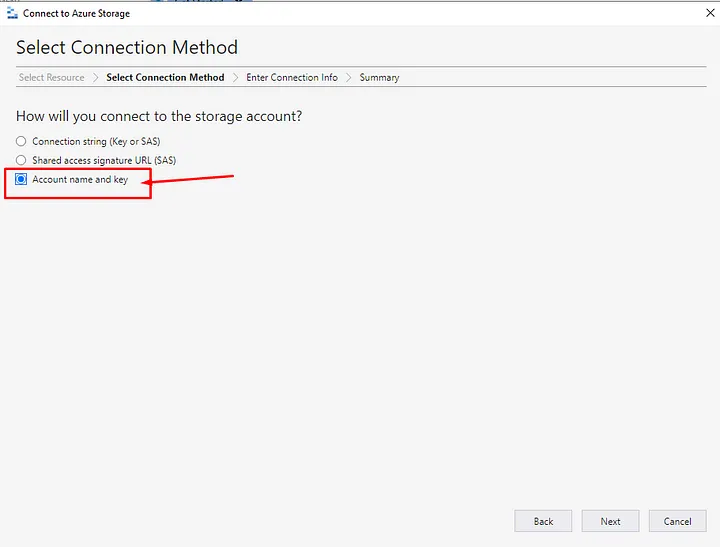
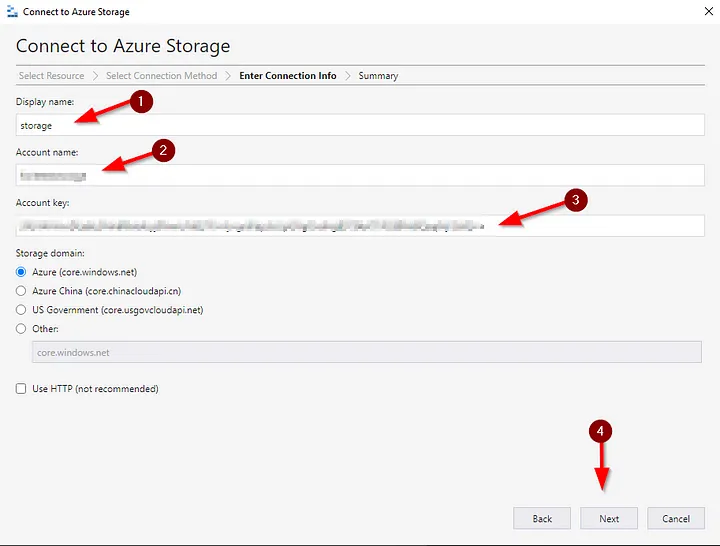
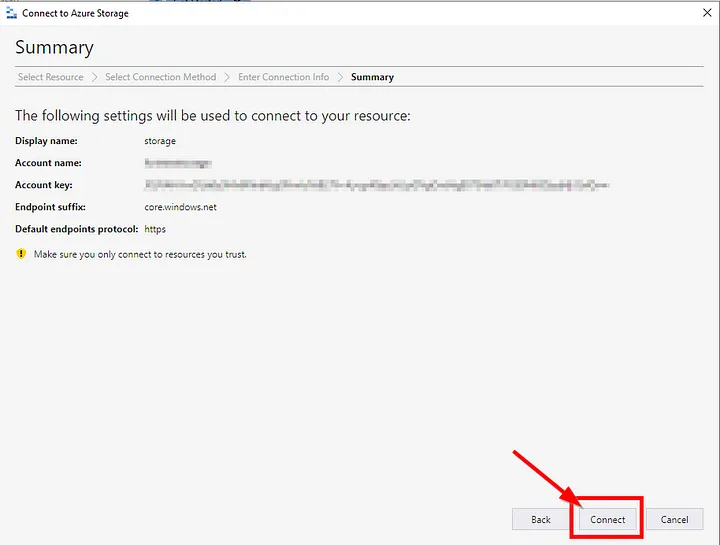
Azure Resource Manager (ARM) is one of the cornerstones of Microsoft Azure and a powerful tool that simplifies infrastructure management. In this section, we will explore the functions, benefits and use cases of ARM in more detail.

Functions of ARM:

  • Resource Creation and Management: ARM can create and manage a variety of Azure resources such as virtual machines, storage accounts, networks and databases through a single template.
  • Repeatability: ARM templates enable consistent and repeatable infrastructure setup across multiple environments. This reduces the risk of error and simplifies the management process.
  • Automation: ARM can be integrated with tools such as Azure DevOps to automate infrastructure deployment and updates.
  • Cost Control: ARM helps optimize costs by providing detailed control over resource usage and billing.
  • Security: ARM protects Azure resources from unauthorized access using security features such as role-based access control (RBAC).

Benefits of ARM:

  • Consistency and Repeatability: ARM templates ensure error-free and consistent infrastructure deployment across different environments.
  • Efficiency and Automation: ARM automates manual processes, making infrastructure management faster and more efficient.
  • Cost Savings: ARM helps reduce costs through resource optimization and automation.
  • Scalability: ARM can be used to easily manage large and complex infrastructures.
  • Security and Compliance: ARM supports Azure’s security and compliance features.

ARM Use Cases:

  • Development and Test Environments: ARM is ideal for building and managing development and test environments quickly and easily.
  • Production Environments: ARM can be used to set up and manage production environments in a consistent and repeatable way.
  • Hybrid Cloud Environments: ARM enables managing Azure resources in hybrid cloud environments from a single platform.
  • Application Lifecycle Management: ARM can be integrated with tools such as Azure DevOps to provide infrastructure automation across the application lifecycle.

Examples:

  • Web Application Deployment: Using an ARM template, you can create the necessary Azure resources such as virtual machines, storage accounts and networking with a single command.
  • Create Database Infrastructure: Using an ARM template, you can automatically create infrastructure such as SQL database server, storage and networking.
  • Hybrid Cloud Synchronization: You can automatically synchronize data between Azure and on-premises infrastructure using an ARM template.

Conclusion:

Azure ARM is a powerful and flexible tool for managing Azure infrastructure. The benefits of ARM — consistency, repeatability, automation, and scalability — help you manage IT infrastructure faster, more securely, and at lower cost.

Categories
Articles Azure Backups

Accessing Azure Blob Storage with Access Keys

Microsoft Azure Storage Explorer: Microsoft Azure’s cloud platform integrates with a free tool known as Microsoft Azure Storage Explorer. This tool is developed to simplify the management and exploration of data stored in the Azure cloud environment. Azure Storage Explorer provides users with a user-friendly interface to perform a range of tasks such as accessing data sources, viewing, uploading, downloading, editing, and deleting data.

The primary use cases of Microsoft Azure Storage Explorer include:

  1. Managing Azure Storage Resources: Azure Storage Explorer can be used to manage various Azure storage services, including Azure Blob Storage, Azure Table Storage, Azure Queue Storage, and Azure Cosmos DB. This allows users to view, modify, and edit the content of these services.
  2. Data Transfer: Storage Explorer facilitates data transfer between your local computer and Azure or vice versa. It can be used to quickly upload or download large files or datasets to/from Azure Blob Storage.
  3. Blob Storage Management: Specifically for Azure Blob Storage, you can use it to view blob containers and their contents, create new containers, upload, download, delete blobs, and perform sorting operations.

Installing Microsoft Azure Storage Explorer: Here are the steps to install Microsoft Azure Storage Explorer:

  1. Download: You can download Microsoft Azure Storage Explorer from the official website. You can directly download it using the following link: Microsoft Azure Storage Explorer Download Page.
Microsoft Azure Storage Explorer İndirme Sayfası

2.Run the Installer: After downloading, run the installer. The installer may check for prerequisites before starting the installation process.

3.Installation Options: When the installer starts, you can configure installation options. Typically, you may want to proceed with the default options, but you can change installation paths and other settings as needed.

4.Installation Process: The installation process will begin. Azure Storage Explorer and its dependencies will be installed on your computer. This process may take a few minutes.

5.Wait for Installation to Finish: Once the installation is completed, the installer will show you a completion message. You can click “Finish” or “Open” to launch Azure Storage Explorer.


Connecting to Azure Blob Storage with Access Keys: You can connect to Azure Blob Storage using access keys via Azure Storage Explorer with the following steps:

1.Sign In to Azure Portal: To access your Azure Blob Storage account, sign in to the Azure Portal.

2.Select Your Blob Storage Account: After signing in, select your Blob Storage account or create a new one.

3.Find Your Access Keys: On your Blob Storage account page, there should be an option on the left for “Access keys” or something similar. Click on this option to find your access keys.

4.Copy the Access Keys: On the access keys page, you will see two keys under “Key1” or “Key2”. Choose one of these keys and click the “Copy” button to copy the key to your clipboard.

5.Launch Azure Storage Explorer: Start the Azure Storage Explorer application on your computer.

6.Add an Account with Access Keys: Select “Access key” as the “Account kind” and enter the following information:

  • Account name: The name of your Blob Storage account.
  • Access key: Paste the access key from your clipboard.

7.Connect: After entering the login information, click the “Connect” or similar button to connect to your Blob Storage account.

8.Manage Blobs: You can now view and manage blob containers and their contents within your Blob Storage account.


If you have any questions or details you would like to add, feel free to write me.
Categories
Articles Azure

Effortlessly Manage and Keep Your Virtual Machines Up to Date with Azure Update Manager

Azure Update Manager is a service offered by Microsoft on the Azure cloud platform and allows you to centrally manage updates for operating systems such as Windows Server. This service is very useful for keeping your servers and virtual machines up to date, closing security gaps and ensuring compliance. With Azure Update Manager, you can do the following:

  1. Update Distribution: Azure Update Manager helps you automatically distribute updates to your servers and virtual machines. This ensures that your servers are current and secure.
  2. Compliance Checks: Azure Update Manager checks your servers for specific compliance requirements and reports non-compliance. This way you can meet compliance requirements.
  3. Scheduling and Planning: You can configure your update policies and schedules. You can set custom schedules to determine when and how updates will be applied.

We have some information about what Azure Update Manager does. Now let’s move on to the installation part.

  • Sign In to Azure Portal: Sign in to your Azure account or create one.

  • Enable Azure Update Manager: Find “Azure Update Manager” or “Update Management” from the left menu and enable the service.

  • Azure Update Manager panel recognition:
Azure Update Manager (Preview)
  1. Total Machines: Shows the total number of virtual machines in Azure.
  2. Update Status for Machine: Shows the update status (current, pending, failed, etc.) of each virtual machine.
  3. Patch Orchestration Configuration of Azure Virtual Machines: Contains settings for determining how to configure update management of virtual machines in Azure.
  4. Update Installation Status: Shows how updates are installed on virtual machines and their success status.
  5. Check for Updates: Used to instantly check the update status.
  6. One-time Update: Allows you to initiate a one-time update at a specific time.
  7. Schedule Updates: Sets whether updates are automatically applied at a specific time or periodically.
  8. Settings: Contains configuration settings related to update management. This is used to edit update policies and other preferences.

Now let’s look at the process of manually updating one of the VMs in our panel;

  • First of all, we select the “Machines” section from the left panel,
Machines
Machines
  • We select a server (VM) from the opened panel and click on the “Check for updates” option,
Azure Update Manager (Preview) | Machines
  • Checks the VM for updates and completes the process,

  • As a result of the check on the same panel, we see that there is a pending update process in the VM,
VM Status
VM Status
  • There is one update visible in the given VM,

  • We continue by selecting the incoming update.

  • We continue by selecting the incoming update.

  • In the “Properties” section, there are options for after the update, here we choose the one suitable for us.

  • In the last stage, we start the one-time update process.

  • By going to the “History” section on the left, we see that our transaction has been completed successfully.

Now, let’s make the installation of the available updates at the time and time we want;

  1. In the Azure Update Manager (Preview) interface, click on the “Machines” section from the left menu.

2. Click “Select all” in this section to select all virtual machines, and then click “Schedule updates”.

Schedule Updates
Schedule Updates

3. Create a “Resource Group” on the screen that opens and specify a name for the process in the “Configuare name” section.

4.There are three different options in the “Maintance Scope” section. These options determine how updates are applied. Make your choice here.
Maintance Scope
Maintance Scope
5.The “Reboot Setting” section is where you determine what action the virtual machine should take after the update.
6.The “Schedule” section is the screen where you configure when updates start, downtime, and other settings. Set the specified schedule.
7.Then, by clicking the “Next” button, we select the relevant virtual machines from the resources.

8. Then, in the “Updates” section, you select the “Include update classification” option, select the update classifications that are important to you, and complete the creation process.

9. Finally, when the updates are finished, we can see the operations performed on the main screen and in the “History” section.

Bu adımları takip ederek Azure Update Manager ile sanal makinelerinizi güncelleyebilir ve yönetebilirsiniz.


If you have any questions or details you would like to add, feel free to write me.
Categories
Articles Azure

Disabling the Windows Firewall of the Virtual Machine via the Azure Portal

When you enable Windows Firewall, in some cases, you might lose Remote Desktop access to the virtual machine. In such situations, you can follow the steps outlined below in the Azure portal to make the Windows Firewall inactive and regain access:

Firstly;

Step 1: Let’s create a PowerShell script with the following codes and name it:
DisableWindowsFirewall.ps1

Set-ItemProperty -Path 'HKLM:\SYSTEM\CurrentControlSet\services\SharedAccess\Parameters\FirewallPolicy\DomainProfile' -name "EnableFirewall" -Değer 0

Set-ItemProperty -Path 'HKLM:\SYSTEM\CurrentControlSet\services\SharedAccess\Parameters\FirewallPolicy\PublicProfile' -name "EnableFirewall" -Değer 0

Set-ItemProperty -Path 'HKLM:\SYSTEM\CurrentControlSet\services\SharedAccess\Parameters\FirewallPolicy\Standardprofile' -name "EnableFirewall" -Değer 0

Step 2: Let’s go to the relevant virtual machine on the Azure portal;

  • Let’s select Extensions + applications and go;

  • Let’s find “Custom script extension” from the screen that opens by clicking Add and continue by selecting it;

  • On the screen that opened, I created a storage and transferred the PowerShell script I had previously prepared into it;


  • Afterwards, the relevant virtual server needs to be restarted.

  • Afterwards, the relevant virtual server needs to be restarted.

  • When the reboot process is completed, we check the windows firewall by making a remote connection to the virtual machine and the process is completed.

If you have any questions or details you would like to add, feel free to write me.