Categories
Articles Windows Server

Creating and Managing an SSL Certificate on Windows Server

Web security holds significant importance for the security of online activities nowadays. SSL (Secure Sockets Layer) certificates play a critical role in the security of websites and applications. This article outlines the steps to create and manage an SSL certificate on a Windows Server.

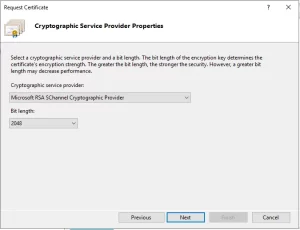
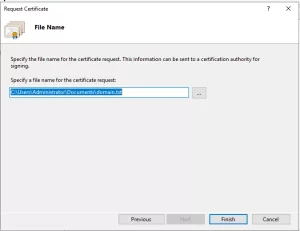
Step 1: Generating a .CSR File:
  • Open the IIS (Internet Information Services) management tool on your Windows Server.
IIS (Internet Information Services)
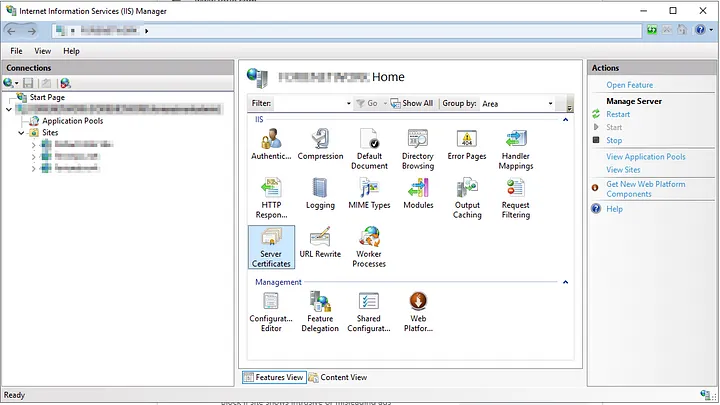
  • Go to “Server Certificates.”
“Sunucu Sertifikaları” (Server Certificates)
(Server Certificates)
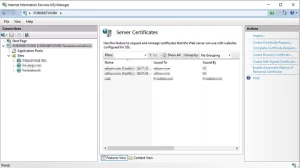
  • Click on “Create Certificate Request.”
“Sertifika İsteği Oluştur” (Create Certificate Request)
Create Certificate Request
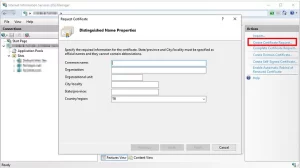
  • Fill in the required details: domain name, organization name, country, etc.
domain name, organization name, country, etc.
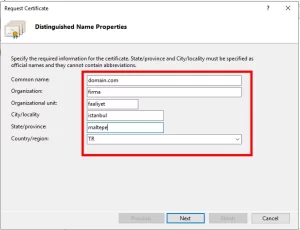
  • Save the .CSR (Certificate Signing Request) file.
.CSR (Certificate Signing Request)

Step 2: Mail Confirmation and Obtaining .CRT File from SSL Provider:
  1. Visit your chosen SSL provider and initiate the certificate purchase process.
  2. Complete the necessary verification steps during the certificate purchase. Typically, you’ll need to verify ownership of the domain you own.
  3. Once the verification is completed, your SSL provider will send you a .CRT (Certificate) file.
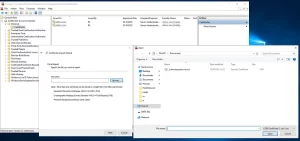
Step 3: Importing the .CRT File using MMC:
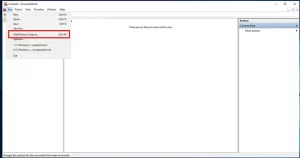
  • On the Windows Server, open the “Run” dialog and type “mmc,” then press Enter.
mmc
mmc

mmc

  • From the “File” menu, select “Add/Remove Snap-in.”
Add/Remove Snap-in.
Add/Remove Snap-in.
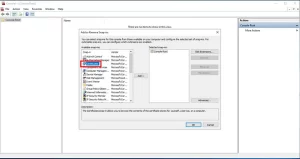
  • Add the “Certificates” snap-in.
Certificates
Certificates
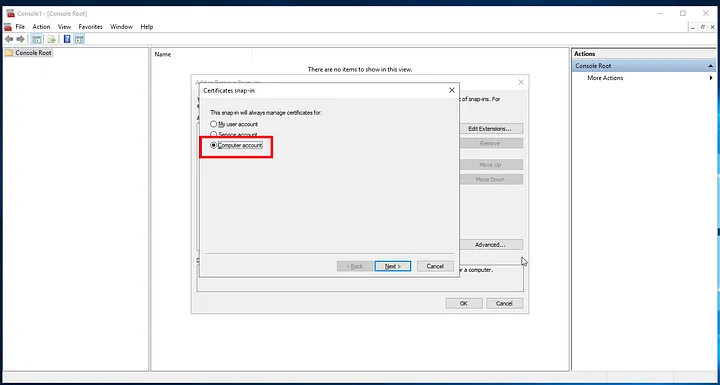
  • Choose the “Computer account” option and select your local computer.
“Bilgisayar hesabı” (Computer Account)
Computer Account
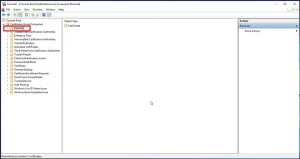
  • Navigate to “Certificates” > “Personal” > “Certificates.”
Personal
Personal
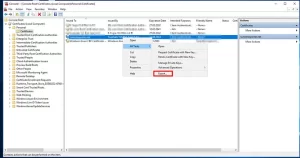
  • Right-click on the imported .CRT file and choose “All Tasks” > “Import…,” then add the .CRT file.
“mport…
Import…
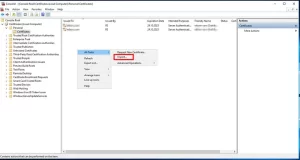
Step 4: Converting .CRT File to .PFX Format:
  • In MMC, right-click on the certificate you imported the .CRT file to.

  • Choose “All Tasks” > “Export…”
Export
Export
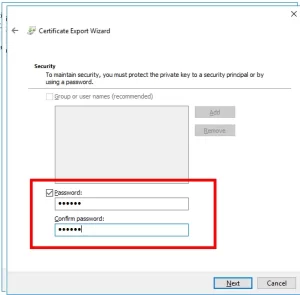
  • In the Certificate Export Wizard, select the .PFX format and proceed.
.PFX formatı
.PFX format
  • Set a password, save the .PFX file, and complete the process.
Bir şifre belirleyin
Set a password


Conclusion: This article has provided a detailed explanation of the steps to create and manage an SSL certificate on a Windows Server. Proper creation and management of SSL certificates are crucial for ensuring web security and safeguarding sensitive user data. Following the correct steps can enhance the security of websites and applications.


If you have any questions or details you would like to add, feel free to write me.

Categories
Articles Windows Windows Server

Clearing IIS Logs at Regular Intervals on Windows Server

Internet Information Services (IIS) is a component that provides web server services on Windows Server. IIS records log files to monitor website performance and detect issues. However, over time, these log files can unnecessarily consume disk space. In this guide, we’ll look at how to clean up IIS logs on Windows Server.

Step 1: Determine the Location of IIS Logs

1.Log in to the Windows Server.

2.Open the “Internet Information Services (IIS) Manager” by typing “IIS” in the Start menu.

IIS 01
IIS 01

3.Expand the name of your server in the left-hand connection tree.

4.Under Sites, select the web site you want to clean up.

IIS 02
IIS 02

5.In the “IIS” section on the right side, find the “Logging” item. Here, you’ll see the directory where log files are stored. This is typically “C:\inetpub\logs\LogFiles” or a similar path.

IIS 03
IIS 03

Step 2: Cleaning Up Logs

1.Before deleting log files, you may want to back up their contents. You can copy the log files to another folder for this purpose.

2.Navigate to the “LogFiles” folder to clean up log files.

LogFiles
LogFiles

3.Here, you’ll see different folders named with date and time information (e.g., W3SVC1, W3SVC2, etc.). Choose the folder corresponding to the web site you’re interested in.

4.Select the log files within the folder, and press the Delete key to permanently remove the files.

Step 3: Creating a Scheduled Task (Optional)

If you want to clean up IIS logs periodically, you can use the Windows Task Scheduler. This way, you can automatically clean up logs at specified intervals.

  1. We’ll continue using the script we prepared earlier. Copy the script to a text editor, give it a name, and save it as a .vbs file.
sLogFolder = "c:\inetpub\logs\LogFiles"
iMaxAge = 30   'in days

' FileSystemObject oluşturuluyor
Set objFSO = CreateObject("Scripting.FileSystemObject")

' Log dosyalarının bulunduğu klasörün alt klasörleri taranıyor
set colFolder = objFSO.GetFolder(sLogFolder)
For Each colSubfolder in colFolder.SubFolders
        ' Alt klasör içindeki dosyaları tarıyor
        Set objFolder = objFSO.GetFolder(colSubfolder.Path)
        Set colFiles = objFolder.Files
        For Each objFile in colFiles
                ' Dosyanın yaşını hesaplıyor
                iFileAge = now - objFile.DateCreated
                ' Belirlediğiniz gün sınırını aşıyorsa silme işlemi yapılıyor
                if iFileAge > (iMaxAge+1) then
                        objFSO.DeleteFile objFile, True ' Dosya siliniyor
                end if
        Next
Next
2.Next, open the “Task Scheduler” application from the Start menu.

3.Click on “Create Basic Task” to create a new scheduled task.

4.Görevinizi adlandırın ve açıklama ekleyin.

5.Choose “Start a Program” and specify a script or batch file to delete the logs.

6.You’ll see a summary of your task. Click “Finish” or “Create” to create the task.

By following these steps, you can clean up IIS logs at regular intervals on Windows Server. Be cautious when deleting logs and remember to create backups before deleting unnecessary files.


If you have any questions or details you would like to add, feel free to write me.