Categories
Articles Windows Server

Diskperf -Y and Diskperf -N Commands in Windows Server: Applications and Necessities

The Windows Server operating system provides various tools and commands for managing and monitoring servers’ administration and performance. Among these tools are the Diskperf -Y and Diskperf -N commands. In this article, we will explore the necessity and usage scenarios of the diskperf commands on Windows Server.

Diskperf -Y: Activation Command

The Diskperf -Y command is used to enable disk performance measurements. The applications and necessities of this command include:

1.Performance Monitoring and Analysis: Monitoring and analyzing server performance is crucial for maintaining efficient operations. The Diskperf -Y command activates performance measurements used to monitor disk usage levels, data transfer rates, and processing delays. System administrators can continually track server disk performance and promptly identify issues when needed.

2.Troubleshooting and Problem Resolution: Issues related to disks, such as performance degradation or excessive load, can adversely impact server efficiency. The Diskperf -Y command serves as an essential tool for detecting and swiftly resolving problems. System administrators can determine when disks are being excessively used or are insufficient in various situations.

Diskperf -N: Disable Command

The Diskperf -N command is used to disable disk performance measurements. The applications and necessities of this command include:

1.Data Privacy and Security: In certain situations, preventing the monitoring of disk performance data on servers becomes necessary. This is especially important when dealing with sensitive data or ensuring server security. The Diskperf -N command can be used to limit the monitoring of such sensitive data and safeguard data privacy.

2.Performance Optimization: The Diskperf -N command enables the temporary disabling of performance measurements based on measurement requirements. This can help optimize overall server performance by freeing up unnecessary system resources.

The Diskperf -Y and Diskperf -N commands provide the means to enable and disable disk performance measurements in the Windows Server operating system. Monitoring disk performance is vital for performance monitoring, troubleshooting, and ensuring data security on servers. When used correctly and purposefully, these commands empower system administrators and users with increased control over server management.

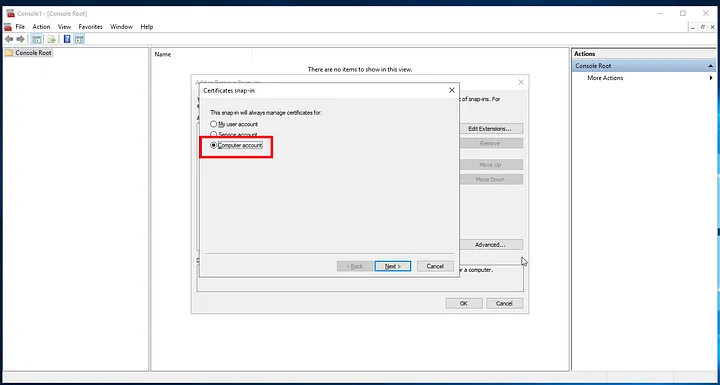
Enabling Diskperf -Y: How to Activate It

Disk performance measurements are crucial indicators for the health and efficiency of computer systems. Windows Server operating systems offer various tools and commands for managing and monitoring servers, and among these tools are the Diskperf -Y and Diskperf -N commands. In this article, we will explore the necessity and applications of the Diskperf -Y and Diskperf -N commands on Windows Server.

Diskperf -Y Command: Activation Process

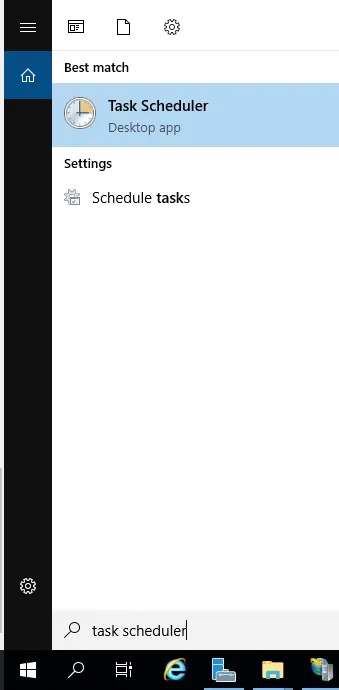
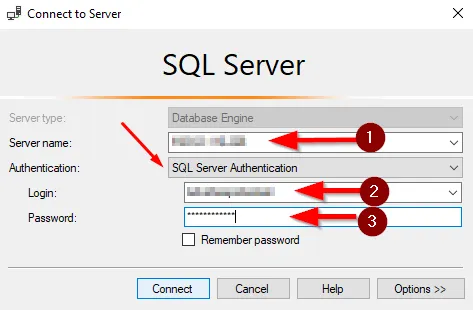
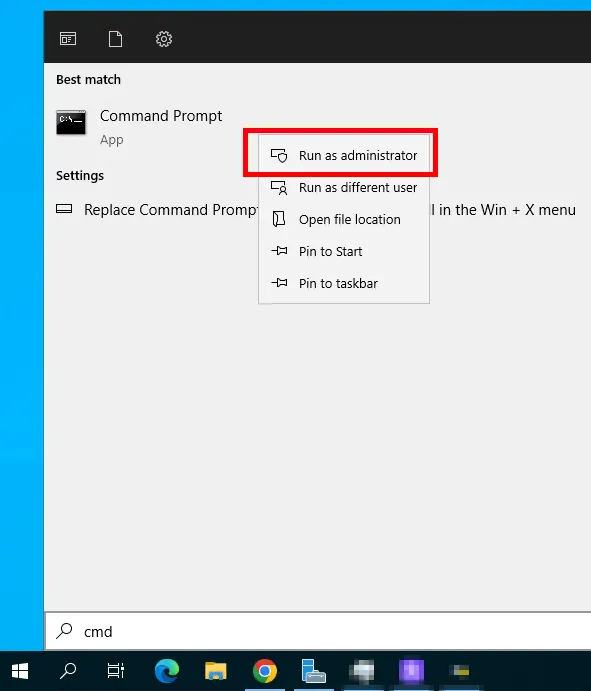
  1. Search for “Command Prompt” in the Start Menu: Navigate to the Start Menu and search for “Command Prompt.” Right-click on the “Command Prompt” application from the search results, and select “Run as administrator” to open it with administrative privileges.
Başlat Menüsü
Başlat Menüsü

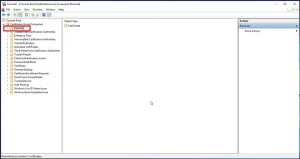
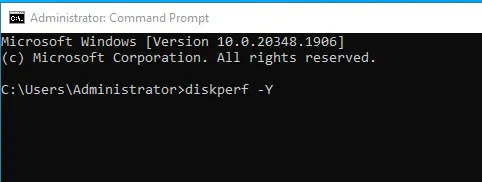
2.Enter the Diskperf -Y Command: In the opened Command Prompt window, type the following command and press the Enter key:

diskperf -Y

Komut İstemi
Command Prompt

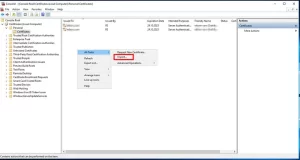
3.Check the Confirmation Message: After executing the command, the system should display a confirmation message such as “Disk performance counters were successfully enabled.” This indicates that disk performance measurements have been successfully activated.

By now, you have successfully used the diskperf -Y command to enable disk performance measurements. This will allow you to monitor performance metrics such as disk activity, data transfer speed, and disk usage.

disk performans
disk performance

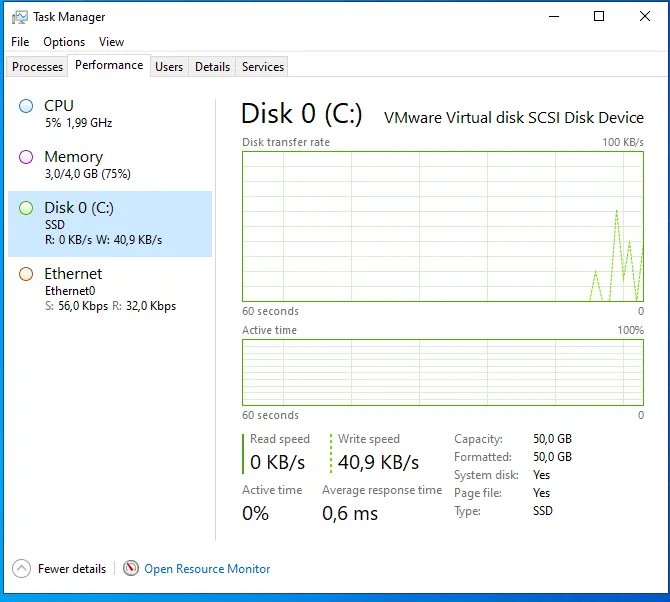
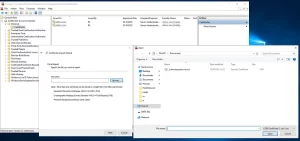
emember that performance measurements can be disabled using the “diskperf -N” command when necessary.

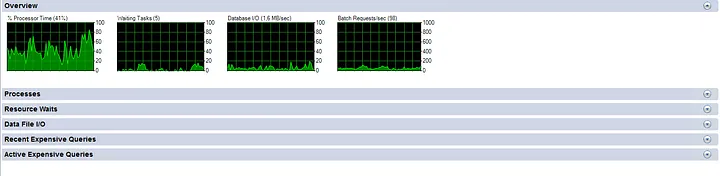
Monitoring disk performance using tools like Task Manager or Performance Monitoring is essential for optimizing the health and efficiency of servers or computers. Keeping track of disk activity and performance ensures a stable and responsive system.


Herhangi bir sorunuz veya eklemek istediğiniz detaylar varsa bana yazmaktan çekinmeyin.

Categories
Articles Windows Server

Creating and Managing an SSL Certificate on Windows Server

Web security holds significant importance for the security of online activities nowadays. SSL (Secure Sockets Layer) certificates play a critical role in the security of websites and applications. This article outlines the steps to create and manage an SSL certificate on a Windows Server.

Step 1: Generating a .CSR File:
  • Open the IIS (Internet Information Services) management tool on your Windows Server.
IIS (Internet Information Services)
  • Go to “Server Certificates.”
“Sunucu Sertifikaları” (Server Certificates)
(Server Certificates)
  • Click on “Create Certificate Request.”
“Sertifika İsteği Oluştur” (Create Certificate Request)
Create Certificate Request
  • Fill in the required details: domain name, organization name, country, etc.
domain name, organization name, country, etc.
  • Save the .CSR (Certificate Signing Request) file.
.CSR (Certificate Signing Request)

Step 2: Mail Confirmation and Obtaining .CRT File from SSL Provider:
  1. Visit your chosen SSL provider and initiate the certificate purchase process.
  2. Complete the necessary verification steps during the certificate purchase. Typically, you’ll need to verify ownership of the domain you own.
  3. Once the verification is completed, your SSL provider will send you a .CRT (Certificate) file.
Step 3: Importing the .CRT File using MMC:
  • On the Windows Server, open the “Run” dialog and type “mmc,” then press Enter.
mmc
mmc

mmc

  • From the “File” menu, select “Add/Remove Snap-in.”
Add/Remove Snap-in.
Add/Remove Snap-in.
  • Add the “Certificates” snap-in.
Certificates
Certificates
  • Choose the “Computer account” option and select your local computer.
“Bilgisayar hesabı” (Computer Account)
Computer Account
  • Navigate to “Certificates” > “Personal” > “Certificates.”
Personal
Personal
  • Right-click on the imported .CRT file and choose “All Tasks” > “Import…,” then add the .CRT file.
“mport…
Import…
Step 4: Converting .CRT File to .PFX Format:
  • In MMC, right-click on the certificate you imported the .CRT file to.

  • Choose “All Tasks” > “Export…”
Export
Export
  • In the Certificate Export Wizard, select the .PFX format and proceed.
.PFX formatı
.PFX format
  • Set a password, save the .PFX file, and complete the process.
Bir şifre belirleyin
Set a password


Conclusion: This article has provided a detailed explanation of the steps to create and manage an SSL certificate on a Windows Server. Proper creation and management of SSL certificates are crucial for ensuring web security and safeguarding sensitive user data. Following the correct steps can enhance the security of websites and applications.


If you have any questions or details you would like to add, feel free to write me.

Categories
Articles Windows Windows Server

Running Prometheus as a Service Using NSSM on Windows Server

In this guide, we will walk you through the process of running Prometheus as a service on Windows Server using NSSM (Non-Sucking Service Manager). Running Prometheus as a service allows you to automatically start and run it in the background smoothly. Here are the details on how to do it:

1.Preparing Prometheus

First and foremost, you need to configure Prometheus to work appropriately on Windows Server. Download the latest version of Prometheus from the official website and complete the configuration steps as instructed.

2.Downloading and Preparing NSSM

Download NSSM (Non-Sucking Service Manager) from the official website and extract it to a directory. NSSM is a tool that helps you turn your applications into Windows services.

NSSM download

3.Creating and Configuring a Service with NSSM

  • Open a command prompt as an administrator.

  • Navigate to the directory where NSSM is located.
  • Use the following command to create a new service:

4.Configure the following settings in the opened window:

  • Application: Path to the Prometheus executable file.
  • AppParameters: Path to the Prometheus configuration file.
  • Startup directory: Directory where the Prometheus executable is located.
  • Shutdown action: Select the action to be taken when the service is stopped (e.g., “Ignore”).
  • You can configure other settings as needed.

5.Starting and Monitoring the Service

  • Use the following command to start the service created by NSSM:

1.Installing Other Programs Using NSSM

NSSM is a versatile tool that allows you to convert various applications, not just services like Prometheus, into Windows services. Here are some tips on how to install other programs as services using NSSM:

2.Preparing the Program

Firstly, ensure that the program you intend to install is ready to function in the Windows environment. Make sure you’ve fulfilled the program’s requirements and configurations properly.

3.Creating a Service with NSSM

To create a new service using NSSM, open a command prompt as an administrator. Navigate to the directory where NSSM is located, and use the following command to create a new service:

Configuring the Service

In the opened window, configure the following settings:

  • Application: Path to the program’s executable file.
  • AppParameters: Add any additional parameters required by the program.
  • Startup directory: Directory where the program’s executable is located.
  • Shutdown action: Select the action to be taken when the service is stopped (e.g., “Ignore”).

You can explore other customization options and adjust them according to your needs.

4.Starting and Monitoring the Service

Use the following command to start the service:

Your new program should now be running as a service. Make sure the program functions as expected.

This method allows you to easily manage various applications as Windows services using NSSM. NSSM provides effective and straightforward service management capabilities.


If you have any questions or details you would like to add, feel free to write me.

Categories
Articles Windows Windows Server

Clearing IIS Logs at Regular Intervals on Windows Server

Internet Information Services (IIS) is a component that provides web server services on Windows Server. IIS records log files to monitor website performance and detect issues. However, over time, these log files can unnecessarily consume disk space. In this guide, we’ll look at how to clean up IIS logs on Windows Server.

Step 1: Determine the Location of IIS Logs

1.Log in to the Windows Server.

2.Open the “Internet Information Services (IIS) Manager” by typing “IIS” in the Start menu.

IIS 01
IIS 01

3.Expand the name of your server in the left-hand connection tree.

4.Under Sites, select the web site you want to clean up.

IIS 02
IIS 02

5.In the “IIS” section on the right side, find the “Logging” item. Here, you’ll see the directory where log files are stored. This is typically “C:\inetpub\logs\LogFiles” or a similar path.

IIS 03
IIS 03

Step 2: Cleaning Up Logs

1.Before deleting log files, you may want to back up their contents. You can copy the log files to another folder for this purpose.

2.Navigate to the “LogFiles” folder to clean up log files.

LogFiles
LogFiles

3.Here, you’ll see different folders named with date and time information (e.g., W3SVC1, W3SVC2, etc.). Choose the folder corresponding to the web site you’re interested in.

4.Select the log files within the folder, and press the Delete key to permanently remove the files.

Step 3: Creating a Scheduled Task (Optional)

If you want to clean up IIS logs periodically, you can use the Windows Task Scheduler. This way, you can automatically clean up logs at specified intervals.

  1. We’ll continue using the script we prepared earlier. Copy the script to a text editor, give it a name, and save it as a .vbs file.
sLogFolder = "c:\inetpub\logs\LogFiles"
iMaxAge = 30   'in days

' FileSystemObject oluşturuluyor
Set objFSO = CreateObject("Scripting.FileSystemObject")

' Log dosyalarının bulunduğu klasörün alt klasörleri taranıyor
set colFolder = objFSO.GetFolder(sLogFolder)
For Each colSubfolder in colFolder.SubFolders
        ' Alt klasör içindeki dosyaları tarıyor
        Set objFolder = objFSO.GetFolder(colSubfolder.Path)
        Set colFiles = objFolder.Files
        For Each objFile in colFiles
                ' Dosyanın yaşını hesaplıyor
                iFileAge = now - objFile.DateCreated
                ' Belirlediğiniz gün sınırını aşıyorsa silme işlemi yapılıyor
                if iFileAge > (iMaxAge+1) then
                        objFSO.DeleteFile objFile, True ' Dosya siliniyor
                end if
        Next
Next
2.Next, open the “Task Scheduler” application from the Start menu.

3.Click on “Create Basic Task” to create a new scheduled task.

4.Görevinizi adlandırın ve açıklama ekleyin.

5.Choose “Start a Program” and specify a script or batch file to delete the logs.

6.You’ll see a summary of your task. Click “Finish” or “Create” to create the task.

By following these steps, you can clean up IIS logs at regular intervals on Windows Server. Be cautious when deleting logs and remember to create backups before deleting unnecessary files.


If you have any questions or details you would like to add, feel free to write me.
Categories
Articles SQL

What is SQL Server Management Studio (SSMS) and How to Install it?

SQL Server Management Studio (SSMS) is the official tool used for Microsoft SQL Server database management and query operations. SSMS enables you to create, edit, back up, and execute data queries within databases. Additionally, you can configure security settings and monitor database performance in SQL Server.

The core functions of SSMS include:
1.Database Management: SSMS allows you to create, delete, rename, and edit SQL Server databases. It provides graphical interfaces and commands for managing your databases.

2.Query Operations: You can write SQL queries and execute them on SQL Server using SSMS. You can view and process the results, which is used for accessing and manipulating data within your database.

3.Backup and Restore: You can take backups of your databases and restore them when needed. This is essential for preventing data loss and safeguarding your database operations.

4.Security Settings: You can configure security settings for your databases and manage access control. You can define users and roles.

5.Performance Monitoring: It provides tools and reports to monitor the performance of SQL Server. This helps you optimize your database performance.

SQL Server Management Studio is a versatile tool for managing and developing with SQL Server, and it serves as a fundamental component for many database applications that work with SQL Server. By installing SSMS on your computer, you can access the necessary tools to start working with SQL Server. You can easily install SSMS by following the instructions below.


SQL Server Management Studio (SSMS) installation:

1.Downloading SQL Server Management Studio: The first step is to download the latest version of SSMS. You can do this by visiting the official Microsoft website. The download link is as follows:

SQL Server Management Studio Download

SSMS indir
SSMS indir

2.Running the Downloaded File: Double-click the downloaded installation file to run it. If a User Account Control (UAC) window appears, select “Yes” or “Continue” to grant permission.

3.Accepting the License Agreement: Read the license agreement carefully, and if you agree, check the “I accept the license terms” option and click the “Next” button.

4.Installation Path Selection: If you choose the “Custom” installation type, you can select a path in this step to determine where SQL Server Management Studio will be installed. If you prefer to use the default settings, you can click the “Install” button.

install
install
install
install

5.Custom Installation Options: If you have chosen the “Custom” installation option, you can customize which components will be installed in this step. Select the components according to your needs and click the “Next” button.

6.Completion of Installation: The installation process may take some time. Once it’s finished, click the “Close” button to complete the installation.

7.Launching SSMS: When the installation is complete, you can launch the SQL Server Management Studio program using the shortcut on your desktop or from the Start Menu. Start the program, and you can begin managing your SQL Server databases.

You should have successfully installed SSMS on your computer by now. You can use this tool to manage your databases and run queries.


How to Perform Database Management and Performance Monitoring Using SQL Server Management Studio (SSMS):

  1. Connecting to a Server: When SSMS starts, you will need to connect to a server. The “Connect to Server” window will open. This window allows you to choose how to connect to SQL Server.

  • Server Type: Choose the server type. Typically, the “Database Engine” option is used.
  • Server Name: Enter the name or IP address of the SQL Server.
  • Authentication: Choose one of the options, either “Windows Authentication” or “SQL Server Authentication,” to connect to SQL Server.

2.Connecting to the Server: After entering the necessary information, click the “Connect” button. When SSMS successfully connects to the server, it will close the connection window.

3.Viewing Databases: In the “Object Explorer” window on the left side, you can view your existing databases by clicking on the “Databases” button located under the connected server. Here, you will see all the databases, including system databases.

Object Explorer
Object Explorer

4.Creating a New Database: To create a new database, right-click on “Databases” and select “New Database.” In the opened window, you can configure the database’s name, filegroups, and other settings.

New Database
New Database

5.Database Backup and Restore: To back up or restore databases, right-click on “Tasks” and use the “Back Up” or “Restore” options to perform these operations.

Tasks
Tasks

6.Security Settings: To configure the security settings for your databases, go to the “Security” section. Settings related to users, roles, and permissions are managed here.

Security
Security

7.Running Queries: To execute SQL queries, you can open a new query window. You can write and execute SQL queries using the “New Query” option.

New Query
New Query

8.Performance Monitoring: SSMS provides tools and reports for monitoring the performance of SQL Server. This helps you optimize your database’s performance.

Performans Monitor
Performans Monitor

If you have any questions or details you would like to add, feel free to write me.