SQL Server can support different TLS (Transport Layer Security) versions across various editions. The TLS versions supported by SQL Server may vary depending on the SQL Server version and the Windows operating system in use.
In general, SQL Server 2008 and later versions typically support TLS 1.0, TLS 1.1, and TLS 1.2. However, it’s essential to obtain the most up-to-date information from Microsoft’s official sources, as security updates and patch releases are primarily designed to address security vulnerabilities.
Below is a table illustrating the commonly supported TLS versions. Keep in mind that this information may change over time:
SQL Server Version
Min. TLS Version
Max. TLS Version
SQL Server 2008
TLS 1.0
TLS 1.2
SQL Server 2008 R2
TLS 1.0
TLS 1.2
SQL Server 2012
TLS 1.0
TLS 1.2
SQL Server 2014
TLS 1.0
TLS 1.2
SQL Server 2016
TLS 1.0
TLS 1.2
SQL Server 2017
TLS 1.0
TLS 1.2
SQL Server 2019
TLS 1.2
TLS 1.3*
* SQL Server 2019 may support TLS 1.3, but this is contingent on the operating system and configuration.
From a security perspective, it is recommended to use the latest version of SQL Server and keep the operating system up to date. Additionally, avoiding the use of unsupported TLS versions is crucial to prevent potential security vulnerabilities.
If you have any questions or details you would like to add, feel free to write me.
SSL (Secure Sockets Layer) and TLS (Transport Layer Security) are cryptographic protocols used to secure communication over the internet. They are similar but distinct security protocols and are often collectively referred to as “SSL/TLS.”
1.SSL (Secure Sockets Layer):
SSL was initially developed by Netscape Communications Corporation in 1994.
Its first version, SSL 1.0, was never publicly released due to numerous security vulnerabilities.
SSL 2.0 emerged in 1995 and saw more widespread use, but its lifespan was short-lived due to security vulnerabilities.
SSL 3.0, introduced in 1996, was more secure. However, over time, various security vulnerabilities were discovered, leading to the abandonment of SSL 3.0.
2.TLS (Transport Layer Security):
TLS is considered an enhanced and secure version of SSL.
TLS 1.0, introduced in 1999, is an improved version of SSL 3.0 with security vulnerabilities addressed.
TLS 1.1 arrived in 2006, and TLS 1.2 followed in 2008, both enhancing the protocol’s security.
TLS 1.3 was released in 2018, introducing numerous security and performance improvements. TLS 1.3 is faster and more secure compared to its predecessors.
SSL and TLS secure internet communication by encrypting traffic, ensuring the confidentiality of data exchanges, and updating security protocols. However, as vulnerabilities and weaknesses emerge, these protocols are continually updated and improved.
TLS 1.2 or TLS 1.3?
As of 2021, TLS 1.0 and TLS 1.1 have been officially deprecated. Source
TLS 1.2:
It is an older version and is supported by many applications and systems.
It is a good option for establishing a secure connection but may have some security vulnerabilities.
Security experts recommend using TLS 1.3 whenever possible instead of TLS 1.2.
TLS 1.3:
It is a more recent version and offers a range of security improvements.
It includes faster connection establishment times and more secure encryption algorithms.
Designed to address security vulnerabilities, it is supported by many modern browsers and servers.
The version you should use depends on the systems, applications, and requirements in use. However, generally, you might prefer TLS 1.3 if possible, as it is more secure and offers better performance. Nevertheless, compatibility issues with older systems or specific requirements may necessitate the use of TLS 1.2.
Web servers and browsers typically automatically use up-to-date and supported TLS versions. If you manage a web server, it is advisable to use the latest and supported TLS version. As users, keeping your browsers and systems up-to-date is essential for enhancing security and ensuring optimal performance.
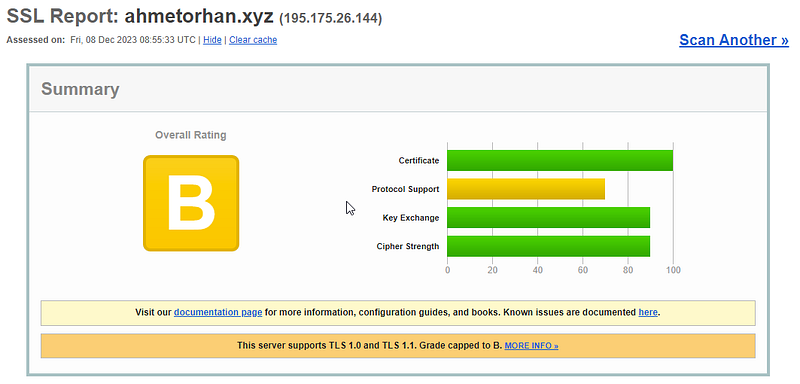
In this article, we will explore how to address the general SSL/TLS warnings provided by https://www.ssllabs.com/ssltest, a platform used to check and score the SSL/TLS security levels of the web hosting platforms. Additionally, we will conduct these checks on the test website https://ahmetorhan.xyz for demonstration purposes. The article will simplify the steps to disable the RC4 protocol and TLS 1.0 and TLS 1.1, especially focusing on how to implement these measures on Windows Servers. As indicated in the output, we will observe the necessity of disabling these protocols for enhanced security.
Our objective here is to disable the deprecated TLS 1.0 and TLS 1.1, as indicated in the following sections.
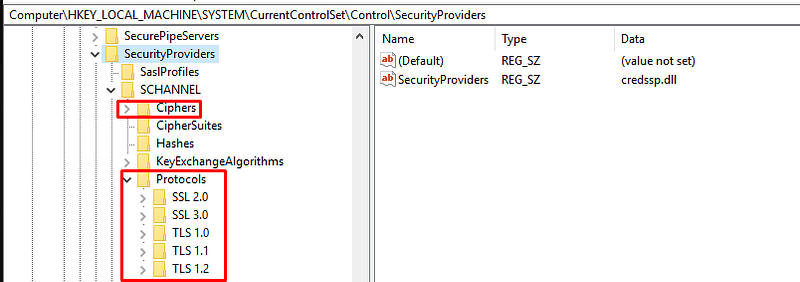
SSL Security Registry Configuration
Paste the provided code into a text document named “security_enable.txt.” Rename the file to “security_enable.reg” and remove the “.txt” extension.
When we run the “security_enable.reg” file, all the entries above will be automatically added to the registry, and you can verify that they have been added as shown below.
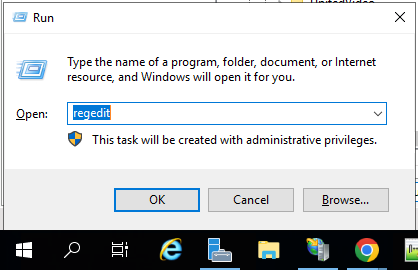
Open regedit by following the path Start -> Run.
After completing these steps, you need to restart your server for the changes to take effect.
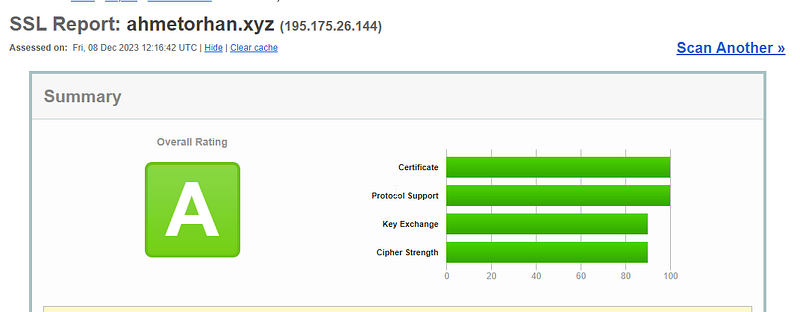
After the restart process is complete, I am initiating the test procedure again for the domain https://ahmetorhan.xyz. Initially classified as B, we now observe that it is categorized as A.
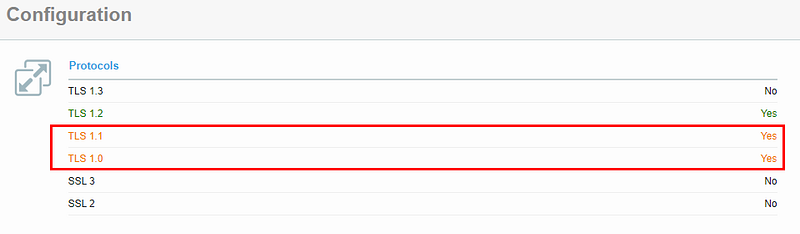
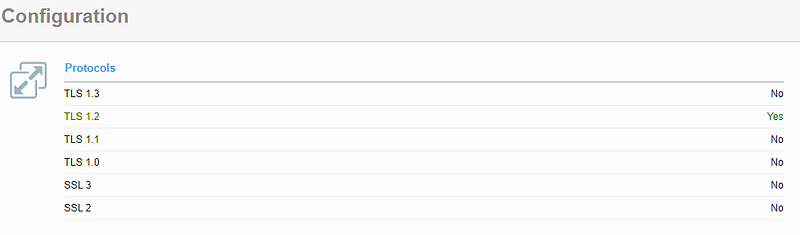
You can observe that the TLS 1.0 and TLS 1.1 protocols have been disabled.
If you want to revert the changes made in the registry, running the following entries and restarting will be sufficient.
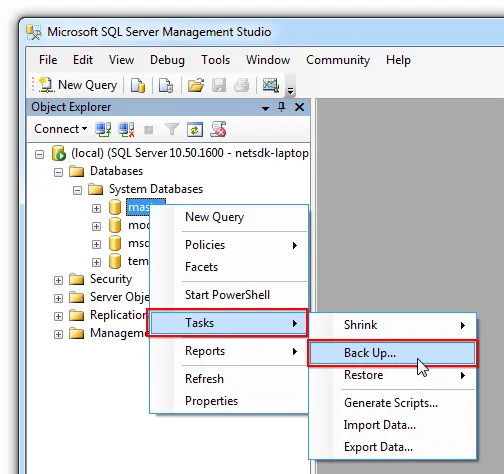
In SQL Server, backups are typically taken in four different types:
Full Backup
Differential Backup
Transaction Log Backup
File or Filegroup Backup
Let’s delve into the details of each type of backup in SQL Server:
1.Full Backup:
Description: A complete backup of the entire database.
Purpose: Provides a baseline for a complete restore of the database in case of a failure.
Frequency: Typically performed on a regular basis, such as daily or weekly.
2.Differential Backup :
Description: Captures only the data that has changed since the last full backup.
Purpose: Reduces the time and space required for backups by including only the changes.
Frequency: Can be taken between full backups to provide incremental updates.
3.Transaction Log Backup:
Description: Backs up the transaction log, recording changes made to the database since the last transaction log backup.
Purpose: Allows for point-in-time recovery and minimizes data loss.
Frequency: Usually taken more frequently, especially in databases with high transaction volumes.
4.File or Filegroup Backup:
Description: Targets specific files or filegroups within the database.
Purpose: Enables more granular backup and restore operations, useful for large databases.
Frequency: Can be used based on the need to selectively backup specific portions of the database.
These backup types collectively form a comprehensive strategy for ensuring data integrity, availability, and recoverability in SQL Server environments. The choice of which backup type(s) to use depends on factors such as the database size, recovery objectives, and the desired balance between backup frequency and resource utilization.
If you have any questions or details you would like to add, feel free to write me.
Azure Command-Line Interface (Azure CLI) is a command-line tool used for managing Microsoft Azure, the cloud service platform by Microsoft. Azure CLI is employed to create, configure, manage, and monitor Azure resources. It is compatible with Windows, macOS, and Linux operating systems.
Key features of Azure CLI include: 1. Cross-Platform Support: Azure CLI can be used on Windows, macOS, and Linux operating systems. 2. Azure Resource Management: Azure CLI facilitates the management of resources supported by Azure Resource Manager (ARM). This encompasses virtual machines, storage accounts, networks, application services, and many other Azure resources. 3. Command-Line Interface: Azure CLI operates as a tool in the command line, making it suitable for automation and scripting tasks utilized by software developers and system administrators.
Installation of Azure Account and Azure CLI
Now that we have learned the basic information about Azure CLI, let’s examine how to install it on the Windows operating system.
Note: Azure CLI is available for use on Windows, macOS, and Linux operating systems.
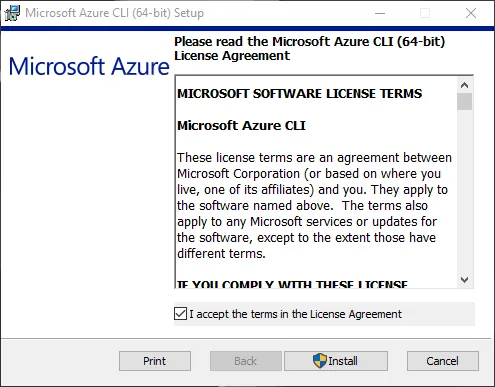
Firstly, we navigate to the link provided below, where options for installation are displayed:
We download the 64-bit version by selecting “.msi”
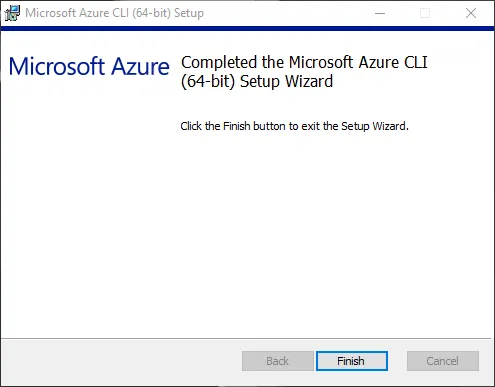
We run the downloaded setup file and complete the installation process by following the relevant steps.
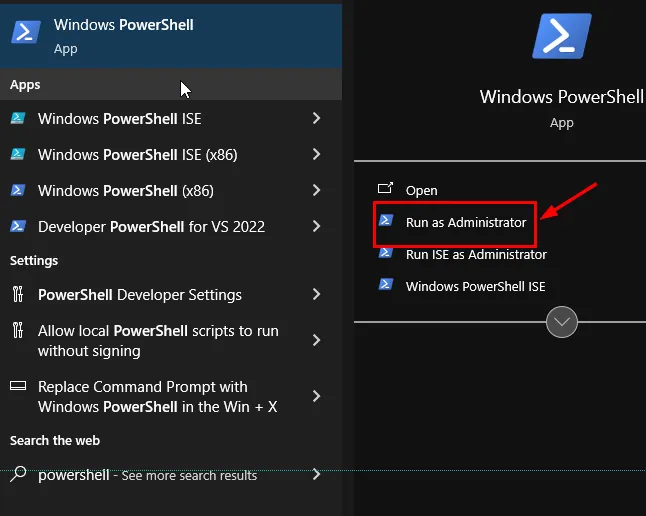
Next, we open PowerShell as an administrator.
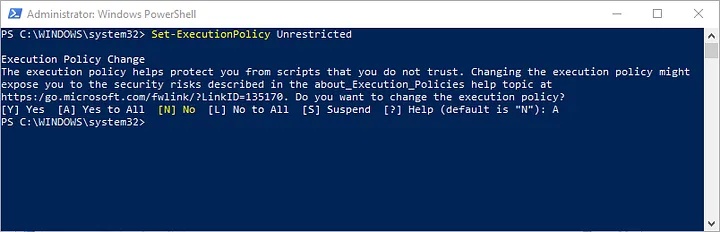
Set-ExecutionPolicy Unrestricted
`Set-ExecutionPolicy Unrestricted` sets the minimum security level that allows the execution of script files in PowerShell. This enables you to run almost any script file on your computer or any script that comes your way.
We grant the necessary permission by selecting “Yes to All” or “A”.
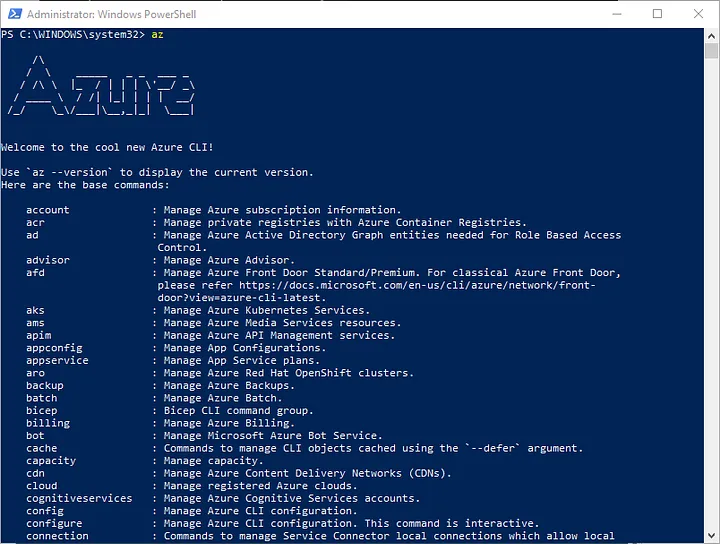
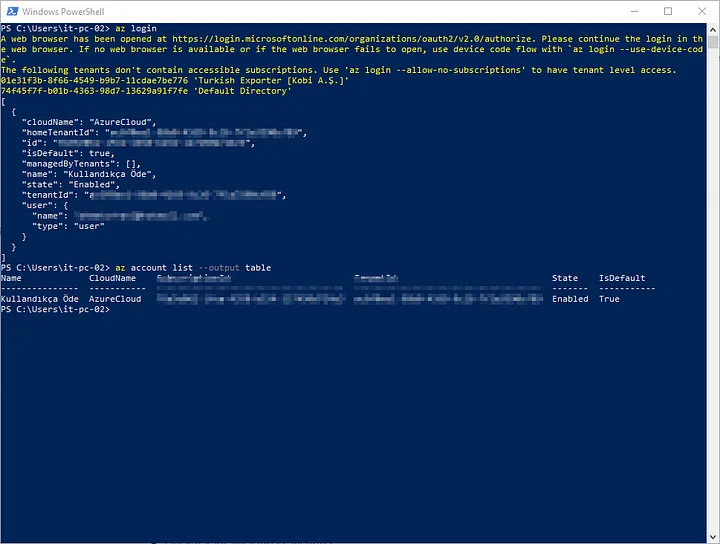
Afterward, by running the “az” command, we complete the installation of Azure CLI.
PS C:\WINDOWS\system32> az
2.Signing In and Selecting a Subscription
To use Azure CLI, you need to sign in to your Azure account using the az login command. Once signed in, you can choose the subscription you want to work with.
az login
az account list - outputtable
az account set - subscription "Subscription_Name_or_ID"
3. Creating and Managing a Resource Group
To manage resources efficiently in Azure, resource groups are utilized. Here is an example of creating and managing a resource group:
# Yeni bir kaynak grubu oluştur
az groupcreate--name MyResourceGroup --location EastUS
# Varolan kaynak gruplarını listele
az group list --output table
# Kaynak grubunu sil
az groupdelete--name MyResourceGroup
4. Virtual Machine Management
Azure CLI provides a comprehensive set of commands for creating and managing virtual machines. For example, to create a new Ubuntu virtual machine:
az vm create --resource-group MyResourceGroup --name MyVM --image UbuntuLTS --admin-username azureuser --admin-password MyPassword
5. Managing Other Azure Resources
With Azure CLI, you can manage networks, storage accounts, databases, and many other Azure resources. Each resource has a specific set of commands.
6. Automation and Scripting
Azure CLI is an excellent tool for automating your workflows. By creating Bash or PowerShell scripts, you can quickly execute repetitive tasks, streamlining your processes.
7. Up-to-Date Documentation and Help
Always refer to the current and comprehensive documentation for Azure CLI. Additionally, you can use the az [command] --help command to see the usage of each command.
If you have any questions or details you would like to add, feel free to write me.
ELK Stack (Elasticsearch, Logstash, Kibana Stack) is a data analysis and visualization platform where Elasticsearch, Logstash, and Kibana are brought together. These three open-source components are used collectively to gather, process, analyze, and visualize unstructured data. ELK Stack offers a powerful toolkit for organizations aiming to effectively work with large datasets.
Here are the fundamental components of ELK Stack:
Elastics
1. Elasticsearch: Elasticsearch is a search and analytics engine that provides rapid search, querying, and indexing capabilities for unstructured data. By swiftly indexing and storing data, it facilitates easy access to information. Elasticsearch is used to handle various types of unstructured data such as text documents, log files, time series data, and other non-structured data.
Logstash
2. Logstash: Logstash collects data from various sources, processes and transforms it, and then directs it to Elasticsearch or other destinations. Logstash plays a significant role in data collection, processing, and transformation stages. With Logstash, it is possible to organize, filter, enrich, and convert data into different formats.
Kibana
3. Kibana: Kibana is used to visualize, analyze, and share data from Elasticsearch. Through Kibana, users can discover data, create diverse visual elements, and build dashboards to effectively present information.
When these three components come together, organizations can collect, process, analyze, and visualize their data. ELK Stack can be employed for handling various data types such as application logs, network logs, text documents, performance metrics, and more. Moreover, the flexible nature of ELK Stack enables the creation of customized solutions and addressing unique data analysis needs.
Installation and Configuration of ELK Stack (Elasticsearch, Logstash, Kibana) on Windows Server can be achieved through the following steps:
1: Java Installation:
Java is required to run Elasticsearch and Logstash. I recommend using OpenJDK instead of the official Oracle JDK. Follow the steps to download and install OpenJDK.
2: Elasticsearch Download and Installation:
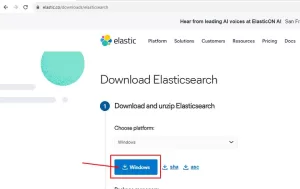
2.1. Download the suitable version of Elasticsearch for Windows from the official Elasticsearch website: https://www.elastic.co/downloads/elasticsearch
elasticsearch
Extract the downloaded compressed file to a folder.
2.2. Configuration File (elasticsearch.yml):
The configuration file for Elasticsearch is located in the “config” folder.
Open the “elasticsearch.yml” file with a text editor.
Make the necessary configurations.
2.3. Starting Elasticsearch as a Service:
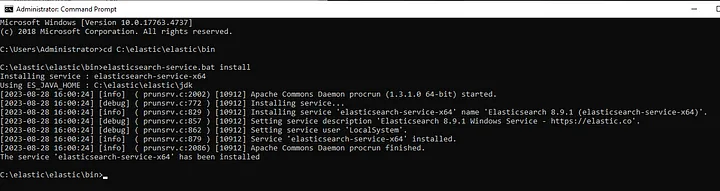
To run Elasticsearch as a Windows service, locate the “elasticsearch-service.bat” file in the “bin” folder.
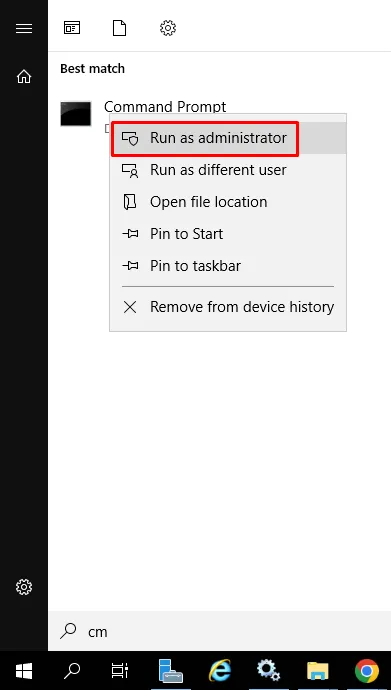
Open the command prompt as an administrator (right-click and select “Run as administrator”) and navigate to the relevant directory.
Use the command elasticsearch-service.bat install to register Elasticsearch as a service.
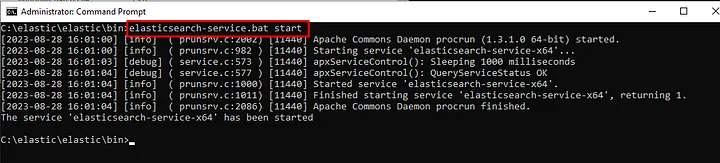
Then, start the Elasticsearch service using the command elasticsearch-service.bat start.
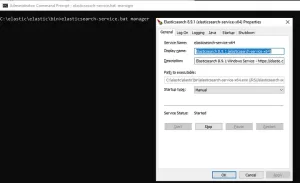
You can stop or manage the service using the command elasticsearch-service.bat manager.
2.4. After these steps, check whether the Elasticsearch service is installed and running:
Go to Start > Run > services.msc, and verify that the Elasticsearch service is installed and running.
3.2. Extract the downloaded compressed file to a folder.
3.3. Configuring Logstash via logstash.yml:
Logstash is configured through the “logstash.yml” file, typically located in the “config” subdirectory within the Logstash installation directory. In the configuration file, you can set up input, filter, and output settings. Additionally, you define the pipeline processing logic here.
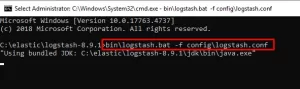
3.4. Running Logstash:
To run Logstash, open the command prompt, navigate to the Logstash installation directory, and use the following command to start Logstash:
4.2. Extract the downloaded compressed file to a folder.
4.3. Configure Kibana: Edit the Kibana configuration file (kibana.yml) to make your configurations (e.g., Elasticsearch connection settings, etc.).
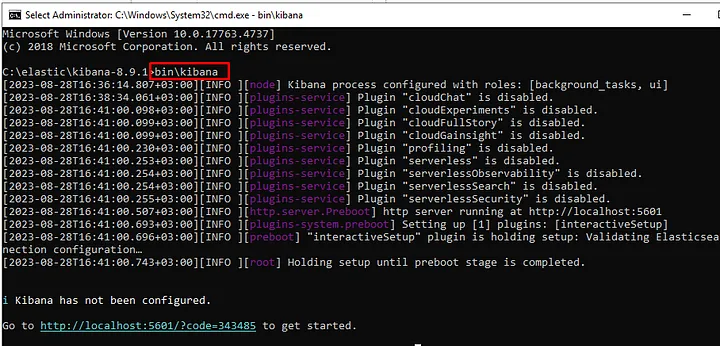
4.4. Running Kibana: Open the command prompt, navigate to the Kibana installation directory, and use the following command to start the service:
bin\kibana
Installation is complete, now we move on to configuration settings:
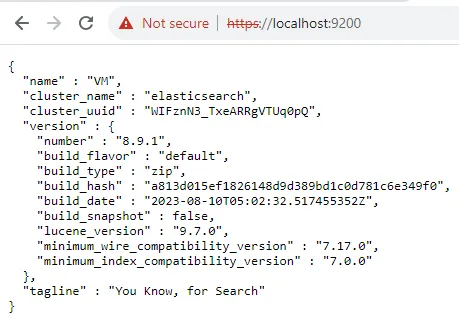
Elasticsearch’s security features can vary depending on the version of Elasticsearch you are using. Starting from version 6.8.0, basic security features (Security) are enabled by default in Elasticsearch. These features include user authentication, role-based access control, and encryption.
In Elasticsearch 7.0.0 and later versions, there is a built-in “elastic” user with a default password. This user can be used for administrative tasks. The credentials for the default “elastic” user are as follows: Username: elastic, Password: A randomly generated password in these versions, printed to the console when Elasticsearch is started.
However, for security reasons, it’s highly recommended to promptly change this default password. It’s advised to replace the randomly generated password with a secure one as soon as Elasticsearch is started.
For the most up-to-date information about Elasticsearch versions and security features, you can refer to the official Elasticsearch documentation or other reliable sources. Security features can evolve over time, so checking the official Elasticsearch documentation is advisable for staying informed.
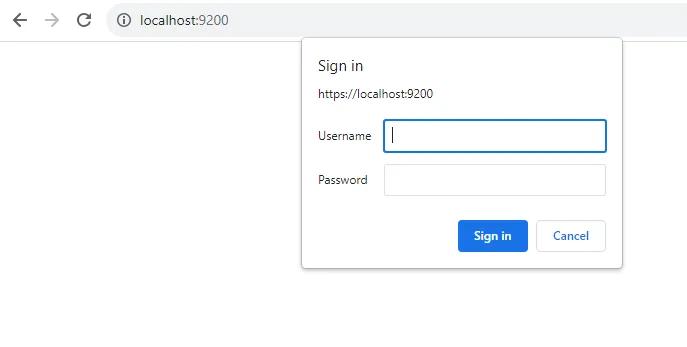
https://localhost:9200/
Username: elastic
Password: Enter the password that was generated during the initial installation, found in the “log” folder within the Elasticsearch directory.
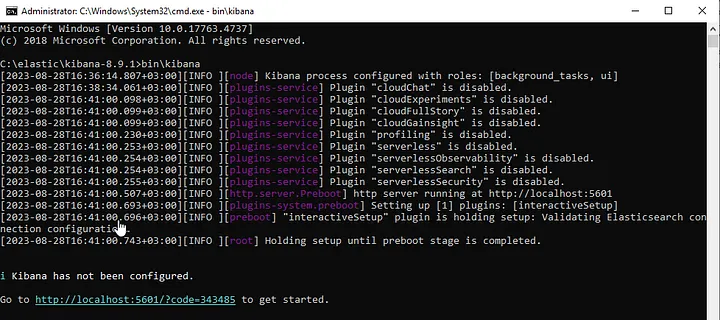
Open your web browser and navigate tohttp://localhost:5601 . This address is the default location where Kibana operates.
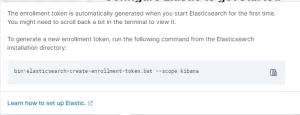
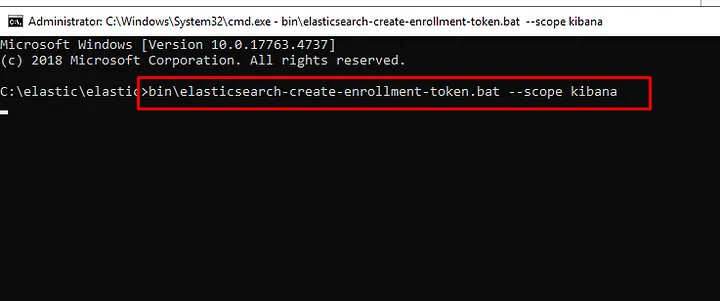
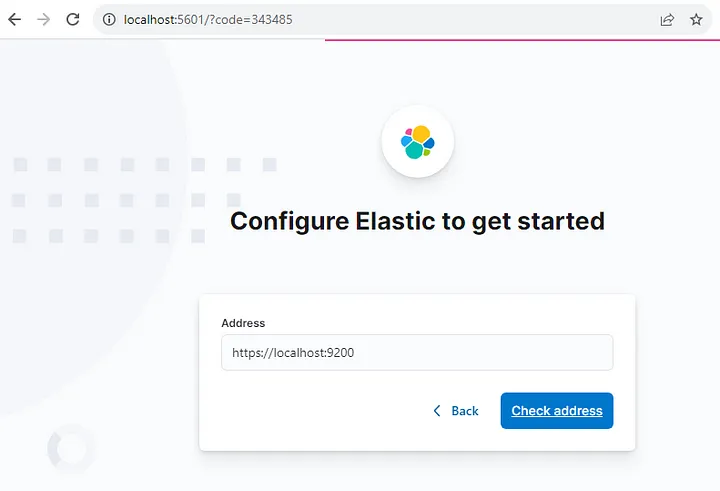
At this step, it requires you to generate a token.
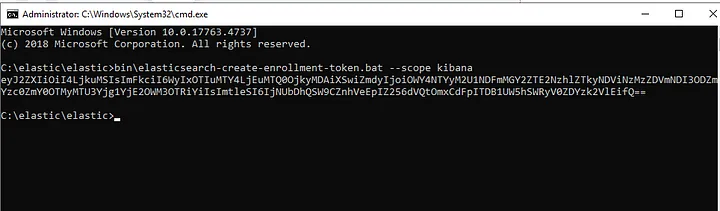
To generate the token, you need to run the relevant command in the command prompt.
bin\elasticsearch-create-enrollment-token.bat
bin\elasticsearch-create-enrollment-token.bat
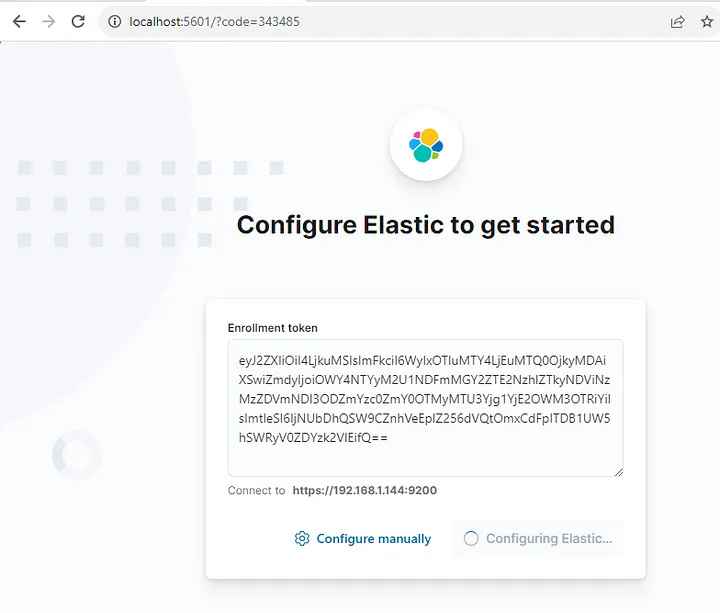
You add the code you generated to the Kibana panel.
Kibana Panel
You establish the connection with the Elastic panel.
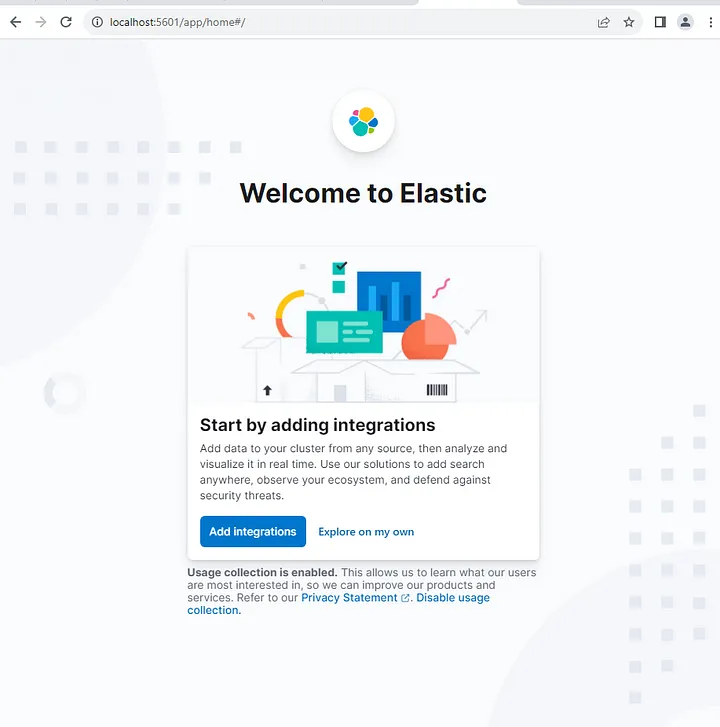
The configuration process for connecting Kibana with Elasticsearch is complete. Now, your ELK Stack connections are ready.
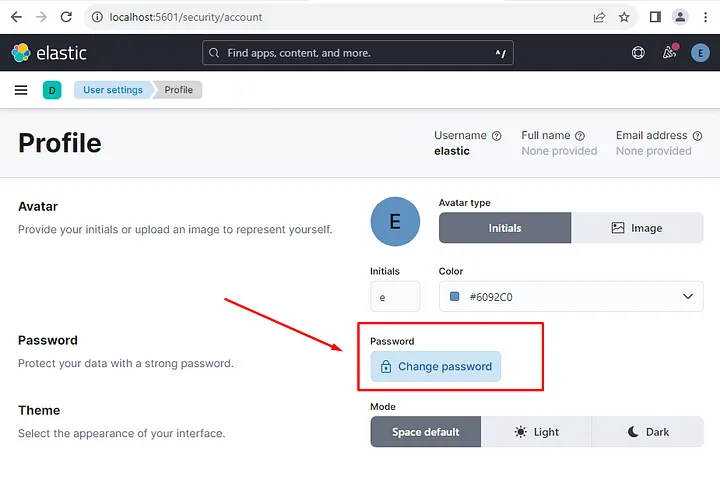
Since data security is crucial in our lives, remember to change the “default” password from the Kibana panel.
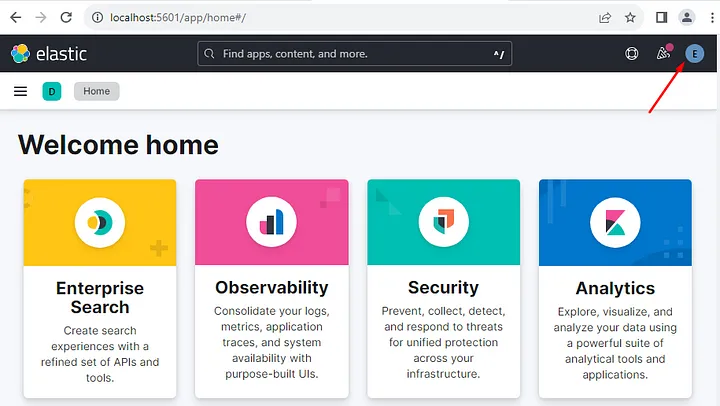
Select the “Edit Profile” option from the top right corner.
Edit Profile
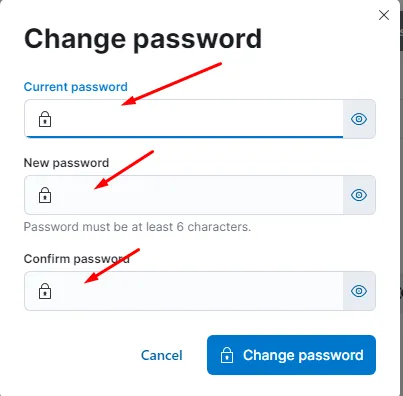
From the “Profile” section, select the “Change password” option.
Complete the process of changing the password by filling in the relevant fields.
By following these steps, you should have completed the installation and configuration of ELK Stack (Elasticsearch, Logstash, Kibana) on a Windows Server. Now, you can begin utilizing this powerful toolset for data analysis and visualization. ELK Stack will assist you in the processes of data collection, processing, analysis, and creating meaningful visuals.
Data security is of utmost importance, so remember to change the default passwords in Elasticsearch and Kibana to strong and unique passwords. This step will ensure the safety of your data.
If you encounter any challenges along the way, it’s a good idea to refer to the official documentation of Elasticsearch and Kibana or seek help from community support forums. Best of luck, and I wish you a successful journey filled with data insights!
If you have any questions or details you would like to add, feel free to write me.