Categories
Articles Windows

Automated File Cleanup in Windows: Boost Efficiency with Task Scheduler

Automated File Cleaning in Windows

In today’s digital age, our computer storage can quickly become filled with unnecessary files over time. These files not only occupy space but can also impact system performance. Fortunately, Windows operating system provides a solution through the Task Scheduler, allowing you to automatically clean up such files, ensuring a faster and more organized computer experience.

In this guide, you’ll learn how to use the Windows Task Scheduler to automatically delete files in a specific folder at regular intervals. By minimizing the need for manual file cleaning, you can save time and utilize your computer more effectively. By following step-by-step instructions, you’ll discover how to set up this automated file cleaning process.

Understanding Task Scheduler

Let’s first take a look at the command we’ll be using: I can provide information about using the forfiles command to delete files older than a specified date. The “forfiles command is used on the Windows operating system to select files within a specific directory and perform actions on them. It’s commonly used to delete files older than a certain date.

forfiles /p "C:\dosya" /s /m *.* /D -6 /C "cmd /c del @path"

Here’s the breakdown of this command:

  • /p "D:\folder": Specifies the directory to operate on.
  • /s: Searches through subdirectories as well.
  • /m *.*: Selects all file types.
  • /D -6: Filters files based on their modification date. -6 selects files that are 6 days old or older.
  • /C "cmd /c del @path": Executes the specified command for each selected file. In this case, del @path deletes the file.

lease exercise caution when using this command! Accidentally deleting important files is possible. If you’re unsure, consider testing the command to observe how it works.


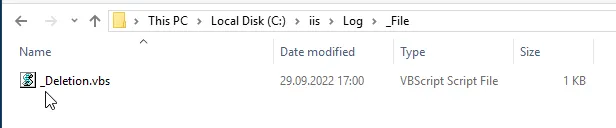
Creating a .bat File

Now, let’s create an example content for a .bat file:
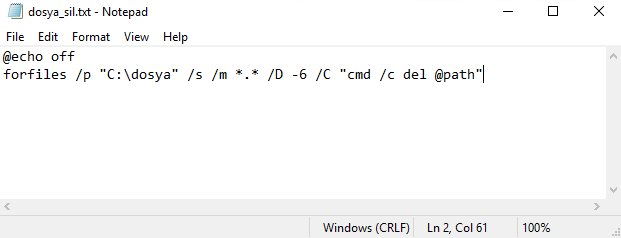
@echo off
forfiles /p "D:\dosya" /s /m *.* /D -6 /C "cmd /c del @path"

You can open a text editor, paste the code above, and save it with a desired name and .bat extension, such as file_cleanup.bat. Running this file will delete files older than the specified date in the designated folder. Caution is advised, as this operation irreversibly deletes files.


Using Task Scheduler

Using Task Scheduler to regularly execute the .bat file is straightforward. Here’s how:

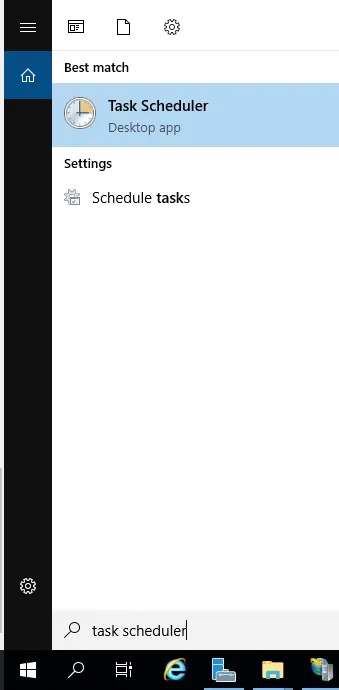
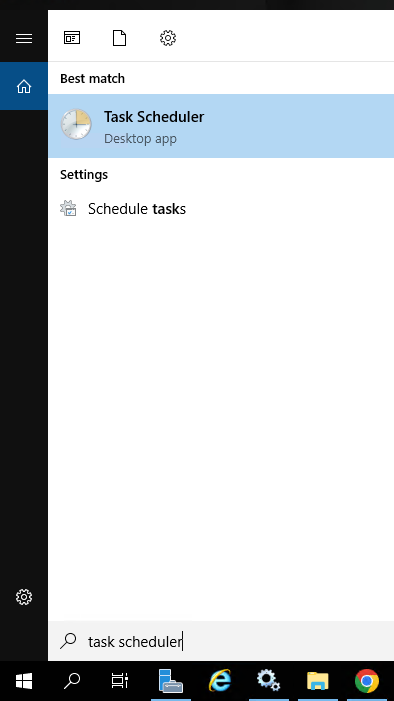
  1. Open the Start menu and search for “Task Scheduler,” then select it from the results.

2.In the Task Scheduler window, click “Create Basic Task” on the right.

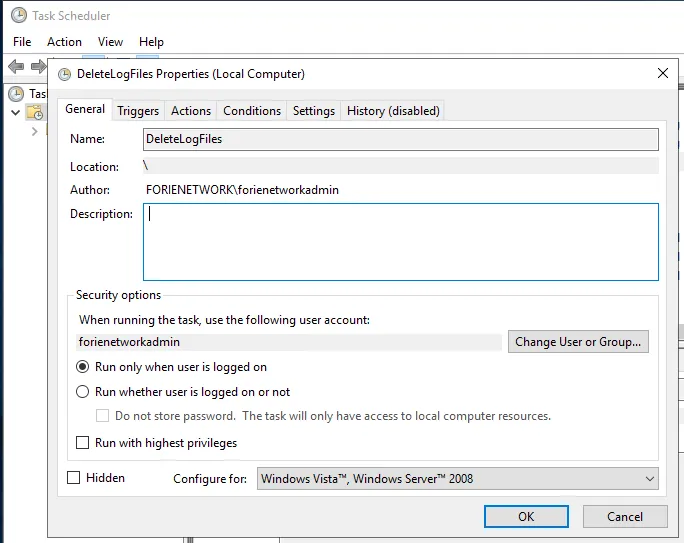
3.Follow these steps in the window that appears:

  • Name and Description: Provide a name and optional description for the task.

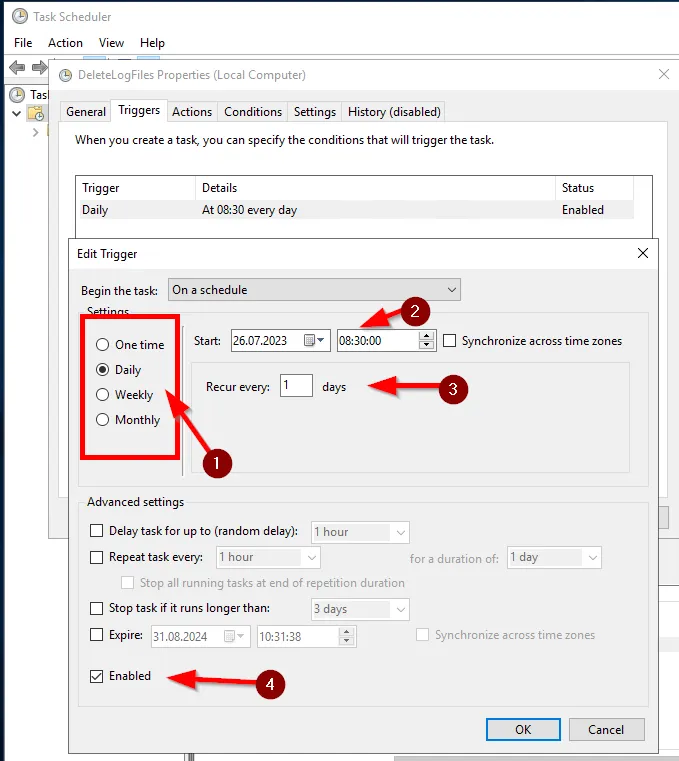
  • Trigger: Choose when you want the task to start. For instance, select “When the task starts” and set the date and time.

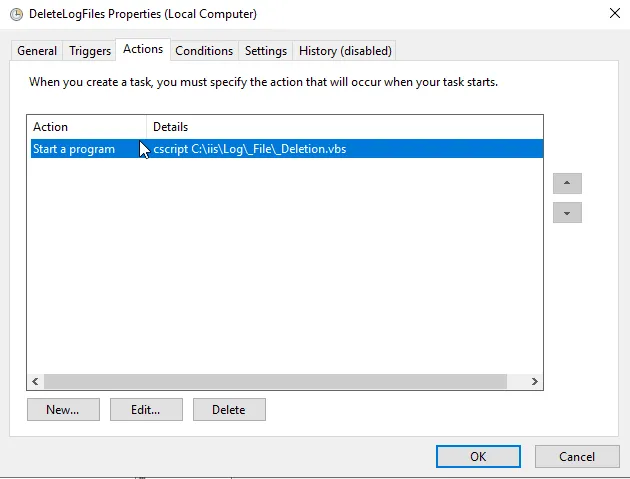
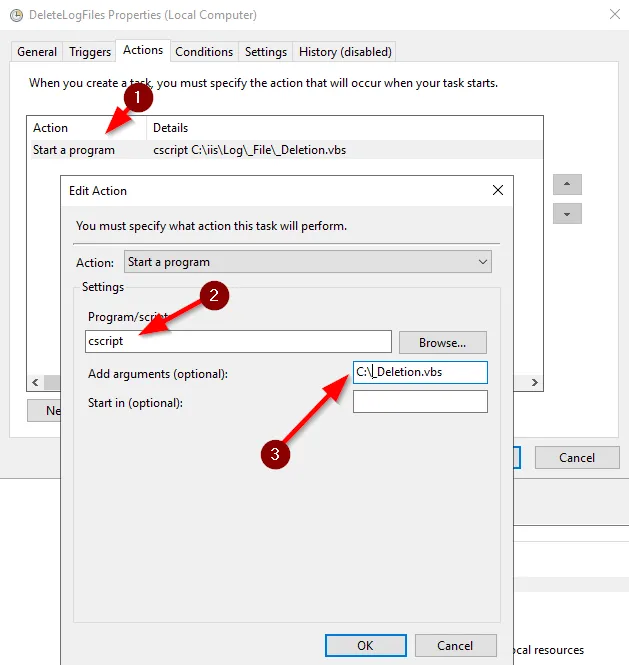
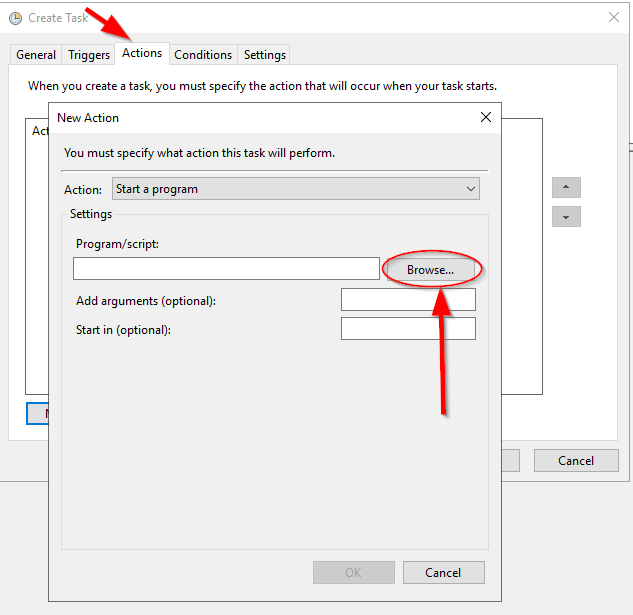
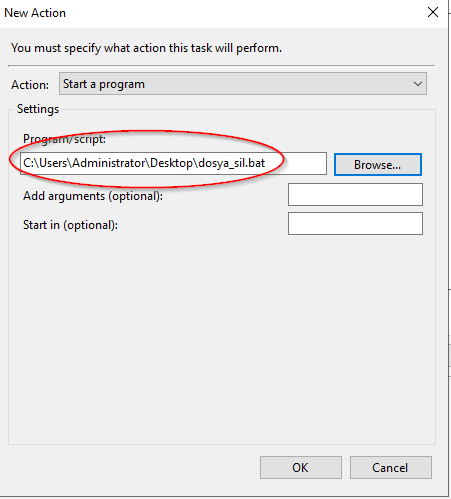
  • Action: Choose “Start a program,” then browse to select the .bat file you created.
  • Finish: Review your settings and click “Finish” to create the task.

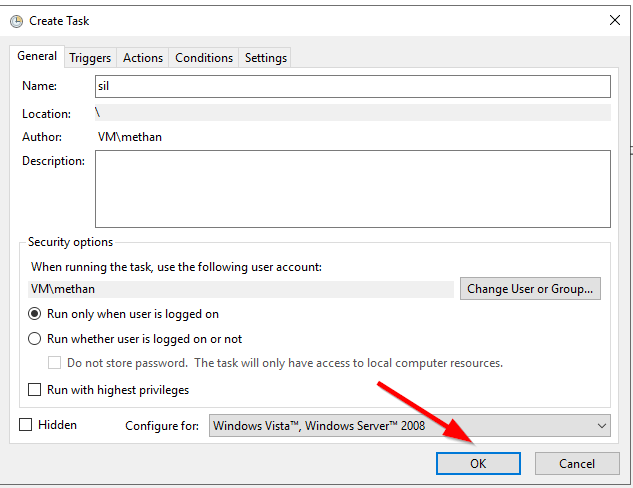
The task will now run the .bat file automatically at the specified times. The flexibility of Task Scheduler allows you to easily customize when and how the file runs.


Remember, the information here is meant to guide you through the process of setting up automated file cleaning using the Windows Task Scheduler. Always exercise caution when deleting files, especially with automated processes.


If you have any questions or details you would like to add, feel free to write me.

Categories
Articles Windows Windows Server

Clearing IIS Logs at Regular Intervals on Windows Server

Internet Information Services (IIS) is a component that provides web server services on Windows Server. IIS records log files to monitor website performance and detect issues. However, over time, these log files can unnecessarily consume disk space. In this guide, we’ll look at how to clean up IIS logs on Windows Server.

Step 1: Determine the Location of IIS Logs

1.Log in to the Windows Server.

2.Open the “Internet Information Services (IIS) Manager” by typing “IIS” in the Start menu.

IIS 01
IIS 01

3.Expand the name of your server in the left-hand connection tree.

4.Under Sites, select the web site you want to clean up.

IIS 02
IIS 02

5.In the “IIS” section on the right side, find the “Logging” item. Here, you’ll see the directory where log files are stored. This is typically “C:\inetpub\logs\LogFiles” or a similar path.

IIS 03
IIS 03

Step 2: Cleaning Up Logs

1.Before deleting log files, you may want to back up their contents. You can copy the log files to another folder for this purpose.

2.Navigate to the “LogFiles” folder to clean up log files.

LogFiles
LogFiles

3.Here, you’ll see different folders named with date and time information (e.g., W3SVC1, W3SVC2, etc.). Choose the folder corresponding to the web site you’re interested in.

4.Select the log files within the folder, and press the Delete key to permanently remove the files.

Step 3: Creating a Scheduled Task (Optional)

If you want to clean up IIS logs periodically, you can use the Windows Task Scheduler. This way, you can automatically clean up logs at specified intervals.

  1. We’ll continue using the script we prepared earlier. Copy the script to a text editor, give it a name, and save it as a .vbs file.
sLogFolder = "c:\inetpub\logs\LogFiles"
iMaxAge = 30   'in days

' FileSystemObject oluşturuluyor
Set objFSO = CreateObject("Scripting.FileSystemObject")

' Log dosyalarının bulunduğu klasörün alt klasörleri taranıyor
set colFolder = objFSO.GetFolder(sLogFolder)
For Each colSubfolder in colFolder.SubFolders
        ' Alt klasör içindeki dosyaları tarıyor
        Set objFolder = objFSO.GetFolder(colSubfolder.Path)
        Set colFiles = objFolder.Files
        For Each objFile in colFiles
                ' Dosyanın yaşını hesaplıyor
                iFileAge = now - objFile.DateCreated
                ' Belirlediğiniz gün sınırını aşıyorsa silme işlemi yapılıyor
                if iFileAge > (iMaxAge+1) then
                        objFSO.DeleteFile objFile, True ' Dosya siliniyor
                end if
        Next
Next
2.Next, open the “Task Scheduler” application from the Start menu.

3.Click on “Create Basic Task” to create a new scheduled task.

4.Görevinizi adlandırın ve açıklama ekleyin.

5.Choose “Start a Program” and specify a script or batch file to delete the logs.

6.You’ll see a summary of your task. Click “Finish” or “Create” to create the task.

By following these steps, you can clean up IIS logs at regular intervals on Windows Server. Be cautious when deleting logs and remember to create backups before deleting unnecessary files.


If you have any questions or details you would like to add, feel free to write me.
Categories
Articles SQL Windows

Azure Data Studio or SSMS — which should I use?

Azure Data Studio (ADS) and SQL Server Management Studio (SSMS) are both database management tools used for different purposes, and which tool to use depends on your needs and preferences.

Azure Data Studio (ADS):

Azure Data Studio (ADS):
  • ADS offers cross-platform support, meaning it can be used on Windows, macOS, and Linux. This can be essential for collaboration among team members using different operating systems.
  • It is primarily designed for database development and query creation. It is used for editing queries, visualizing query results, and managing databases at a high level.
  • It comes with an integrated query editor with advanced development features such as syntax highlighting, auto-completion, and code hints.
  • ADS can work with multiple database systems (SQL Server, PostgreSQL, MySQL, MongoDB, etc.) and allows you to create different connection profiles.
  • You can extend its functionality using extensions and plugins, enabling you to customize your workflow by installing or developing specific extensions.

SQL Server Management Studio (SSMS):

SQL Server Management Studio (SSMS):
  • SSMS only runs on the Windows operating system and is specifically designed for managing SQL Server. Therefore, it is recommended for those working primarily with SQL Server databases.
  • SSMS allows you to create, edit, manage, and back up database objects. It provides tools for tasks like database backup, security configuration, and performance monitoring.
  • It offers specialized reports and performance monitoring tools for professional SQL Server administration.
  • SSMS provides specialized tools and design surfaces for tasks like creating databases, writing stored procedures, and designing workflows.
  • It offers advanced monitoring and security features for database administrators.

In conclusion, the choice between Azure Data Studio (ADS) and SQL Server Management Studio (SSMS) depends on your project requirements, team member preferences, and the database system you are working with. If you have general database development and query-writing needs across various platforms, ADS might be a better fit. However, if you are primarily working with SQL Server and handling administrative tasks, SSMS is the more suitable choice. To make the best decision for your needs, consider trying out both tools and assessing which one aligns better with your workflow.


If you have any questions or details you would like to add, feel free to write me.

Categories
Articles SQL

What is SQL Server Management Studio (SSMS) and How to Install it?

SQL Server Management Studio (SSMS) is the official tool used for Microsoft SQL Server database management and query operations. SSMS enables you to create, edit, back up, and execute data queries within databases. Additionally, you can configure security settings and monitor database performance in SQL Server.

The core functions of SSMS include:
1.Database Management: SSMS allows you to create, delete, rename, and edit SQL Server databases. It provides graphical interfaces and commands for managing your databases.

2.Query Operations: You can write SQL queries and execute them on SQL Server using SSMS. You can view and process the results, which is used for accessing and manipulating data within your database.

3.Backup and Restore: You can take backups of your databases and restore them when needed. This is essential for preventing data loss and safeguarding your database operations.

4.Security Settings: You can configure security settings for your databases and manage access control. You can define users and roles.

5.Performance Monitoring: It provides tools and reports to monitor the performance of SQL Server. This helps you optimize your database performance.

SQL Server Management Studio is a versatile tool for managing and developing with SQL Server, and it serves as a fundamental component for many database applications that work with SQL Server. By installing SSMS on your computer, you can access the necessary tools to start working with SQL Server. You can easily install SSMS by following the instructions below.


SQL Server Management Studio (SSMS) installation:

1.Downloading SQL Server Management Studio: The first step is to download the latest version of SSMS. You can do this by visiting the official Microsoft website. The download link is as follows:

SQL Server Management Studio Download

SSMS indir
SSMS indir

2.Running the Downloaded File: Double-click the downloaded installation file to run it. If a User Account Control (UAC) window appears, select “Yes” or “Continue” to grant permission.

3.Accepting the License Agreement: Read the license agreement carefully, and if you agree, check the “I accept the license terms” option and click the “Next” button.

4.Installation Path Selection: If you choose the “Custom” installation type, you can select a path in this step to determine where SQL Server Management Studio will be installed. If you prefer to use the default settings, you can click the “Install” button.

install
install
install
install

5.Custom Installation Options: If you have chosen the “Custom” installation option, you can customize which components will be installed in this step. Select the components according to your needs and click the “Next” button.

6.Completion of Installation: The installation process may take some time. Once it’s finished, click the “Close” button to complete the installation.

7.Launching SSMS: When the installation is complete, you can launch the SQL Server Management Studio program using the shortcut on your desktop or from the Start Menu. Start the program, and you can begin managing your SQL Server databases.

You should have successfully installed SSMS on your computer by now. You can use this tool to manage your databases and run queries.


How to Perform Database Management and Performance Monitoring Using SQL Server Management Studio (SSMS):

  1. Connecting to a Server: When SSMS starts, you will need to connect to a server. The “Connect to Server” window will open. This window allows you to choose how to connect to SQL Server.

  • Server Type: Choose the server type. Typically, the “Database Engine” option is used.
  • Server Name: Enter the name or IP address of the SQL Server.
  • Authentication: Choose one of the options, either “Windows Authentication” or “SQL Server Authentication,” to connect to SQL Server.

2.Connecting to the Server: After entering the necessary information, click the “Connect” button. When SSMS successfully connects to the server, it will close the connection window.

3.Viewing Databases: In the “Object Explorer” window on the left side, you can view your existing databases by clicking on the “Databases” button located under the connected server. Here, you will see all the databases, including system databases.

Object Explorer
Object Explorer

4.Creating a New Database: To create a new database, right-click on “Databases” and select “New Database.” In the opened window, you can configure the database’s name, filegroups, and other settings.

New Database
New Database

5.Database Backup and Restore: To back up or restore databases, right-click on “Tasks” and use the “Back Up” or “Restore” options to perform these operations.

Tasks
Tasks

6.Security Settings: To configure the security settings for your databases, go to the “Security” section. Settings related to users, roles, and permissions are managed here.

Security
Security

7.Running Queries: To execute SQL queries, you can open a new query window. You can write and execute SQL queries using the “New Query” option.

New Query
New Query

8.Performance Monitoring: SSMS provides tools and reports for monitoring the performance of SQL Server. This helps you optimize your database’s performance.

Performans Monitor
Performans Monitor

If you have any questions or details you would like to add, feel free to write me.

Categories
Articles SQL

Finding Active and Inactive Databases in SQL Server

To find active and inactive databases in SQL Server when you have a large number of databases, you can use the following code:

CREATE TABLE #T (dbName varchar(100),last_user_seek datetime,last_user_scan datetime,last_user_lookup datetime,last_user_update datetime)
declare @dbId as int
declare @dbname as varchar(100)
declare crs cursor for select dbid,name from sysdatabases 
open crs
fetch next from crs into @dbId,@dbname
while @@FETCH_STATUS=0
begin
Insert Into #T 
Select @dbname,
last_user_seek = MAX(last_user_seek),
last_user_scan = MAX(last_user_scan),
last_user_lookup = MAX(last_user_lookup),
last_user_update = MAX(last_user_update)
From
sys.dm_db_index_usage_stats
WHERE
database_id=@dbId

fetch next from crs into @dbId,@dbname
end 
close crs
deallocate crs 

select * from #t 
drop table #t

Here are the steps to execute this query in SQL Server Management Studio (SSMS):

1.Open SSMS and log in to your SQL Server instance.If you do not have it installed, you can find the article in which I explain its installation here.

2.In SSMS, open a new query window by clicking “New Query.”

3.Paste the provided query into the query window.

4.Execute the query by clicking the “Execute” button or pressing F5.

After executing the query, you will see a result similar to the one you mentioned, which shows when each database had its last user seek, scan, lookup, and update operations.


For those who are curious, here’s an explanation of the query:

  1. The “CREATE TABLE #T” command creates a temporary table. This temporary table is named #T and contains several columns: dbName, last_user_seek, last_user_scan, last_user_lookup, and last_user_update. This table is used to store the results.
  2. The “declare @dbId as int” and “declare @dbname as varchar(100)” commands declare two variables to be used in the query. @dbId is an integer (int) variable, and @dbname is a character string (varchar) variable.
  3. The “declare crs cursor for select dbid,name from sysdatabases” command defines a cursor. It selects database IDs (dbid) and names (name) from the sysdatabases system view, creating a cursor that will allow us to loop through all the databases.
  4. The “open crs” command opens the defined cursor and prepares it to start processing database information.
  5. The “fetch next from crs into @dbId,@dbname” command moves the cursor to the next database record and assigns the values of @dbId and @dbname variables to the current record. This process is repeated as the cursor iterates through all the databases.
  6. The “while @@FETCH_STATUS=0” command checks whether the cursor has reached the end. As long as the @@FETCH_STATUS variable is 0, meaning the cursor has found more database records, the loop continues.
  7. Inside the loop, the “Insert Into #T” command adds data to the #T temporary table. This command retrieves index usage statistics for a specific database from the sys.dm_db_index_usage_stats system view and inserts the maximum values of these statistics into the #T table. This way, the latest index usage statistics for each database are consolidated in this table.
  8. The loop uses the “fetch next from crs into @dbId,@dbname” command to move to the next database record, and the process is repeated for other databases.
  9. When all databases have been traversed, the “close crs” command closes the cursor, and the “deallocate crs” command cleans up the cursor.
  10. The “select * from #t” command displays the results from the #T table. These results include the latest index usage statistics for each database.
  11. Finally, the “drop table #t” command deletes the temporary table because the results are no longer needed.

kaynak : https://omercolakoglu.net/


If you have any questions or details you would like to add, feel free to write me.